Difference between pages "3D Asset Workflow: Tile Textures and Trimsheets" and "3D Asset Workflow: Concepting"
m |
m (→Concepting Examples) |
||
| Line 7: | Line 7: | ||
= Summary = | = Summary = | ||
| − | * | + | * '''Concepts aren't marketing art per se - it's enough to just communicate the idea''' |
| − | * | + | * The general goal of concepting a 3D asset first is to make sure that '''the assets are as usable and efficient to the level artists as possible''' |
| − | + | * '''Concepting a 3D asset is an umbrella term for:''' | |
| − | * | + | # Sketching a concept in 2D |
| + | # Photobashing | ||
| + | # Making a '''base mesh''', i.e. blocking the asset roughly in 3D | ||
| + | #* '''Can also be done as a second step for either of the above''', to help the [[3D Asset Workflow: Sculpting|sculpting]] and [[3D Asset Workflow: Retopology|retopoing]] process later on | ||
| − | == | + | = Concepting Workflow Steps = |
| − | * | + | == First and Foremost == |
| − | + | * If the asset is a blockset (consists of a larger set of pieces, that are used together to build big areas), make sure to follow the guidelines in [[3D Asset Workflow: Blocksets]] | |
| − | + | * For bigger sets that use e.g. [[3D Asset Workflow: Tile Textures and Trimsheets|tile textures and trimsheets]], '''they should be planned at this stage already''' | |
| − | |||
| − | * | ||
| − | |||
| − | |||
| − | |||
| − | = | + | == Research == |
| − | + | # If there aren't any existing plans or concepts for the asset, '''discuss with the AD and the level artists about what is wanted''' | |
| − | * | + | #* Research any materials related to the asset |
| − | * | + | #* If there are existing concepts, use them as a starting point |
| − | ** | + | # Look through the level's wiki page to '''get a good idea of the context where the asset will be used''' |
| − | * | + | #* Pay attention to the '''the general shape language''' of the level |
| − | * | + | #** Are the forms curvy, straight, round, sharp, angular, thick, thin, horizontal, vertical? |
| + | #** How are the decorative details on different concepts, if there are any? | ||
| + | # If there is an actual level already created, or '''assets that are made for that same level''', check them | ||
| + | #* You can also try to see if there are already similar assets that you might have planned to make for your asset set, to make sure you're not making 1:1 duplicates of them | ||
| + | #** This can be done e.g. in the Editor by searching some general asset name from the TypeTree | ||
| + | # Think about the '''story of the asset''' | ||
| + | #* Is it old or young/new, what is the nature of it, the environment it will be used in etc? | ||
| + | #* What's the history of the asset, how does all this affect to the look of the asset? | ||
| + | # Search for '''reference images''' online | ||
| + | #* Analyze the reference images, '''combine ideas''', and come up with a general idea for the asset | ||
| + | #* Pick images that have any nice usable ideas that you like - they don’t have to be perfect and often aren't. That's where the concept art steps in! | ||
| − | + | [[File:How to use reference images in concepting.jpg|300px|center]] | |
| − | |||
| − | |||
| − | |||
| − | |||
| − | |||
| − | |||
| − | : | ||
| − | |||
| − | |||
| − | |||
| − | + | == Make the concept == | |
| − | : | + | # Use the best ideas from the possible existing concepts, your reference images, and your imagination - '''never copy stuff 1:1''' from existing reference images |
| − | + | # '''3D asset concept art is not marketing art, so don't use time to polish it unnecessarily''' | |
| − | + | #* It's just to share the idea of the asset with the AD, before using a lot of time to make the final asset | |
| − | + | # Concentrate on the '''big forms, silhouette, proportions and the overall design''' | |
| − | : | + | # Keep the detail level and distribution in balance - have '''small, medium, and large''' detail |
| + | #* The details can be further specified during the sculpting process (use reference images for this part of the process as well) | ||
| + | # Think about the colors of the asset - remember the '''importance of the values''' | ||
| + | #* If it's hard to read in [http://www.artofscholes.com/checkingvalues/ true black & white], it'll be hard to read in color as well | ||
| + | #* A good concept will make sculpting and texturing easier, and also lets the AD and the team know what you are up to | ||
| + | # You can ask for opinions and feedback at any point, but at the very latest '''before you start working on the final sculpt''' | ||
| − | + | <gallery widths=600px heights=800px mode="nolines"> | |
| − | + | File:trine_concept_tips_02.jpg|An example of how to take the idea of the concept further | |
| − | + | File:trine_concept_tips_01.jpg|3D asset process from the concept to the final asset | |
| − | |||
| − | |||
| − | |||
| − | |||
| − | |||
| − | |||
| − | |||
| − | |||
| − | |||
| − | |||
| − | |||
| − | |||
| − | |||
| − | |||
| − | |||
| − | |||
| − | |||
| − | |||
| − | |||
| − | |||
| − | |||
| − | <gallery widths= | ||
| − | File: | ||
</gallery> | </gallery> | ||
| − | + | == Concepting Examples == | |
| − | + | * Below in the collapsibles there are a few concepting examples for reference | |
| − | + | <div class="toccolours mw-collapsible mw-collapsed" style="background-color: #f3e9f5; border-width:2px; border-radius:10px; margin: 5px;"> | |
| − | + | Concepting Example: Modular Fountain Set Concept Process | |
| − | = | + | <div class="mw-collapsible-content"> |
| − | * | + | <gallery widths=600px heights=800px mode="nolines"> |
| − | + | File:How to use reference images in concepting.jpg | |
| − | + | File:Fountain pegasus1.jpg | |
| − | + | File:Fountain goat1.jpg | |
| − | |||
| − | |||
| − | |||
| − | |||
| − | |||
| − | |||
| − | |||
| − | |||
| − | <gallery widths= | ||
| − | |||
| − | File: | ||
| − | File: | ||
</gallery> | </gallery> | ||
| + | <small><i>How to use reference images in concepting</i><br> | ||
| + | <i>PHOTO:Multiple [[3D_Asset_Workflow:_Concepting#Sources|Sources]]</i></small> | ||
| + | </div></div> | ||
| − | === | + | <div class="toccolours mw-collapsible mw-collapsed" style="background-color: #f3e9f5; border-width:2px; border-radius:10px; margin: 5px;"> |
| + | Concepting Example 2: Modular Tree Set Concept Process | ||
| + | <div class="mw-collapsible-content"> | ||
| + | '''Planning the separate Assets''' | ||
| + | * A good way to start planning an asset is to collect all the info you have first, and then start concepting. The more complicated and big the asset task is, the more preparations are needed in the planning phase | ||
| + | ** First you can just concept different things you think would be useful | ||
| + | ** Once you think you have everything down, you can check if some of the stuff could be recycled between your different models to save time | ||
| + | ** There is no point in having different models for something that would work as well with just one model in every situation needed, so only make variations that are different enough | ||
| + | [[File:Modular tree trunk set plan.jpg|1200px]]<br> | ||
| + | '''Making Quick Rough Models for Testing Before Finalizing the Assets''' | ||
| + | * Sometimes it can be hard for the level artists to say if some assets will be useful or not, and how they could be improved based on only the 2D concept image | ||
| + | ** For complicated sets it's a very effective method to first make the planned pieces very quickly and roughly and let the level artists test them | ||
| + | ** Testing the assets before finalizing them can be a life saver, as some assets might end up being totally useless | ||
| + | * Here is an example of super rough models that were first made, but decided not to be used as level artists noticed it would be better to have whole tree trunk pieces instead of these smaller pieces | ||
| + | [[File:Modular tree trunk set trash models.jpg|600px]]<br> | ||
| + | * After level artists' feedback the pieces were scrapped and new ones created, not much time was lost as the pieces were done very quickly | ||
| + | [[File:Modular tree trunk set trash models2.jpg|600px]]<br> | ||
| + | * Once these were tested and confirmed working the finalized detailed assets could be made | ||
| + | ** Also similar test models of the branches were added for the same purpose | ||
| + | ** Here are the test pieces and how the level artist tested them | ||
| + | [[File:Modular tree trunk set trash models3.jpg|600px]]<br> | ||
| + | [[File:Trine4 modular tree set wip pieces level artist test.png|600px]]<br> | ||
| + | * These ended up being the final pieces needed for the set | ||
| + | [[File:Modular tree trunk set trash models sculpt 3.jpg|600px]]<br> | ||
| + | </div></div> | ||
| − | + | <div class="toccolours mw-collapsible mw-collapsed" style="background-color: #f3e9f5; border-width:2px; border-radius:10px; margin: 5px;"> | |
| − | + | Determining the Assets of a Set Based on Existing Concept Art | |
| − | + | <div class="mw-collapsible-content"> | |
| − | + | [[File:3d_workflow_determining_asset_set_pieces_based_on_concepts.png|1000px]] | |
| − | + | </div></div> | |
| − | + | = Frozenbyte concept art examples = | |
| − | + | * These are all concepts made by the 3D artists who also created the final game model so it's up to each artist how far they feel like they want to design in the concept phase | |
| − | |||
| − | |||
| − | |||
| − | |||
| − | |||
| − | |||
| − | |||
| − | |||
| − | |||
| − | === | + | <div class="toccolours mw-collapsible mw-collapsed" style="background-color: #e6f2ff; border-width:2px; border-radius:10px; margin: 5px;"> |
| + | Concept art gallery | ||
| + | <div class="mw-collapsible-content"> | ||
| + | <gallery widths=300px heights=300px mode="nolines"> | ||
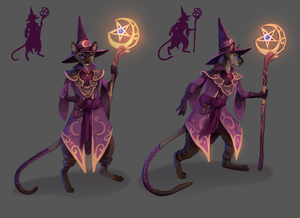
| + | File:Amadeus concept.png | Here only the front of the character was designed during the concepting, the rest was figured out during the sculpting | ||
| + | File:Mistymountainsboss sketch.jpg | Here only the look of the character was decided in the concept art and the colors for the final model were designed during the texturing phase | ||
| + | File:Siamese warlock concept.png| Here only the front of the character was designed during the concepting, the rest was figured out during the sculpting | ||
| + | File:Healer wizard concept.jpg | Here only the front of the character was designed during the concepting, the rest was figured out during the sculpting | ||
| + | File:Ice wizard concept.png | Here both the front and back of the character are designed so the sculpting process was faster for that part | ||
| + | File:Hanging lantern concept 3.jpg | Often a simple concept gets the job done | ||
| − | + | File:Deer concept 01.png | Sometimes it's ok to take the concept further, then it can be used possibly in marketing too | |
| − | + | File:Possessed boss concept.png | With a complicated asset it's useful to solve most of the design problems in the concept phase | |
| − | + | File:Christmas sarek.jpg | In some cases the mood and feeling of the character can be brought out more than the actual details | |
| − | + | File:Goody good concept.jpg | Different ideas for the character | |
| − | + | File:Kappa concepts 2.png | Here are different ideas for the character, the one on the left was chosen to be made into the final game asset | |
| − | + | File:Redwood logs shot.png | Here you can see the concept and the final asset set based on that | |
| − | + | File:Orrery sketch.png | Scale is important, here the asset seems a little bit too small compared to the character but it can be fixed before sculpting phase and time is saved | |
| + | File:Broomstick watering can bucket concepts.png | It's very much recommended to keep the scale of the assets in mind right from the beginning of the design process | ||
| + | File:Book lift concept.jpg |A concept for an environment asset can be just a crude scribble over a screenshot | ||
| − | + | </gallery> | |
| − | + | </div></div> | |
| − | |||
| − | |||
| − | |||
| − | = | + | =Sources= |
| − | < | + | <small> |
| − | + | [PHOTO: How to use reference images in concepting.jpg] - Source list :<br> | |
| − | + | *Img. 1. [(311) Pinterest] https://fi.pinterest.com/pin/557883472571184162/ (accessed June 5, 2018)<br> | |
| − | + | *Img. 2. [Garda Three Tier Pond Fountain] https://www.outdoorartpros.com/collections/tiered-outdoor-fountains/products/garda-three-tier-pond-fountain (accessed June 6, 2018) | |
| − | </ | + | *Img. 3. [Water Fountains, Front Yard and Backyard Designs] http://www.lushome.com/water-fountains-front-yard-backyard-designs/52334 (accessed June 6, 2018) |
| + | *Img. 4. [Bronze Fountain Statuary] http://www.specialtyfountains.com/bronze_fountains.html (accessed June 6, 2018) | ||
| + | *Img. 5. [FONTAINES POUR JARDIN ROMANA – FFBarbecues] https://www.ffbarbecues.com/produit/fontaines-pour-jardin-romana/ (accessed June 6, 2018) | ||
| + | *Img. 6. [Nyc Public Library Photo, Stock Photo of NYC Public Library, Phillip Colla Natural History Photography] http://www.oceanlight.com/spotlight.php?img=11155 (accessed June 5, 2018) | ||
| + | *Img. 7. [Robed angel looking down | Monceau | Flickr] https://www.flickr.com/photos/monceau/6291672868 (accessed June 6, 2018) | ||
| + | *Img. 8. [Giant lion sculpture] http://www.chinadaily.com.cn/china/2007-05/08/content_868100.htm (accessed June 6, 2018) | ||
| + | *Img. 9. [(NO NAME)] no website (accessed June 5, 2018) | ||
| + | *Img. 10. [Palermo e dintorni ma anche...: maggio 2009] http://palermodintorni.blogspot.com/2009/05/ (accessed June 6, 2018) | ||
| + | </small> | ||
Revision as of 10:13, 1 August 2023
- ◇ Main Steps
- 3D Asset Workflow: Concepting
- 3D Asset Workflow: Sculpting
- 3D Asset Workflow: Retopology
- 3D Asset Workflow: UV Mapping
- 3D Asset Workflow: Baking
- 3D Asset Workflow: Texturing
- 3D Asset Workflow: Asset Assembling
- 3D Asset Workflow: Naming the Asset
- 3D Asset Workflow: LODs
- 3D Asset Workflow: Exporting to Editor
- 3D Asset Workflow: Completed asset checklist
- ◇ Additional Steps
- 3D Asset Workflow: Alternative Textures
- 3D Asset Workflow: Billboards
- 3D Asset Workflow: Blocksets
- 3D Asset Workflow: Collisions
- 3D Asset Workflow: Sikailu
- 3D Asset Workflow: Sway
- 3D Asset Workflow: Tile Textures and Trimsheets
- 3D Asset Workflow: Tintmask
- 3D Asset Workflow: Vegetation
- ◇ General Tips and Troubleshooting
Contents
Summary
- Concepts aren't marketing art per se - it's enough to just communicate the idea
- The general goal of concepting a 3D asset first is to make sure that the assets are as usable and efficient to the level artists as possible
- Concepting a 3D asset is an umbrella term for:
- Sketching a concept in 2D
- Photobashing
- Making a base mesh, i.e. blocking the asset roughly in 3D
Concepting Workflow Steps
First and Foremost
- If the asset is a blockset (consists of a larger set of pieces, that are used together to build big areas), make sure to follow the guidelines in 3D Asset Workflow: Blocksets
- For bigger sets that use e.g. tile textures and trimsheets, they should be planned at this stage already
Research
- If there aren't any existing plans or concepts for the asset, discuss with the AD and the level artists about what is wanted
- Research any materials related to the asset
- If there are existing concepts, use them as a starting point
- Look through the level's wiki page to get a good idea of the context where the asset will be used
- Pay attention to the the general shape language of the level
- Are the forms curvy, straight, round, sharp, angular, thick, thin, horizontal, vertical?
- How are the decorative details on different concepts, if there are any?
- Pay attention to the the general shape language of the level
- If there is an actual level already created, or assets that are made for that same level, check them
- You can also try to see if there are already similar assets that you might have planned to make for your asset set, to make sure you're not making 1:1 duplicates of them
- This can be done e.g. in the Editor by searching some general asset name from the TypeTree
- You can also try to see if there are already similar assets that you might have planned to make for your asset set, to make sure you're not making 1:1 duplicates of them
- Think about the story of the asset
- Is it old or young/new, what is the nature of it, the environment it will be used in etc?
- What's the history of the asset, how does all this affect to the look of the asset?
- Search for reference images online
- Analyze the reference images, combine ideas, and come up with a general idea for the asset
- Pick images that have any nice usable ideas that you like - they don’t have to be perfect and often aren't. That's where the concept art steps in!

Make the concept
- Use the best ideas from the possible existing concepts, your reference images, and your imagination - never copy stuff 1:1 from existing reference images
- 3D asset concept art is not marketing art, so don't use time to polish it unnecessarily
- It's just to share the idea of the asset with the AD, before using a lot of time to make the final asset
- Concentrate on the big forms, silhouette, proportions and the overall design
- Keep the detail level and distribution in balance - have small, medium, and large detail
- The details can be further specified during the sculpting process (use reference images for this part of the process as well)
- Think about the colors of the asset - remember the importance of the values
- If it's hard to read in true black & white, it'll be hard to read in color as well
- A good concept will make sculpting and texturing easier, and also lets the AD and the team know what you are up to
- You can ask for opinions and feedback at any point, but at the very latest before you start working on the final sculpt
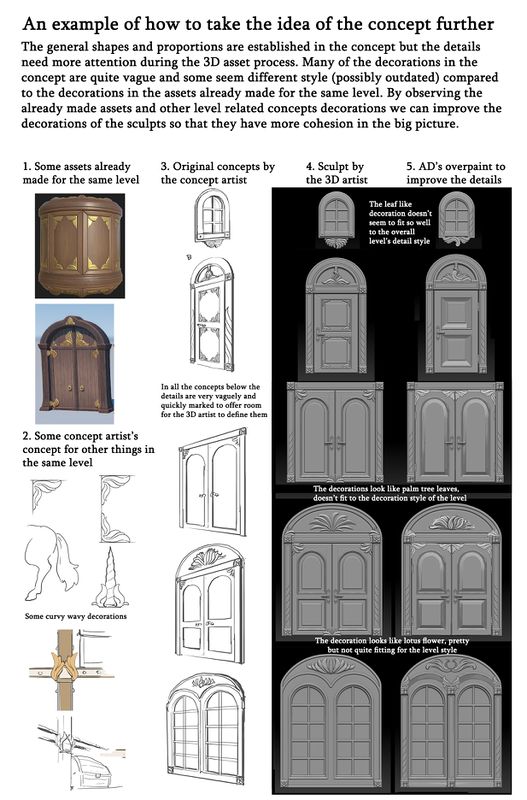
An example of how to take the idea of the concept further
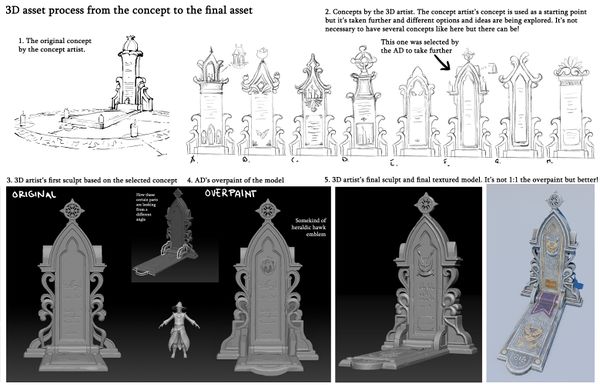
3D asset process from the concept to the final asset


Concepting Examples
- Below in the collapsibles there are a few concepting examples for reference
Concepting Example: Modular Fountain Set Concept Process


How to use reference images in concepting
PHOTO:Multiple Sources
Concepting Example 2: Modular Tree Set Concept Process
Planning the separate Assets
- A good way to start planning an asset is to collect all the info you have first, and then start concepting. The more complicated and big the asset task is, the more preparations are needed in the planning phase
- First you can just concept different things you think would be useful
- Once you think you have everything down, you can check if some of the stuff could be recycled between your different models to save time
- There is no point in having different models for something that would work as well with just one model in every situation needed, so only make variations that are different enough

Making Quick Rough Models for Testing Before Finalizing the Assets
- Sometimes it can be hard for the level artists to say if some assets will be useful or not, and how they could be improved based on only the 2D concept image
- For complicated sets it's a very effective method to first make the planned pieces very quickly and roughly and let the level artists test them
- Testing the assets before finalizing them can be a life saver, as some assets might end up being totally useless
- Here is an example of super rough models that were first made, but decided not to be used as level artists noticed it would be better to have whole tree trunk pieces instead of these smaller pieces

- After level artists' feedback the pieces were scrapped and new ones created, not much time was lost as the pieces were done very quickly

- Once these were tested and confirmed working the finalized detailed assets could be made
- Also similar test models of the branches were added for the same purpose
- Here are the test pieces and how the level artist tested them


- These ended up being the final pieces needed for the set

Determining the Assets of a Set Based on Existing Concept Art

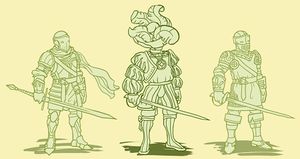
Frozenbyte concept art examples
- These are all concepts made by the 3D artists who also created the final game model so it's up to each artist how far they feel like they want to design in the concept phase
Concept art gallery

Here only the front of the character was designed during the concepting, the rest was figured out during the sculpting
Here only the look of the character was decided in the concept art and the colors for the final model were designed during the texturing phase
Here only the front of the character was designed during the concepting, the rest was figured out during the sculpting
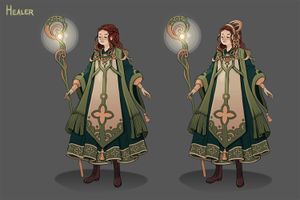
Here only the front of the character was designed during the concepting, the rest was figured out during the sculpting
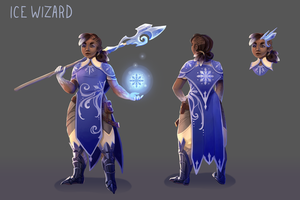
Here both the front and back of the character are designed so the sculpting process was faster for that part
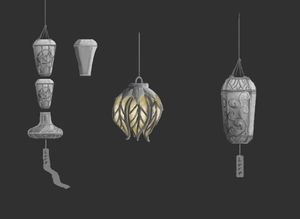
Often a simple concept gets the job done
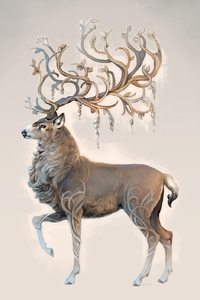
Sometimes it's ok to take the concept further, then it can be used possibly in marketing too
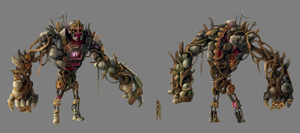
With a complicated asset it's useful to solve most of the design problems in the concept phase

In some cases the mood and feeling of the character can be brought out more than the actual details
Different ideas for the character
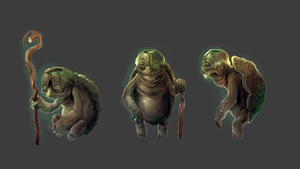
Here are different ideas for the character, the one on the left was chosen to be made into the final game asset

Here you can see the concept and the final asset set based on that
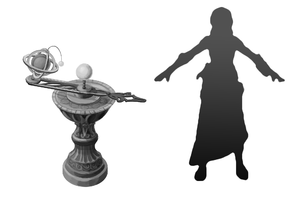
Scale is important, here the asset seems a little bit too small compared to the character but it can be fixed before sculpting phase and time is saved

It's very much recommended to keep the scale of the assets in mind right from the beginning of the design process
A concept for an environment asset can be just a crude scribble over a screenshot


Sources
[PHOTO: How to use reference images in concepting.jpg] - Source list :
- Img. 1. [(311) Pinterest] https://fi.pinterest.com/pin/557883472571184162/ (accessed June 5, 2018)
- Img. 2. [Garda Three Tier Pond Fountain] https://www.outdoorartpros.com/collections/tiered-outdoor-fountains/products/garda-three-tier-pond-fountain (accessed June 6, 2018)
- Img. 3. [Water Fountains, Front Yard and Backyard Designs] http://www.lushome.com/water-fountains-front-yard-backyard-designs/52334 (accessed June 6, 2018)
- Img. 4. [Bronze Fountain Statuary] http://www.specialtyfountains.com/bronze_fountains.html (accessed June 6, 2018)
- Img. 5. [FONTAINES POUR JARDIN ROMANA – FFBarbecues] https://www.ffbarbecues.com/produit/fontaines-pour-jardin-romana/ (accessed June 6, 2018)
- Img. 6. [Nyc Public Library Photo, Stock Photo of NYC Public Library, Phillip Colla Natural History Photography] http://www.oceanlight.com/spotlight.php?img=11155 (accessed June 5, 2018)
- Img. 7. [Robed angel looking down | Monceau | Flickr] https://www.flickr.com/photos/monceau/6291672868 (accessed June 6, 2018)
- Img. 8. [Giant lion sculpture] http://www.chinadaily.com.cn/china/2007-05/08/content_868100.htm (accessed June 6, 2018)
- Img. 9. [(NO NAME)] no website (accessed June 5, 2018)
- Img. 10. [Palermo e dintorni ma anche...: maggio 2009] http://palermodintorni.blogspot.com/2009/05/ (accessed June 6, 2018)