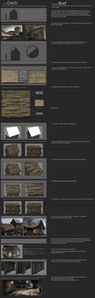
3D Asset Workflow: Tile Textures and Trimsheets
Revision as of 16:42, 28 July 2023 by Mio Mäkijärvi (talk | contribs)
- ◇ Main Steps
- 3D Asset Workflow: Concepting
- 3D Asset Workflow: Sculpting
- 3D Asset Workflow: Retopology
- 3D Asset Workflow: UV Mapping
- 3D Asset Workflow: Baking
- 3D Asset Workflow: Texturing
- 3D Asset Workflow: Asset Assembling
- 3D Asset Workflow: Naming the Asset
- 3D Asset Workflow: LODs
- 3D Asset Workflow: Exporting to Editor
- 3D Asset Workflow: Completed asset checklist
- ◇ Additional Steps
- 3D Asset Workflow: Alternative Textures
- 3D Asset Workflow: Billboards
- 3D Asset Workflow: Blocksets
- 3D Asset Workflow: Collisions
- 3D Asset Workflow: Sikailu
- 3D Asset Workflow: Sway
- 3D Asset Workflow: Tile Textures and Trimsheets
- 3D Asset Workflow: Tintmask
- 3D Asset Workflow: Vegetation
- ◇ General Tips and Troubleshooting
Contents
Summary
- 3D Asset Workflow: Blocksets
- If you have a big/long surface of something like wall/rope/floor/ground, it's probably best to make a tile texture or a trimsheet
- A tile texture is a texture that tiles seamlessly in either vertically/horizontally, or both
- A texture map that has multiple, separate tiling textures (all tiling to the same direction, e.g. vertically only), is called a trimsheet
Limitations
- With tile textures, you can stretch UV islands to go outside of the UV space, but don't go overboard with it
- There are some technical limitations if the UV islands are stretched very far from the 0...1 UV coordinates
- The engine supports max. 64k maps, and can display them at that size accurately when the UVs are within the 0...1 range - when the UVs go outside this range, the maximum supported resolution starts dropping
- Generally this will not be a problem, but to make sure if your chosen tile texture size is supported, you can calculate the maximum supported resolution by dividing 64000 by the maximum area of the UVs
- Example:
- There are some technical limitations if the UV islands are stretched very far from the 0...1 UV coordinates
- You have a tiling rope texture that stretches from -7...5 in UV coordinates, making the area 12 UV tiles
- The maximum texture resolution for the rope is: 64 000 / 12 = 5333,333...
- In this case, the rope can have 4k textures and still be displayed accurately, but 8k textures will be too large (for many other reasons as well)
Tile Textures
- With a tiling material, the size of the mesh no longer matters when it comes to texture size
- Large and small models can both use the same texture map, since the UVs don't need to be limited to the 0...1 range
- When UV mapping, all you need to do is create the UVs so that the texture is properly aligned, and the UV islands are in correct proportions to each other
- Then it is a matter of just scaling them with the Texel Density Tool
- The size of the UVs can extend greatly beyond the 0...1 boundaries, or they can go smaller, as long as the Texel Density is correct
General Design Guidelines
- Be careful with directionality in the material
- In some cases, directionality can be used to make certain textures more interesting
- For example, having hanging moss grow on a stone brick wall
- However, directionality can limit the asset's usage depending on its shape
- A formless wall blob could be used in any orientation by the level artists, but directional textures can severely limit this
- When tiled enough times, all textures will eventually show repetition - however, it can be minimized through scale and detail
- Managing detail
- Avoid large distinctive shapes
- Any singular detail that stands out from the rest of the texture will be immediately picked up by the viewer as repetitive, if the texture tiles more than once
- All detail levels and elements should be evenly distributed across the texture
- Doesn't necessarily mean completely uniform textures - just making sure that every detail has counterparts elsewhere in the texture to not focus attention on any single one
- Avoid large distinctive shapes
- Pay attention to scale
- Scale determines how many times the texture will have to be tiled, so plan it accordingly in advance
- Export resolution and scale are also interlinked, due to the Texel Density guidelines
- The current texel density for environmental Trine assets is 200px/m
- This means that a 1k texture will be 5m across in-game, and a 2k will be 10m across
- A larger texture can fit in more unique detail, while still retaining the same scale
- It will also have a negative effect on performance
- Changing the resolution can be used for a rough scale change after the material is done, but it is not ideal - better to have the scale in mind before starting
- When planning the scale, think about how much uninterrupted area will be covered by the texture
- For example, a terrain texture can cover a large area without any meshes interrupting it, so a 2k material (10x10m plane) with denser detail would work well to minimize tiling
- A wall texture on the other hand could work with a 1k size (5x5m plane) with larger details, since it can be broken up with additional architectural meshes to hide the tiling better
Using Substance Designer
- In general, every material made with Substance Designer is already tiling, so this is a short section
- However, the Transform2D node can break tiling if used carelessly
- If you need to scale, rotate or offset the texture, it is best to use the Safe Transform node, as that retains the tiling
Using Zbrush
Complementing Tiling Textures with Geometry
- Completely flat surfaces can be easily noticed by players and aren't nice visually, especially if the texture has a lot of depth
- Cheap and easy way to combat this issue is to model out / extrude out shapes from the tiling texture
Breaking flat surfaces / fake displacement with mesh. Source: http://wiki.polycount.com/wiki/ModularMountAndBlade

- In the case that you have a planar mesh and a tiling texture with a height map that needs depth, but too detailed to extrude by hand in a reasonable timeframe, a quick and dirty way is to take the plane to ZBrush and apply the height map as a displacement map
- Then you can decimate it until the polygon density seems appropriate, take the mesh back to Modo for cleanup, and apply planar UV projection with the dimensions of the original plane
- Checking projection rotation is also important!
Trim Sheets
- The term trim sheet applies to a resource that includes pieces, that can be easily extracted from the sheet, and tiled
- Usually a trim sheet works best with mostly planar geometry, or geometry that can be extruded from a plane
- Anything more complex is better done as a unique model
- In a trim sheet, there are multiple tiling textures on a single texture atlas, which are then mapped to a mesh in a way that makes it seem like it has multiple textures
- This saves memory and improves performance, since the engine has to load fewer textures, and thus needs fewer drawcalls
- In a way, making a trim sheet is the reverse workflow compared to normal: you create a texture first, and then make a mesh to fit it afterwards
- With a good trim sheet texture you can make almost anything for modular set
- Making new assets from it is easy too: it's just a matter of mapping UVs of a new mesh to the trim sheet map
- Keeping the trim sheet textures as simple rectangular shapes helps mapping UVs to them
- Making new assets from it is easy too: it's just a matter of mapping UVs of a new mesh to the trim sheet map
- If you will add some unique (meaning, not tiling) models to the modular blocksets which use trim sheets, it might be better to make a separate texture for them, and not try to fit them into the trim sheet texture atlas - even if they'd fit there
- That way, if those models are used on their own, or as a part of another set, they don't load a large, mostly unused texture with them

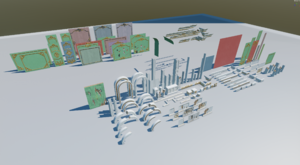
Parts made from previous trim sheet material


Creating Trim Sheets
- Trim sheets are created mostly the same way as any tiling texture or model
- You can use e.g. Zbrush, Modo, Substance Designer, or all of them
- The main idea is that individual pieces tile in at least one direction - vertically or horizontally
- You can also include seams and corners, and even create tiling pseudo-decals using alpha test material
- Alpha blend is not recommended, since it changes the rendering mode for the whole trim sheet
- To start:
- Plan out your trim sheet in Modo by dividing a plane into a uniform square grid
- The plane doesn't have to be a square either, but the aspect ratio needs to be the same as the texture will be (1:1, 1:2, 1:3, 2:1, etc.)
- Keep the segments divisible by 10, as it will make UV mapping easier down the line
- Separate or divide sections of the grid where different trims should go
- After that, you can model some trims in Modo, and/or export that as a base to ZBrush for more complicated ornaments
- In ZBrush, 'Auto Groups' and 'Mask by Polygroups' will make it easier to work on the trims without affecting the ones next to them
- The finished sculpt/hipoly will be baked to a flat plane, so the sculpt depth doesn't really matter
- Normal map won't pick up how far from the 0-level a surface extends
- However, if you want to make a trim that blends with the underlying mesh, remember to keep its edges as flat as possible
- There should be at least a small part near the blending edge that points directly outwards (or is R128, G128, B255 on the normal map)
Using Trim Sheets
- With a finished trim sheet you can now create polygons and UV amp them to correct parts of the sheet
- If your base mesh was a grid that was divisible by 10, you can easily determine where a trim section starts and ends
- For example, 0.0-0.5 on U axis, 0.4-0.5 on V axis
- When UV mapping strips of quads, you can use the 'rectangle' function in Modo's UV tools to quickly straighten it
- After that, it is trivial to cut and stack the UV islands to overlap each other, and fit on to the allocated trim sheet section
- If your trim sheet is non-square, remember to scale the UVs down on the longer axis to match the texture's aspect ratio
- The UVs remain always as a 0...1 square, so for example with a 2048x1024px texture, you need to scale the UVs to 50% on U axis (or to 200% on V axis)
- Example of a trim sheet in use
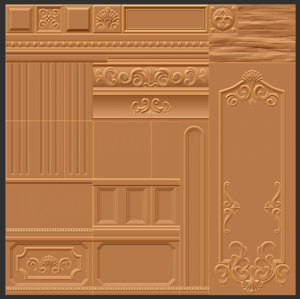
- Trimsheet itself
- Mesh and UVs
- Mesh and UVs without the tiling material

Example Trim Sheets
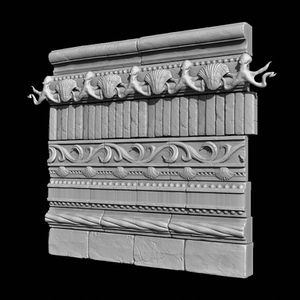
Sculpted trim sheet. source: http://nathanbaerwald.blogspot.com/2015/08/lions-arch.html


