Difference between pages "3D Asset Workflow: Concepting" and "3D Asset Workflow: Asset Assembling"
(Difference between pages)
m (→Frozenbyte concept art examples) |
m (→Asset Assembly Example Gallery) |
||
| Line 7: | Line 7: | ||
= Summary = | = Summary = | ||
| − | * ''' | + | Check also [[3D Asset Workflow: Blocksets]] and [[3D Asset Workflow: Tile Textures and Trimsheets]] |
| − | * | + | * After the 3D asset set pieces are retopoed, UV mapped, and textured, it's time to '''assembly to set''' |
| − | * '' | + | * Asset assembling step is used for asset sets which consists of multiple parts, some of which duplicated and mirrored to save texture space |
| − | + | ** E.g. when making a chair model, you can only make one chair leg, and duplicate + mirror it to create a chair with for legs - all of which use the the same UVs | |
| − | + | *** This is the reason assembling needs to be done ''after'' UV mapping | |
| − | + | ** '''If your model only consists of one mesh with no mirrored/duplicated pieces, you can skip this step and move straight to''' [[3D Asset Workflow: Naming the Asset]] | |
| − | |||
| − | + | [[File:Noble furniture 13.JPG|900px|center]] | |
| − | |||
| − | |||
| − | |||
| − | == | + | == Asset Assembling Workflow Steps == |
| − | # | + | # Make sure you have all the pieces needed to create all the assets that are required |
| − | + | # Make new mesh layers as required, and assembly the new meshes to the new layers | |
| − | # | + | #* Use the pieces wisely - most of the time, they don't need to be actually attached to each other, if they just look like they are |
| − | + | #** However, don't leave any holes, and delete geometry that's left inside the model | |
| − | #* | + | # [[3D_Asset_Workflow#Trine_Art_Team_Terminology|"Vessanpönttöily" and "juhlamokkailu"]] are also parts of the asset assembly workstep |
| − | + | #* '''Make sure the assets have nice and natural unevenness and asymmetry''' in them, so that they fit the Trine style better | |
| − | #** | + | #** It's better to add the wonkiness at this step rather than when sculpting, as it's easier to retopo symmetrical assets |
| − | + | #** If your making blocksets, check [[3D Asset Workflow: Blocksets]] - they need to match to each other more mathematically at times, so asymmetry can't be too radical | |
| − | # | + | # If needed, create new mesh layers for the same meshes different variations |
| − | + | #* Three is usually a good amount of variations for the same mesh | |
| − | # | + | #* '''Note that the variations should look different enough from each other to make an actual difference''' |
| − | + | # Add separate parts (e.g. door frames, doors) to their own layers | |
| − | #* | + | #* Make sure the pivots are in a sensible place - e.g. on the hinges of doors |
| − | + | #** This makes them more usable to the level artists | |
| − | #* | + | # If needed, make [[3D Asset Workflow: Billboards|billboards]] and/or very lowpoly background versions of the assets at this point |
| − | + | # When done, move onto [[3D Asset Workflow: Naming the Asset]] | |
| − | |||
| − | [[ | ||
| − | |||
| − | |||
| − | |||
| − | |||
| − | # | ||
| − | |||
| − | |||
| − | #* | ||
| − | # | ||
| − | # | ||
| − | #* | ||
| − | |||
| − | |||
| − | |||
| − | |||
| − | |||
| − | |||
| − | |||
| − | |||
| − | |||
| − | |||
| − | |||
| − | |||
| − | |||
| − | |||
| − | |||
| − | |||
| − | |||
| − | |||
| − | |||
| − | |||
| − | |||
| − | |||
| − | |||
| − | |||
| − | |||
| − | |||
| − | |||
| − | |||
| − | ** | ||
| − | |||
| − | |||
| − | |||
| − | |||
| − | |||
| − | |||
| − | [[ | ||
| − | |||
| − | |||
| − | |||
| − | |||
| − | |||
| − | [[ | ||
| − | |||
| − | |||
| − | |||
| − | |||
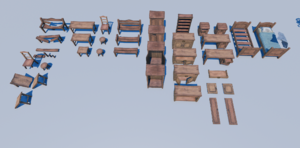
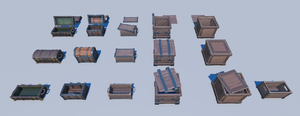
| + | = Asset Assembly Example Gallery = | ||
<div class="toccolours mw-collapsible mw-collapsed" style="background-color: #f3e9f5; border-width:2px; border-radius:10px; margin: 5px;"> | <div class="toccolours mw-collapsible mw-collapsed" style="background-color: #f3e9f5; border-width:2px; border-radius:10px; margin: 5px;"> | ||
| − | + | Asset Assembly Example Gallery | |
| − | |||
| − | |||
| − | |||
| − | |||
| − | |||
| − | |||
| − | |||
| − | |||
| − | |||
<div class="mw-collapsible-content"> | <div class="mw-collapsible-content"> | ||
<gallery widths=300px heights=300px mode="nolines"> | <gallery widths=300px heights=300px mode="nolines"> | ||
| − | File: | + | File:Noble furniture 13.JPG|Also with an [[3D Asset Workflow: Alternative Textures|alternative texture]] |
| − | + | File:FurnitureFinal.png | |
| − | File: | + | File:General crate chest set.png |
| − | File: | + | File:Carriage 29 9 2021.jpg|Also with a [[3D Asset Workflow: Tintmask|tintmask]] |
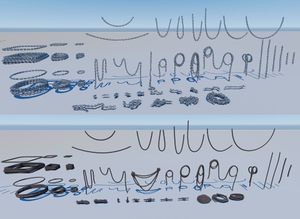
| − | + | File:Props decoration chain rope 16.8.2021 WIP4.JPG | |
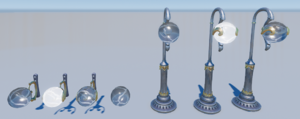
| − | File: | + | File:Breakable lamp 15.2.22.png |
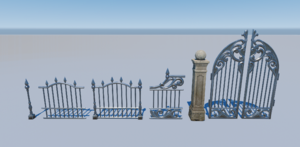
| − | + | File:Fence Texture Final.png | |
| − | |||
| − | File: | ||
| − | |||
| − | File: | ||
| − | |||
| − | |||
| − | File: | ||
| − | |||
| − | |||
| − | |||
</gallery> | </gallery> | ||
| − | </div></div | + | </div> |
| − | + | </div> | |
| − | |||
| − | |||
| − | |||
| − | |||
| − | |||
| − | |||
| − | |||
| − | |||
| − | |||
| − | |||
| − | |||
| − | |||
| − | |||
| − | |||
Revision as of 10:17, 1 August 2023
- ◇ Main Steps
- 3D Asset Workflow: Concepting
- 3D Asset Workflow: Sculpting
- 3D Asset Workflow: Retopology
- 3D Asset Workflow: UV Mapping
- 3D Asset Workflow: Baking
- 3D Asset Workflow: Texturing
- 3D Asset Workflow: Asset Assembling
- 3D Asset Workflow: Naming the Asset
- 3D Asset Workflow: LODs
- 3D Asset Workflow: Exporting to Editor
- 3D Asset Workflow: Completed asset checklist
- ◇ Additional Steps
- 3D Asset Workflow: Alternative Textures
- 3D Asset Workflow: Billboards
- 3D Asset Workflow: Blocksets
- 3D Asset Workflow: Collisions
- 3D Asset Workflow: Sikailu
- 3D Asset Workflow: Sway
- 3D Asset Workflow: Tile Textures and Trimsheets
- 3D Asset Workflow: Tintmask
- 3D Asset Workflow: Vegetation
- ◇ General Tips and Troubleshooting
Summary
Check also 3D Asset Workflow: Blocksets and 3D Asset Workflow: Tile Textures and Trimsheets
- After the 3D asset set pieces are retopoed, UV mapped, and textured, it's time to assembly to set
- Asset assembling step is used for asset sets which consists of multiple parts, some of which duplicated and mirrored to save texture space
- E.g. when making a chair model, you can only make one chair leg, and duplicate + mirror it to create a chair with for legs - all of which use the the same UVs
- This is the reason assembling needs to be done after UV mapping
- If your model only consists of one mesh with no mirrored/duplicated pieces, you can skip this step and move straight to 3D Asset Workflow: Naming the Asset
- E.g. when making a chair model, you can only make one chair leg, and duplicate + mirror it to create a chair with for legs - all of which use the the same UVs

Asset Assembling Workflow Steps
- Make sure you have all the pieces needed to create all the assets that are required
- Make new mesh layers as required, and assembly the new meshes to the new layers
- Use the pieces wisely - most of the time, they don't need to be actually attached to each other, if they just look like they are
- However, don't leave any holes, and delete geometry that's left inside the model
- Use the pieces wisely - most of the time, they don't need to be actually attached to each other, if they just look like they are
- "Vessanpönttöily" and "juhlamokkailu" are also parts of the asset assembly workstep
- Make sure the assets have nice and natural unevenness and asymmetry in them, so that they fit the Trine style better
- It's better to add the wonkiness at this step rather than when sculpting, as it's easier to retopo symmetrical assets
- If your making blocksets, check 3D Asset Workflow: Blocksets - they need to match to each other more mathematically at times, so asymmetry can't be too radical
- Make sure the assets have nice and natural unevenness and asymmetry in them, so that they fit the Trine style better
- If needed, create new mesh layers for the same meshes different variations
- Three is usually a good amount of variations for the same mesh
- Note that the variations should look different enough from each other to make an actual difference
- Add separate parts (e.g. door frames, doors) to their own layers
- Make sure the pivots are in a sensible place - e.g. on the hinges of doors
- This makes them more usable to the level artists
- Make sure the pivots are in a sensible place - e.g. on the hinges of doors
- If needed, make billboards and/or very lowpoly background versions of the assets at this point
- When done, move onto 3D Asset Workflow: Naming the Asset
Asset Assembly Example Gallery
Asset Assembly Example Gallery
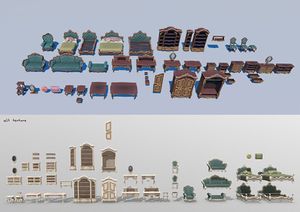
Also with an alternative texture
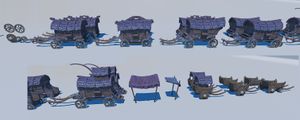
Also with a tintmask