Difference between pages "3D Asset Workflow: Billboards" and "3D Asset Workflow: General Tips"

From Frozenbyte Wiki
(Difference between pages)
Jump to: navigation, search
m
 
m
 
Line 6: Line 6:
 
</div>
 
</div>
  
=Preparation=
+
= Summary =
* This guide goes into detail on how to bake billboards using Substance Designer
+
* Check also: [[3D Asset Workflow: Troubleshooting]]
* Export your game-/editor-ready low poly mesh as their own fbx-file
 
* You can have multiple meshes in a single file as long as they use the same texture maps and they are named properly
 
* Same way as if you were baking with Substance Painter
 
* See [[3D_Asset_Workflow:_Baking_and_Texturing#Baking_in_the_Substance_Painter| Baking with Substance Painter]] for reference
 
* You will also need the diffuse/albedo, normal map and specular map for the exported low poly
 
  
==Create your billboard mesh==
+
= Lowpoly/UVs/Baking =
 +
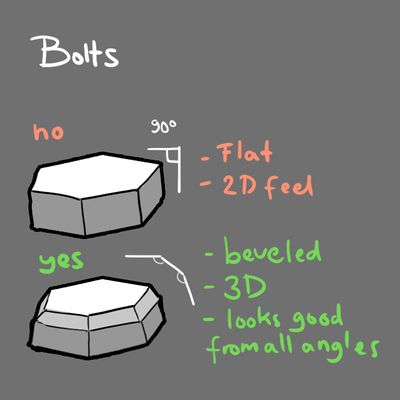
* Using bevels and avoiding 90 degree angles in models results in better bakes
 +
[[File:Trine 3D bolts tips 01.jpg|400px|center]]
  
# Import your low poly mesh into Modo
+
== Baking Non-welded Geometry ==
# Go into front orthographic view by pressing numpad + 2 (revert to perspective with numpad + ,)
+
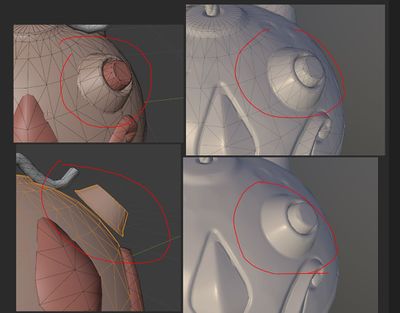
* It is not always necessary to weld all the lowpoly geo to get smooth transition between surfaces.
# Use the pen tool to draw a plane that covers the low poly mesh. Try to make the plane silhouette match the low poly as closely as possible to reduce the number of rendered transparent pixels.  
+
** Important: The angle between the floater geo and the base should be more than 90 degrees. Otherwise, there might be noticeable seams!
# Connect the vertices (Ctrl + L when 2 vertices selected) and create a UV map
+
[[File:not_welded_baked_geo.jpg|400px|center]]
# Center the billboard and duplicate it to a new mesh layer
 
# Move the duplicate away from the low poly, until they no longer intersect
 
# Now you have 3 meshes: Game ready low poly (used as high poly), billboard plane (used as low poly), and the offset duplicate (cage)
 
# Export your billboard and cage as separate files
 
  
=Substance Designer=
+
== Modo Tips ==
# Open Substance Designer and make a new substance (File > New Substance, or Ctrl+N)
+
* Assign [[Modo#Vertex_Normal_Toolkit|Vertex Normal Toolkit]]'s buttons to hotkeys to make them quicker to use
#* Settings don't matter at this point, empty graph works as well as any other
+
** It's especially advised to assign a hotkey to updating the normals
# Right click on '''Unsaved package''' in the left side panel, and select '''Link > 3D mesh'''
+
* A plugin that enables you to pick color from the mesh
# Select your billboard mesh
+
** ''\\WORKSPACE\workspace\art\art_resources\modo\modo_scripts\vmapColorPicker''
# The imported mesh can be found in the resources folder in the same panel
 
# Right click on the imported mesh and select '''Bake model information'''
 
  
==Bakers==
+
== Photoshop Tips ==
 +
=== Adding Padding to Maps After Baking ===
 +
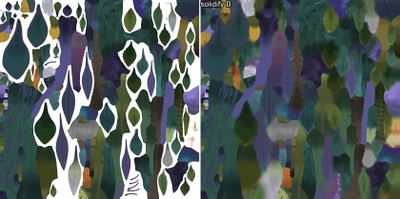
* If you need to create padding for some texture afterwards, without being able to do it with Substance Painter, Solidify Photoshop plugin can do it for you
 +
** Once installed it can be found in Photoshop under Filter -> Flaming Pear -> Solidify B
 +
** You will need to have separate layer with transparent areas, that the tool will then fill
  
* In the dialog, click on the small '''+''' -sign in the middle panel labeled 'Bakers', and select '''Transferred texture from mesh'''
+
[[File:solidifyExample.jpg|400px|center]]
* Add 3 of them. Select each new entry and point them to albedo, normal and specular.
 
* Remember to tick '''Normal map''' -checkbox in the case of normal map
 
* Reference for Substance Designer bake settings:
 
[[File:Billboard_designer_baking.jpg|1200px|alt=Designer baking|Reference for Substance Designer bake settings]]
 
  
*For the 2019 Substance Designer version. The UI is slightly different.
+
= Editor =
 +
* If your selected object is blue in the Editor:
 +
** Go to Tools > Options
 +
*** Find "Selection Self Illumination Visualization" and turn it FALSE
 +
* Sometimes, when the renderer processes the imported TGA textures, there can appear some strange pixelation - this can be remedied with a setting change in the RendererModule
 +
** Disable the FastTextureCompression in Modules > RendererModule
 +
** This will force the editor to process meshmaterials and textures more slowly but also with more precisio
 +
*** It should fix any possible strange pixelation in the textures/masks
  
[[File:wiki_SD_2019_billboard.png|1000px]]
+
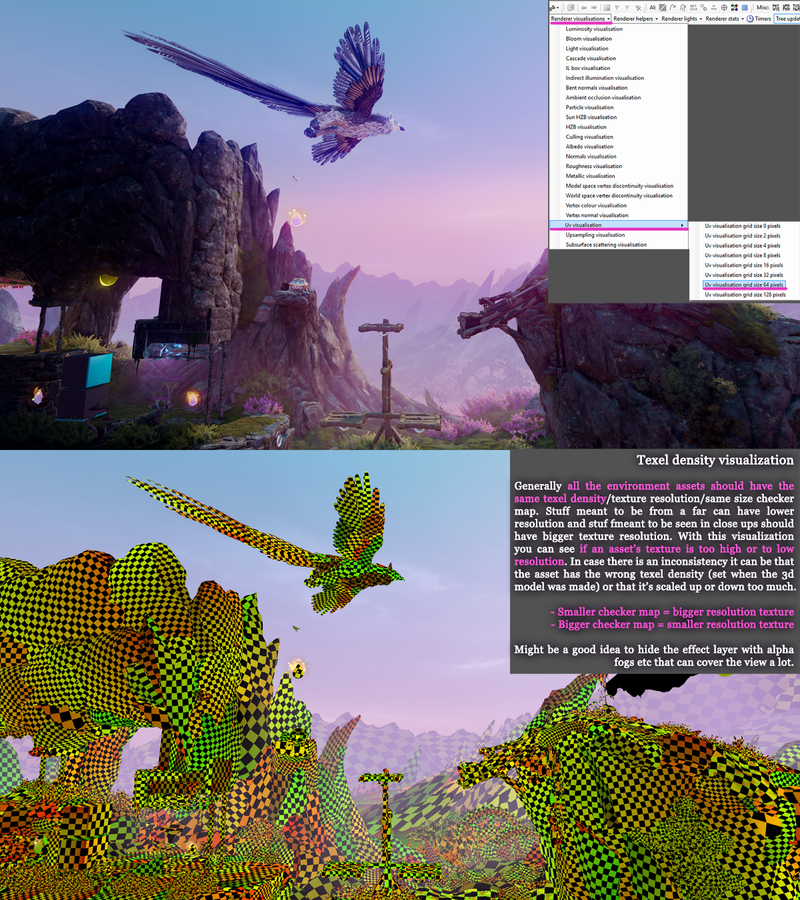
== Texel Density Visualization in Editor ==
 +
* We have a visualisation tool in the editor that shows the texel density in game "UV visualisation"
 +
* With this visualization you can see if an asset’s texture is too high or to low resolution.  
 +
* Generally all the environment assets should have the same texel density/texture resolution/same size checker map.
 +
* Stuff meant to be from a far can have lower resolution and stuff fmeant to be seen in close ups should have bigger texture resolution
 +
* In case there is an inconsistency it can be that the asset has the wrong texel density (set when the 3D model was made) or that it’s scaled up or down too much in the editor
 +
* Smaller checker map = bigger resolution texture
 +
* Bigger checker map = smaller resolution texture
 +
* Might be a good idea to hide the effect layer with alpha fogs etc that can cover the view a lot
  
==Bake parameters==
+
[[File:3d asset workflow level art texel density visualisation guide.png|800px|center]]
 
 
* Most of these settings are the same as in Painter
 
* In the right side panel, select the export folder, output size and dilation amount and/or diffusion
 
* For the high definition mesh(es) select the game ready low poly
 
* Add the cage if you have one. If not, increase the Max Frontal and Rear distance until no clipping occurs.
 
* Match '''By mesh name''' if you are baking multiple meshes at once and have them properly named. Otherwise use '''Always'''. Antialiasing 4x4 or 8x8.
 
* Press OK to bake the maps


=Baking the opacity/alpha=
 
* For a opacity map, that has individual leafs and their back faces taken to account as well, start by importing your low poly tree into Zbrush
 
* In Zbrush Separate your leaf planes in to another subtool
 
* You can do this by using Auto Groups in polygroups menu, then hide all the leafs and in subtool menu -> split hidden.
 
* Now Import your opacity map for the leaf planes into Zbrush
 
* Remember to flip your texture in ZBrush. Texture -> flip v and apply it to the leaf planes subtool
 
* For applying the texture into your leaf planes go to '''Tool -> Texture map'''
 
* Applied texture on leaf planes:
 
[[File:Billboard_opacity_bake_tutorial01.jpg|1200px|Applied texture on leaf planes]]


* Next you will need to subdivide the leaf planes in such way that they don't get smoothed
 
* In '''Tools -> Geometry next to Divide button turn Smt off
 
* ''' Subdivide the mesh until it is over 1 milj points
 
* You might need even more subdivision if you are not getting desired sharpness/resolution later
 
* Transfer the texture map in to polypaint: '''Tool -> Polypaint -> Polypaint From Texture'''
 
* If the Polypaint looks blurry try increasing the subdivision and repeat Polypaint From Texture command


* Next you will need to polygroup your black colored areas and delete them: '''Tool -> polygroups -From Polypaint'''
 
* Now to get backsides to show up for the leafs apply panel loops to them: '''Geometry ->  Geometry -> Panel Loops'''
 
* Adjust the thickness to be low amount and '''set Polish to 0'''
 
* Also you can decrease Loops amount. Test what thickness value works best for your asset.
 
* Thickness value is effected by the assets size, so it can vary with each model
 
* Merge your leaf plane subtool into your trees trunk and export the subtool out as obj or FBX
 
* How the tree looks like before exporting it:
 
[[File:Billboard_opacity_bake_tutorial02.jpg|300px|How the tree looks like before exporting it.]]


* Create low poly billboard planes for your tree and cage mesh for it as well
 
* After that in '''xNormal''' set the model that you just made in Zbrush in to the high poly mesh slot
 
* And add the low poly billboard model in to the low poly slot. By right clicking in that same slot you can assign custom cage mesh.
 
* In Baking options select for example Bake base texture as the map you want to bake
 
* Set Edge padding to 0 and antialising to 4x
 
* Once the bake is finished open the map in Photoshop and turn the base color to white or copy that textures alpha channel, as xNormal creates for all of its bakes usually an alpha channel also. 


==Bake==


* The baking process is the same, but instead of '''Transferred texture from mesh''', select '''Opacity Mask from Mesh''' From the bakers-panel, and change the high definition mesh to the one described above.


=Editor=


* In Photoshop, paste the baked opacity map to the textures alpha channel (Add the alpha channel from the channels tab by clicking on the new channel button).
 
* Only the albedo needs the alpha channel, so save it as a 32-bit tga and name it [texturename]_alphatest.tga.
 
* Export the rest of the maps as 24-bit tga and name them [texturename]_alphatest_[suffix].tga.
 
* More about naming conventions in [[3D_Asset_Workflow:_Baking_and_Texturing#Naming_Conventions | Naming conventions]].
 
* After importing the billboards to the editor, check '''BillboardY''' in the model component to make the billboard follow the camera on Y-axis.
 
* On the left is the billboard version of the fern group seen on the right:
 
[[File:Billboard vs model.png|800px]]


=Rendering Billboard Passes in Marmoset=
 
For now we only have one license of Marmoset and we have agreed with Lucia that she can make everyone's billboards with it. If it seems there is more frequent use for the program we can discuss buying more licenses.
 
==Intro==
 
This guide goes into detail on how to bake billboards using Marmoset Toolbag 4 and Photoshop.
 
There is no baking in this process. We are using the Marmoset render passes. It allows us to get the transparency of an alpha plane which wasn't possible in the previous process.


Exemple of a finished billboard :


[[File:t5_billboard_tuto_01.PNG|x350px]]


==Preparation==


* Export your game-/editor-ready low poly mesh as its own fbx-file. Be sure of the final orientation of your fbx file before exporting in Marmoset. Marmoset doesn't update the normal vertex when you rotate. If you rotate the model in Marmoset, you will not render pass in the correct light direction.
 
* You can have multiple meshes in a single file as long as they use the same texture maps and they are named properly
 
* You will also need the textures files (albedo/alpha, normal and metal/roughness) ready for the Editor


==Get your render passes in Marmoset==


# Import your fbx file. Material(s) are created by default depending on the informations provided by your fbx file. If you need to add an alternate texture, you have to create a new material.
 
# Insert your textures, if you have some alternate texture it's good to have them already placed.
 
# Flip the green channel (Y) of your normal map if you want the correct normal orientation in Marmoset. If you don't, you can skip the flip Y in the rendering passes.
 
# On the left side, click on render then below, you have the ouput/render properties. The render passes will render depending on your main camera. So be sure, it's placed properly.
 
# Change the size file to a game ready size if you want. You can crop properly later on Photoshop too.
 
# In render passes, you have to add :
 
#* '''Alpha Mask''' It's the outline of your billboard. Used it when compiling in Toshop. Placed it in the alpha channel in the Albedo texture.
 
#* '''Depth (Not mandatory)''' It helps to fake a bit more depth. In Toshop, place it above the albedo on multiply and reduce the opacity.
 
#* '''Albedo'''
 
#* '''Roughness'''
 
#* '''Normal''' If you have decided to flip the green channel while importing your texture for a correct display in Marmoset, you have to flip it back when rendering the passes.


[[File:t5_billboard_tuto_2.jpg|1000px]]


==Compilation in Photoshop==


*Use photoshop or anything else to compile your render passes ready for the Editor/Game.
 
*The normal map is the most important texture for a convincing billboard. You can use some filter such as levels, contrast or curve to intensify your normal map.
 
Try to be as close as you can to the original 3d model. Something like this :


[[File:t5_billboard_tuto_3.PNG|500px]]
 
The left one is the 3d model and the right one is the billboard.


Quick summary for the game ready textures :


*Albedo + Channel alpha for the transparency (32 bits tga)
 
*Normal (24 bits tga)
 
*Metalness/Roughness (24 bits tga). The Red Channel has the metalness information. The Green Channel has the roughness information and the blue one is empty (black).


==Modo==


*Create a plane and apply your new billboard texture.
 
*Use the pen tool to draw a plane that covers the billboard. Try to make the plane silhouette match the billboard image as closely as possible to reduce the number of rendered transparent pixels.
 
*Apply the material on the new billboard asset and adjust the UV.


[[File:t5_billboard_tuto_4.jpg|300px]]


*Export your asset like you usually do


==Editor==


* After importing the billboards to the editor, check '''BillboardY''' in the model component to make the billboard follow the camera on Y-axis.


End result under some specific lights :


[[File:maple_tree_112.PNG|x500px]]
 

Latest revision as of 16:42, 28 July 2023

3D Asset Workflow

Summary

Lowpoly/UVs/Baking

  • Using bevels and avoiding 90 degree angles in models results in better bakes
Trine 3D bolts tips 01.jpg

Baking Non-welded Geometry

  • It is not always necessary to weld all the lowpoly geo to get smooth transition between surfaces.
    • Important: The angle between the floater geo and the base should be more than 90 degrees. Otherwise, there might be noticeable seams!
Not welded baked geo.jpg

Modo Tips

  • Assign Vertex Normal Toolkit's buttons to hotkeys to make them quicker to use
    • It's especially advised to assign a hotkey to updating the normals
  • A plugin that enables you to pick color from the mesh
    • \\WORKSPACE\workspace\art\art_resources\modo\modo_scripts\vmapColorPicker

Photoshop Tips

Adding Padding to Maps After Baking

  • If you need to create padding for some texture afterwards, without being able to do it with Substance Painter, Solidify Photoshop plugin can do it for you
    • Once installed it can be found in Photoshop under Filter -> Flaming Pear -> Solidify B
    • You will need to have separate layer with transparent areas, that the tool will then fill
SolidifyExample.jpg

Editor

  • If your selected object is blue in the Editor:
    • Go to Tools > Options
      • Find "Selection Self Illumination Visualization" and turn it FALSE
  • Sometimes, when the renderer processes the imported TGA textures, there can appear some strange pixelation - this can be remedied with a setting change in the RendererModule
    • Disable the FastTextureCompression in Modules > RendererModule
    • This will force the editor to process meshmaterials and textures more slowly but also with more precisio
      • It should fix any possible strange pixelation in the textures/masks

Texel Density Visualization in Editor

  • We have a visualisation tool in the editor that shows the texel density in game "UV visualisation"
  • With this visualization you can see if an asset’s texture is too high or to low resolution.
  • Generally all the environment assets should have the same texel density/texture resolution/same size checker map.
  • Stuff meant to be from a far can have lower resolution and stuff fmeant to be seen in close ups should have bigger texture resolution
  • In case there is an inconsistency it can be that the asset has the wrong texel density (set when the 3D model was made) or that it’s scaled up or down too much in the editor
  • Smaller checker map = bigger resolution texture
  • Bigger checker map = smaller resolution texture
  • Might be a good idea to hide the effect layer with alpha fogs etc that can cover the view a lot
3d asset workflow level art texel density visualisation guide.png