Difference between revisions of "3D Asset Workflow: Sculpting"
(Created page with " * Previous workflow phase 3D Asset Workflow: Concepting * Next workflow phase 3D Asset Workflow: Retopo and UVs * This site is a part of a series of 3D asset creating...") |
m |
||
| (11 intermediate revisions by 2 users not shown) | |||
| Line 1: | Line 1: | ||
| + | <div style="border-bottom:2px solid #99aac7; background:#d0def5; padding:0.4em 0.5em; font-size:130%; margin-bottom: 25px; text-align: center; float:top;"> | ||
| + | ⬑ [[3D Asset Workflow]]</div> | ||
| + | <div style="border-bottom:2px solid #99aac7; background:#d0def5; padding:0.4em 0.5em; font-size:130%; float:right; margin-bottom: 25px;"> | ||
| + | Next step: [[3D Asset Workflow: Retopology]] →</div> | ||
| + | <div style="border-bottom:2px solid #99aac7; background:#d0def5; padding:0.4em 0.5em; font-size:130%; float:left; margin-bottom: 25px;"> | ||
| + | ← Previous step: [[3D Asset Workflow: Concepting]]</div> | ||
| − | |||
| − | |||
| − | |||
| − | |||
| + | <div style="padding-right: 10px; padding-left: 1000px; padding-top: 60px; padding-bottom: 80px;"> | ||
| + | {{#lst:3D Asset Workflow}} <!-- Link list transcluded from main 3D Asset Workflow page --> | ||
| + | </div> | ||
| + | = Summary = | ||
| + | * Sculpting means creating a highpoly mesh in e.g. ZBrush, which can then be used as a reference model for the lowpoly mesh | ||
| + | ** '''The highpoly mesh is never used in the game as is''', but its information will be baked onto the game-friendly lowpoly mesh | ||
| + | * [[3D_Asset_Workflow:_Troubleshooting#Sculpting|Troubleshooting]] | ||
| + | == Sculpting Workflow Steps == | ||
| + | # [[3D_Asset_Workflow:_Sculpting#Using_a_base_mesh:|Prepare a base mesh in Modo]] OR start with a primitive shape in ZBrush | ||
| + | #* You can also recycle models you have done before to speed up the process | ||
| + | # Make sure you have everything in the '''correct scale''' from the very beginning - it helps to have a character model from the game you are working on as a subtool in your scene | ||
| + | #* ''For reference, the characters in the Trineverse games are 2m tall'' | ||
| + | # '''Keep the resolution of the mesh as low as possible at first''', until the '''general shape''' is established | ||
| + | #* Show this version to the AD '''before''' adding more subdivisions and details, as it's '''easier to make possibly required changes at this point rather than later''' | ||
| + | # '''Keep the big picture in mind at all times!''' | ||
| + | #* If your model (or set of models) consists of several pieces, make all of them as a '''rough low res version''' first, NOT one piece at a time from start to finish | ||
| + | # '''Keep checking the asset from the distance in which it's probably seen in the game''', to make sure the '''detail level is not too dense''' and '''the silhouette is readable''' | ||
| + | #* If some of the detail work is smaller than one pixel on the screen, it's be unreadable and might flicker | ||
| + | # Once the asset is otherwise finished, it is usually a good idea to add a layer of '''damage and scratches''' etc | ||
| + | #* Leep in mind the possible mirroring and tiling of the UVs | ||
| + | #** Big dents and other details will repeat if you are not careful! | ||
| + | # Trine style assets should be crooked and not exactly symmetrical, but '''keep the sculpt version symmetrical if possible, so that the retopo is easy to do''' | ||
| + | #* It'll be much easier to have a clean symmetrical sculpt to retopo and bake, and modify the final textured lowpoly mesh to be bent, crooked and unsymmetrical | ||
| + | # Once you are happy with the sculpt, use Decimation Master to make the mesh lower resolution while keeping the details | ||
| + | #* You can '''decimate''' to the point just before it starts to show too much (keep the game camera distance in mind here too) | ||
| + | #** You can use this decimated mesh for both '''retopo in Modo''' and '''baking in the Substance Painter''' | ||
| + | # '''Name all your subtools''' | ||
| + | #* They should have a suffix, e.g. _hp or _high, to separate them from their lowpoly counterparts when [[3D Asset Workflow: Baking|baking]] | ||
| + | # '''[[3D_Asset_Workflow:_Sculpting#Exporting_from_Zbrush|FBX Export]]''' the subtools to one FBX, which contains all your highpoly meshes | ||
| + | #* If the model's scale is off, check [[3D_Asset_Workflow:_Troubleshooting#The_model.27s_scale_is_off_when_exporting_from_ZBrush_to_a_different_program|troubleshooting]] | ||
| + | # '''Import to Modo for retopoing''' | ||
| − | * Good sites for more ZBrush info | + | = Sculpting Tips & Tricks = |
| − | ** | + | * ZBrush can feel a bit intimidating for a beginner, but there are tons and tons of free learning material online |
| − | ** | + | <div class="toccolours mw-collapsible mw-collapsed" style="background-color: #f3e9f5; border-width:2px; border-radius:10px; margin: 5px;"> |
| − | *** | + | Good sites for more ZBrush info |
| − | *** | + | <div class="mw-collapsible-content"> |
| − | + | ** [http://pixologic.com/zclassroom/ ZClassroom] | |
| − | + | ** [https://www.youtube.com/results?search_query=zbrush+tutorial YouTube] | |
| − | + | *** For example: | |
| − | + | *** [https://www.youtube.com/playlist?list=PLkzopwqcFevYqrk_0MKIaUwrWYILzYsp6 Intro to ZBrush] | |
| − | + | *** [https://www.youtube.com/user/Pavlovich2005/feed Michael Pavlovich zbrush tricks and hardsurface stuff] | |
| − | + | </div> | |
| − | + | </div> | |
| − | + | * Everybody has their own way of working in ZBrush | |
| − | + | ** You can use any techniques you want and it's fine, as long as the resulting model looks good! | |
| − | |||
| − | |||
| − | |||
| − | |||
| − | |||
| − | |||
| − | |||
| − | |||
| − | |||
| − | |||
| − | |||
| − | |||
| − | |||
| − | * Everybody has their own way of working in | ||
| − | |||
== How to Start Sculpting in ZBrush == | == How to Start Sculpting in ZBrush == | ||
| − | + | * This guide image is meant for people '''who aren't familiar with the program''', so this can make the very first steps much easier | |
| − | * This guide image is meant for people who aren't familiar with the program so this can make the very first steps much easier | ||
* Here you can also see one way of customizing your ZBrush layout and the brushes this artist uses most often | * Here you can also see one way of customizing your ZBrush layout and the brushes this artist uses most often | ||
| − | ** Customizing your layout is really important for quick and smooth working so don't be afraid to do it! | + | ** Customizing your layout is really important for quick and smooth working, so don't be afraid to do it! |
| − | [[File:How to start sculpting in zbrush.jpg|1000px]] | + | <div class="toccolours mw-collapsible mw-collapsed" style="background-color: #f3e9f5; border-width:2px; border-radius:10px; margin: 5px;"> |
| + | '''How to customize your ZBrush's layout for better workflow''' | ||
| + | <div class="mw-collapsible-content"> | ||
| + | * Editing the positions of the different interface buttons etc can be done in the customization mode: Preferences -> Config -> Enable Customize | ||
| + | ** Now with holding CTRL+ALT, you can drag and drop different features from the menus to your custom setup on the sides of the viewport, and rearrange their positions too | ||
| + | * When you are done, remember to turn the Enable Customize mode off and Config -> Store Config and Save UI | ||
| + | </div> | ||
| + | </div> | ||
| + | [[File:How to start sculpting in zbrush.jpg|1000px|center]] | ||
| − | == Using a base mesh | + | == Using a Base Mesh == |
| − | * You can use a base mesh you make in Modo before starting the sculpting | + | <div class="toccolours mw-collapsible mw-collapsed" style="background-color: #f3e9f5; border-width:2px; border-radius:10px; margin: 5px;"> |
| − | * Base meshes can be useful especially in hard surface modeling | + | '''Guides for using a base mesh''' |
| − | * You can also use some of your old sculpts or models as starting points | + | <div class="mw-collapsible-content"> |
| − | ** If you often make similar models like humanoid characters you might want to start a library of base meshes to make your | + | * You can use a base mesh you make in Modo before starting the sculpting |
| + | ** You can also skip this part and start in ZBrush from a basic primitive shape of your choosing | ||
| + | * Base meshes can be useful especially in hard surface modeling | ||
| + | * You can also use some of your old sculpts or models as starting points | ||
| + | ** If you often make similar models, like humanoid characters, you might want to start a library of base meshes to make your workflow faster | ||
| − | + | '''Exporting the base mesh from Modo''' | |
| − | |||
* Separate mesh layers exported from Modo convert automatically to subtools when using FBX, and the scale stays consistent when you use the same format | * Separate mesh layers exported from Modo convert automatically to subtools when using FBX, and the scale stays consistent when you use the same format | ||
| − | * In Modo go to Game Tools tab and use the following settings: | + | * Once you have modeled the base mesh, export as FBX from Modo |
| + | * In Modo, go to Game Tools tab and use the following settings: | ||
** '''Export file:''' FBX 2014 | ** '''Export file:''' FBX 2014 | ||
** '''Export type:''' Export selected | ** '''Export type:''' Export selected | ||
| − | ** '''Check only:''' Save Geometry ( | + | ** '''Check only:''' Save Geometry (other settings don't matter at this point) |
** '''Units:''' Millimeters (might depend on what is set as default units in Modo) | ** '''Units:''' Millimeters (might depend on what is set as default units in Modo) | ||
** '''Scale multiplier:''' 1.0 | ** '''Scale multiplier:''' 1.0 | ||
| − | * | + | * Select the mesh layers you want to export and Export As |
| − | * '''These settings make sure that the mesh scale stays the same in both Modo and | + | * '''These settings make sure that the mesh scale stays the same in both Modo and ZBrush''' |
| − | [[File:Base_mesh_export.jpg|800px|alt=Export settings|FBX export settings for Zbrush and Substance | + | [[File:Base_mesh_export.jpg|800px|alt=Export settings|FBX export settings for Zbrush and Substance|center]] |
| − | |||
| − | |||
| − | |||
| − | |||
| − | |||
| − | |||
| − | |||
| − | |||
| − | |||
| − | |||
| − | |||
| − | |||
| − | |||
| − | |||
| − | + | '''Importing the base mesh to Zbrush''' | |
| − | + | # Go to ZPlugin > FBX ExportImport > Import | |
| − | + | # Drag the model to the canvas | |
| − | + | # Select '''Edit Mode''' from the top left menu | |
| − | + | </div> | |
| − | + | </div> | |
| − | |||
| − | |||
| − | |||
| − | |||
| − | |||
| − | |||
| − | |||
| − | |||
| − | |||
| − | |||
| − | |||
| − | |||
| − | |||
| − | |||
== Sculpting Techniques == | == Sculpting Techniques == | ||
=== Zbrush Tutorial: Panel Loops Ornament Technique === | === Zbrush Tutorial: Panel Loops Ornament Technique === | ||
* Great technique for creating surface models and ornaments | * Great technique for creating surface models and ornaments | ||
| − | * | + | ** Features are used in this video: |
| − | ** Panel Loops | + | *** Panel Loops |
| − | ** Masking | + | *** Masking |
| − | |||
| − | |||
| − | |||
| − | |||
| − | |||
| − | |||
| − | |||
| − | |||
| − | |||
| − | |||
| − | |||
*** Symmetry | *** Symmetry | ||
| − | *** | + | *** Morph target (kind of a layer that can be "erased") |
| − | |||
| − | |||
| − | |||
| − | |||
| − | + | [[File:Zbrush tutorial panel loops ornament technique 01.mp4|1000px|center]] | |
| − | |||
| − | |||
| − | |||
| − | |||
| − | |||
| − | |||
| − | |||
| + | == Morph Brush == | ||
| + | {{#ev:youtube|https://www.youtube.com/watch?v=B_wKwXwjcZs&t=}} | ||
| − | [[File:Tree trunk shapes tips.jpg| | + | == Sculpting Tip Gallery == |
| + | <gallery widths=400px heights=400px mode="packed"> | ||
| + | File:Overpaint_canon_ornaments.jpg|General direction should be simple and all the forms should support that same flow for a clear and readable, flowing design | ||
| + | File:Straight vs crooked.jpg|Shape language: straight v. crooked | ||
| + | File:Trine Flourish Curve Style Guide.jpg|<i>PHOTO:Multiple [[3D_Asset_Workflow:_Sculpting#Sources|Sources]]</i></small> | ||
| + | File:Trine 3D bolts tips 01.jpg|90 degree angled bolt can look very flat when viewed from top directly, while beveled version looks good and three dimensional from all the angles | ||
| + | File:Trine style details sculpt tips.jpg|Details should have depth and not just look like they are drawn on | ||
| + | File:Tree trunk shapes tips.jpg|An example image of adding variation to a tree trunk | ||
| + | File:Tree fow sculpt 3D flow overpaint 2.png|Tree flow example | ||
| + | File:Tree fow sculpt 3D flow overpaint 1.png|Tree flow example | ||
| + | </gallery> | ||
| − | === | + | == Sculpting a Set == |
| − | |||
| − | |||
| − | |||
| − | [[File: | + | * Try to always think about the '''most optimal way of creating the set''' |
| + | ** Don't create unnecessary unique pieces - '''recycle whenever you can!''' | ||
| + | ** You can also '''save texture space''' by having [[3D Asset Workflow: Tile Textures and Trimsheets|tile texture or trimsheets]] for the whole set, or just some parts | ||
| + | ** You can make a set of only few pieces, and use that to build various assets | ||
| + | *** For example, if you make a chair, you can just make one chair leg | ||
| + | **** After retopoing and UV mapping it, copy & paste the chair leg so that you have four legged chair | ||
| + | * '''Optimizing & recycling is the key!''' | ||
| + | [[File:Modular set recycling.jpg|800px|center]] | ||
| − | === | + | === How Many Variations? === |
| − | * | + | * Often with environmental 3D assets, the task is to '''sculpt a set of assets that can be used in many ways by the level artists''' |
| + | ** It can be e.g. a set of trees or a set of modular pieces like fences, that can be '''combined together in several ways to create different arrangements out of the same pieces''' | ||
| + | * With organic stuff like trees, plants, rocks etc., a good amount is usually '''three (3) different variations''' of the same thing | ||
| + | ** '''Having too many variations is bad, because more time is used to make them, but not much more value is added to the set''' | ||
| + | ** '''Don't make extra variations just in case they are needed''', make the optimal amount and once it's used in the game, we'll know if more variations are needed - only make them if there is a real need | ||
| + | ** '''The amount of the asset variations should be optimized as well as the geometry of the model''' | ||
| + | ** Level artists can work wonders even with one good rock asset by rotating and scaling it | ||
| + | * To create an optimal set, '''discuss with the level artists and ask what their preferences are''' | ||
| + | ** '''It's important to keep general assets quite general looking, as they are used a lot around the levels''' | ||
| + | ** If you make three variations of a tree/rock/etc. '''make sure that they are different shape/size with each other''' to get the maximal variation out of them | ||
| + | ** '''Make the different sides of one asset look different''', that way you have lots of variation even inside the one asset | ||
| + | *** It can be copied and rotated to make look like a different asset | ||
| − | [[File: | + | * One asset viewed from four directions = looks like there are four different assets: |
| − | + | [[File:Wrecking ball renders.jpg | 900px|center]] | |
| − | |||
| − | + | * These three variations of the same type of tree are enough to build a forest | |
| + | ** Notice how they all have different shape but are still quite general: | ||
| + | [[File:Flowertree combined.jpg| 900px|center]] | ||
| − | * When your sculpt is finished and decimated it needs to be exported from ZBrush | + | = Exporting from Zbrush = |
| + | * When your sculpt is finished and decimated, it needs to be exported from ZBrush | ||
| + | ** After that, a lowpoly mesh can be created in Modo via retopoing on top of the highpoly mesh | ||
== Decimate == | == Decimate == | ||
| − | * Once you are happy with the sculpt | + | * Once you are happy with the sculpt: |
| − | * Decimate your sculpt using | + | # Use Decimation Master to make the mesh lower resolution while keeping the details |
| − | + | #* Decimate your sculpt using Decimation Master in the ZPlugins tab | |
| − | + | # You'll first need to pre-process each piece, and then decimate | |
| + | # You can decimate to the point just before it starts to show too much (keep the game camera distance in mind here too) | ||
== Color ID == | == Color ID == | ||
* Apply solid colors to your sculpt using polypaint (Color > FillObject) | * Apply solid colors to your sculpt using polypaint (Color > FillObject) | ||
| − | * This will later be used as an ID | + | * This will later be used as an ID Map in Substance Painter, so '''use the same color when coloring parts that have the same material''' |
| − | * If you plan to have only one subtool/retopo mesh, you can also use polygroups instead of polypaint | + | * If you plan to have only one subtool/retopo mesh, you can also use polygroups instead of polypaint as IDs for faster results, but the same polypaint can be applied across subtools whereas polygroups cannot |
| − | + | # Clean up your subtools | |
| − | + | #* Figure out which parts of your sculpt will be separated when baking, and group them up under the same subtools | |
| − | + | # Name the subtools consistently | |
| − | ** An example of subtool naming: | + | #* Each subtool should have a suffix such as e.g. _hp or _high - it doesn't matter as long as it's the same for all of them |
| − | [[File:Subtools.PNG|alt=Subtools|An example of subtool naming]] | + | #** This is to separate the highpoly models from their lowpoly counterparts when paking |
| − | * A | + | * An example of subtool naming: |
| − | [[File:Polypaint.PNG|500px|alt=Vertex color masking|A | + | [[File:Subtools.PNG|alt=Subtools|An example of subtool naming|center]] |
| + | * A highpoly sculpt with different materials masked using polypaint/vertex color: | ||
| + | [[File:Polypaint.PNG|500px|alt=Vertex color masking|A highpoly sculpt with different materials masked using polypaint/vertex color|center]] | ||
== Exporting == | == Exporting == | ||
| − | * You can use either FBX or OBJ for exporting | + | * You can use either FBX or OBJ for exporting meshes out of ZBrush |
| − | * FBX is usually the best option as it keeps the separate subtools as separate layers in Modo | + | ** FBX is usually the best option as it '''keeps the separate subtools as separate layers in Modo''' |
| − | * OBJ can be used if you only have one merged piece and you don't need to bake any parts separately | + | ** OBJ can be used if you '''only have one merged piece''', and you '''don't need to bake any parts separately''' |
=== Exporting as FBX === | === Exporting as FBX === | ||
| − | * Export your sculpt using | + | <div class="toccolours mw-collapsible mw-collapsed" style="background-color: #f3e9f5; border-width:2px; border-radius:10px; margin: 5px;"> |
| + | Exporting as FBX | ||
| + | <div class="mw-collapsible-content"> | ||
| + | * Export your sculpt using ZPlugin > FBX ExportImport | ||
* FBX should be used since it retains the polypaint/vertex colors and named subtools in one file | * FBX should be used since it retains the polypaint/vertex colors and named subtools in one file | ||
* Use the following settings: | * Use the following settings: | ||
** '''Visible''' | ** '''Visible''' | ||
| − | |||
** '''FBX 2014''' | ** '''FBX 2014''' | ||
** '''bin''' | ** '''bin''' | ||
** '''MayaYUp''' | ** '''MayaYUp''' | ||
| − | * Then the FBX can be imported to | + | * Then the FBX can be imported to Modo for [[3D Asset Workflow: Retopology|retopo]] |
| − | ** There might be some scale issues when exporting as FBX, check the | + | ** In Modo's FBX import dialogue, leave '''load mesh smoothness''' unchecked |
| + | *** Zbrush adds two subdivisions to the FBX export - unchecking smoothness removes this | ||
| + | ** There might be some scale issues when exporting as FBX, check the [[3D_Asset_Workflow:_Troubleshooting#The_model.27s_scale_is_off_when_exporting_from_ZBrush_to_a_different_program|troubleshooting page]] if this happens | ||
| + | </div> | ||
| + | </div> | ||
=== Exporting as OBJ === | === Exporting as OBJ === | ||
| + | <div class="toccolours mw-collapsible mw-collapsed" style="background-color: #f3e9f5; border-width:2px; border-radius:10px; margin: 5px;"> | ||
| + | Exporting as OBJ | ||
| + | <div class="mw-collapsible-content"> | ||
* One subtool can be exported as an OBJ | * One subtool can be exported as an OBJ | ||
| − | * It's done from the Tools menu "Import" and by selecting the file format OBJ | + | * It's done from the Tools menu "Import", and by selecting the file format OBJ |
| − | * OBJ format doesn't have layers like the FBX format | + | * '''OBJ format doesn't have layers like the FBX format''' |
| − | * OBJ scales should work nicely when exporting from | + | * OBJ scales should work nicely as is when exporting from ZBrush and importing to Modo |
| − | * Then the OBJ can be imported to | + | * Then the OBJ can be imported to Modo for [[3D Asset Workflow: Retopology|retopo]] ("Import as static mesh" option recommended) |
| + | </div> | ||
| + | </div> | ||
| + | |||
| + | == About export scales == | ||
| + | * [[3D_Asset_Workflow:_Troubleshooting#The_model.27s_scale_is_off_when_exporting_from_ZBrush_to_a_different_program|Troubleshooting]] | ||
| + | * ZBrush uses Mystery Units™ and doesn't recognize the metric system | ||
| + | ** '''What ZBrush calls "scale" is actually the size of the ZTool's bounding box in Mystery Units™''' | ||
| + | * In general, we use millimeters for everything, but other units should work as well - '''as long as they are always the same across all applications''' | ||
| + | ** 1 unit -> scaled to 1000 units = 1000mm = 1m | ||
| + | ** To fix this, once you are ready to export, go to Tool -> Export -> Scale | ||
| + | [[File:Zbrush fbx export scale.png|ZBrush FBX export scale for a program that uses millimeters as a default scale]] | ||
| + | |||
| + | = Updating ZBrush = | ||
| + | * There are two kinds of updates for ZBrush: | ||
| + | ** Smaller updates that can be done with the ZUpgrader.exe found in the Program files (For example: C:\Program Files\Pixologic\ZBrush 2022) | ||
| + | ** Bigger updates where the version number changes (For example from version 2021 to version 2022) and for these the ZBrush needs to be completely re-installed | ||
| + | * When updating ZBrush to a completely new version, you need to make some effort to get the settings from the old version to the new version | ||
| + | == The UI and Hotkeys settings == | ||
| + | * In the old/current version of ZBrush, make sure all your settings are up to date and saved | ||
| + | ** Preferences -> Config -> Save UI | ||
| + | ** Preferences -> Hotkeys -> Save | ||
| − | + | * In the new version of ZBrush you can then load the UI and Hotkeys settings you saved from the old version | |
| + | ** Preferences -> Config -> Load Ui -> Load the file you just saved in the previous version -> Store Config (to save as the default in startup) | ||
| + | ** Preferences -> Hotkeys -> Load -> Load the file you just saved in the previous version -> Store (to save as the default in startup) | ||
| − | * | + | == Plugins, Custom Brushes, Custom Materials, Custom Alphas == |
| − | * | + | * Still missing from the latest version are the |
| − | * | + | ** Plugins |
| − | ** | + | ** Custom Brushes |
| − | * | + | ** Custom Materials |
| − | + | ** Custom Alphas | |
| − | * | + | # Go to the previous version's startup folder (for example C:\Program Files\Pixologic\ZBrush 2021\ZStartup) |
| − | + | # Copy the custom plugins from the startup folder (for example C:\Program Files\Pixologic\ZBrush 2021\ZStartup\ZPlugs64) and paste them to the new version's equivalent folder (for example C:\Program Files\Pixologic\ZBrush 2021\ZStartup\ZPlugs64) | |
| − | + | # Do the same for the Alphas, BrushPresets and Materials and any other possible customized things that you might have in the old version | |
| + | #* For the ZbBush default things it's best to keep the new things and '''not replace them with the older versions''' in case there might be some changes in the new version | ||
| + | #* For example don't replace the ZStartup -> ZPlugs64 new version folder (For example TransposeMasterData_2022) with the older version (For example TransposeMasterData_2021), those have the version year number in the end for a reason. | ||
| + | # If you start getting some weird pop ups about missing files when opening the new version of ZBrush, it might be that you have some old version folders accidentally copied to the new ZbBush folders | ||
| − | == | + | == Other settings == |
| − | * | + | * Document: |
| − | * | + | ** Adjust up the Width and Height -> Resize to cover the full viewport area |
| − | * | + | ** Bg color: Range 0 |
| − | + | ** Save as Startup Doc (The settings will be saved as default) | |
| − | * | + | * Material -> Save As Startup Material |
| − | * | + | ** Select a material you want to always be the default when opening ZBrush |
| − | * | ||
| − | * | ||
| − | * | ||
| − | ** | ||
| − | |||
| − | |||
= Frozenbyte sculpt examples = | = Frozenbyte sculpt examples = | ||
| + | <div class="toccolours mw-collapsible mw-collapsed" style="background-color: #f3e9f5; border-width:2px; border-radius:10px; margin: 5px;"> | ||
| + | Highpoly model gallery | ||
| + | <div class="mw-collapsible-content"> | ||
<gallery widths=300px heights=300px mode="nolines"> | <gallery widths=300px heights=300px mode="nolines"> | ||
| Line 256: | Line 300: | ||
</gallery> | </gallery> | ||
| + | </div></div> | ||
=Sources= | =Sources= | ||
| − | <small>[PHOTO: Trine Flourish Curve Style Guide.jpg] - Source list :<br> | + | <small> |
| − | *Img. 1 | + | [PHOTO: Trine Flourish Curve Style Guide.jpg] - Source list :<br> |
| − | *Img. 2 | + | *Img. 1. [Barcelona Steel Door] https://www.pinterest.de/pin/293367363199673143/ (accessed June 5, 2018)<br> |
| − | *Img. 3 | + | *Img. 2. [STD Privacy Gates - ALLIED GATE companyALLIED GATE company] http://www.alliedgate.com/irongates/iron-gate-photos/std-privacy-gates/ (accessed June 6, 2018) |
| + | *Img. 3. [Андрій Метельський - Різьба по дереву - різних майстрів. | OK] https://ok.ru/andry.metelsky/album/582642885456/582712663376 (accessed June 6, 2018) | ||
</small> | </small> | ||
| − | |||
| − | |||
Latest revision as of 09:18, 4 September 2023
- ◇ Main Steps
- 3D Asset Workflow: Concepting
- 3D Asset Workflow: Sculpting
- 3D Asset Workflow: Retopology
- 3D Asset Workflow: UV Mapping
- 3D Asset Workflow: Baking
- 3D Asset Workflow: Texturing
- 3D Asset Workflow: Asset Assembling
- 3D Asset Workflow: Naming the Asset
- 3D Asset Workflow: LODs
- 3D Asset Workflow: Exporting to Editor
- 3D Asset Workflow: Completed asset checklist
- ◇ Additional Steps
- 3D Asset Workflow: Alternative Textures
- 3D Asset Workflow: Billboards
- 3D Asset Workflow: Blocksets
- 3D Asset Workflow: Collisions
- 3D Asset Workflow: Sikailu
- 3D Asset Workflow: Sway
- 3D Asset Workflow: Tile Textures and Trimsheets
- 3D Asset Workflow: Tintmask
- 3D Asset Workflow: Vegetation
- ◇ General Tips and Troubleshooting
Contents
Summary
- Sculpting means creating a highpoly mesh in e.g. ZBrush, which can then be used as a reference model for the lowpoly mesh
- The highpoly mesh is never used in the game as is, but its information will be baked onto the game-friendly lowpoly mesh
- Troubleshooting
Sculpting Workflow Steps
- Prepare a base mesh in Modo OR start with a primitive shape in ZBrush
- You can also recycle models you have done before to speed up the process
- Make sure you have everything in the correct scale from the very beginning - it helps to have a character model from the game you are working on as a subtool in your scene
- For reference, the characters in the Trineverse games are 2m tall
- Keep the resolution of the mesh as low as possible at first, until the general shape is established
- Show this version to the AD before adding more subdivisions and details, as it's easier to make possibly required changes at this point rather than later
- Keep the big picture in mind at all times!
- If your model (or set of models) consists of several pieces, make all of them as a rough low res version first, NOT one piece at a time from start to finish
- Keep checking the asset from the distance in which it's probably seen in the game, to make sure the detail level is not too dense and the silhouette is readable
- If some of the detail work is smaller than one pixel on the screen, it's be unreadable and might flicker
- Once the asset is otherwise finished, it is usually a good idea to add a layer of damage and scratches etc
- Leep in mind the possible mirroring and tiling of the UVs
- Big dents and other details will repeat if you are not careful!
- Leep in mind the possible mirroring and tiling of the UVs
- Trine style assets should be crooked and not exactly symmetrical, but keep the sculpt version symmetrical if possible, so that the retopo is easy to do
- It'll be much easier to have a clean symmetrical sculpt to retopo and bake, and modify the final textured lowpoly mesh to be bent, crooked and unsymmetrical
- Once you are happy with the sculpt, use Decimation Master to make the mesh lower resolution while keeping the details
- You can decimate to the point just before it starts to show too much (keep the game camera distance in mind here too)
- You can use this decimated mesh for both retopo in Modo and baking in the Substance Painter
- You can decimate to the point just before it starts to show too much (keep the game camera distance in mind here too)
- Name all your subtools
- They should have a suffix, e.g. _hp or _high, to separate them from their lowpoly counterparts when baking
- FBX Export the subtools to one FBX, which contains all your highpoly meshes
- If the model's scale is off, check troubleshooting
- Import to Modo for retopoing
Sculpting Tips & Tricks
- ZBrush can feel a bit intimidating for a beginner, but there are tons and tons of free learning material online
Good sites for more ZBrush info
- Everybody has their own way of working in ZBrush
- You can use any techniques you want and it's fine, as long as the resulting model looks good!
How to Start Sculpting in ZBrush
- This guide image is meant for people who aren't familiar with the program, so this can make the very first steps much easier
- Here you can also see one way of customizing your ZBrush layout and the brushes this artist uses most often
- Customizing your layout is really important for quick and smooth working, so don't be afraid to do it!
How to customize your ZBrush's layout for better workflow
- Editing the positions of the different interface buttons etc can be done in the customization mode: Preferences -> Config -> Enable Customize
- Now with holding CTRL+ALT, you can drag and drop different features from the menus to your custom setup on the sides of the viewport, and rearrange their positions too
- When you are done, remember to turn the Enable Customize mode off and Config -> Store Config and Save UI

Using a Base Mesh
Guides for using a base mesh
- You can use a base mesh you make in Modo before starting the sculpting
- You can also skip this part and start in ZBrush from a basic primitive shape of your choosing
- Base meshes can be useful especially in hard surface modeling
- You can also use some of your old sculpts or models as starting points
- If you often make similar models, like humanoid characters, you might want to start a library of base meshes to make your workflow faster
Exporting the base mesh from Modo
- Separate mesh layers exported from Modo convert automatically to subtools when using FBX, and the scale stays consistent when you use the same format
- Once you have modeled the base mesh, export as FBX from Modo
- In Modo, go to Game Tools tab and use the following settings:
- Export file: FBX 2014
- Export type: Export selected
- Check only: Save Geometry (other settings don't matter at this point)
- Units: Millimeters (might depend on what is set as default units in Modo)
- Scale multiplier: 1.0
- Select the mesh layers you want to export and Export As
- These settings make sure that the mesh scale stays the same in both Modo and ZBrush

Importing the base mesh to Zbrush
- Go to ZPlugin > FBX ExportImport > Import
- Drag the model to the canvas
- Select Edit Mode from the top left menu
Sculpting Techniques
Zbrush Tutorial: Panel Loops Ornament Technique
- Great technique for creating surface models and ornaments
- Features are used in this video:
- Panel Loops
- Masking
- Symmetry
- Morph target (kind of a layer that can be "erased")
- Features are used in this video:
Morph Brush
Sculpting Tip Gallery
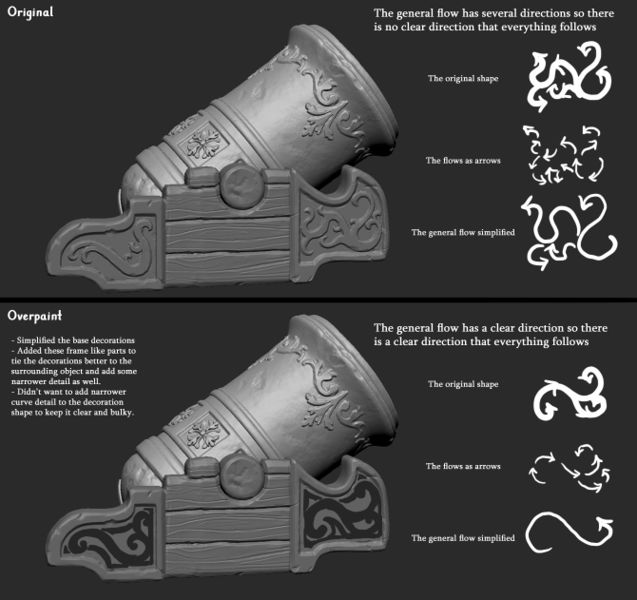
General direction should be simple and all the forms should support that same flow for a clear and readable, flowing design
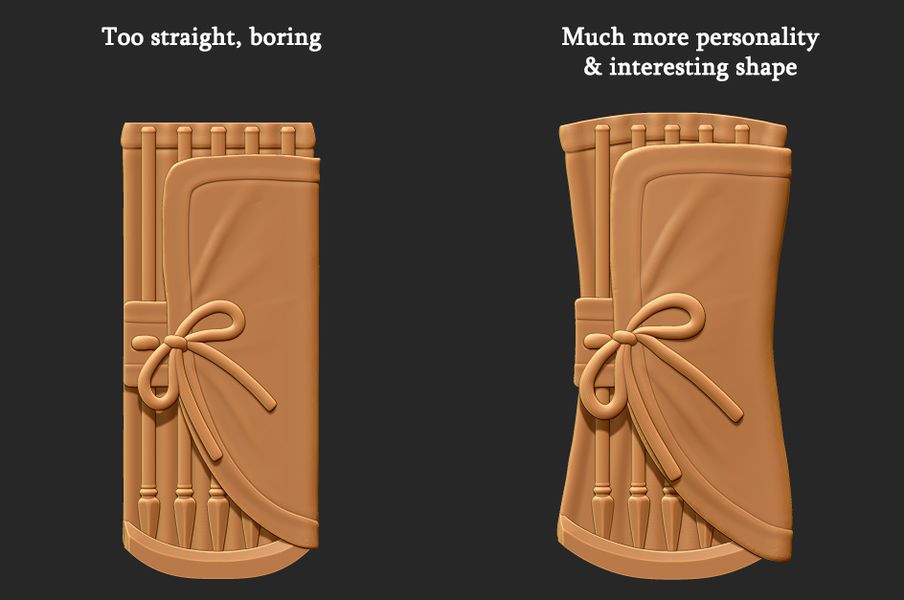
Shape language: straight v. crooked
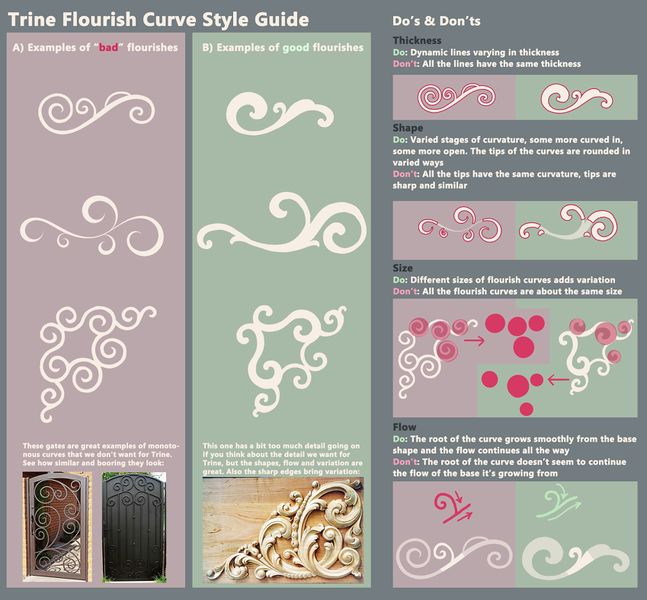
PHOTO:Multiple Sources</small>
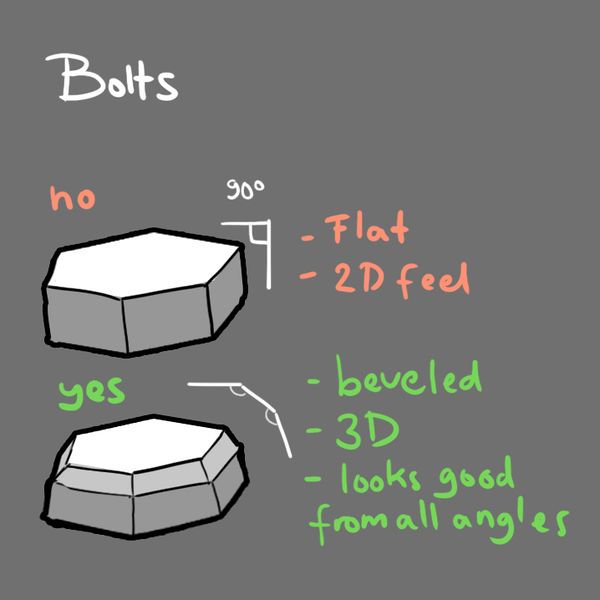
90 degree angled bolt can look very flat when viewed from top directly, while beveled version looks good and three dimensional from all the angles
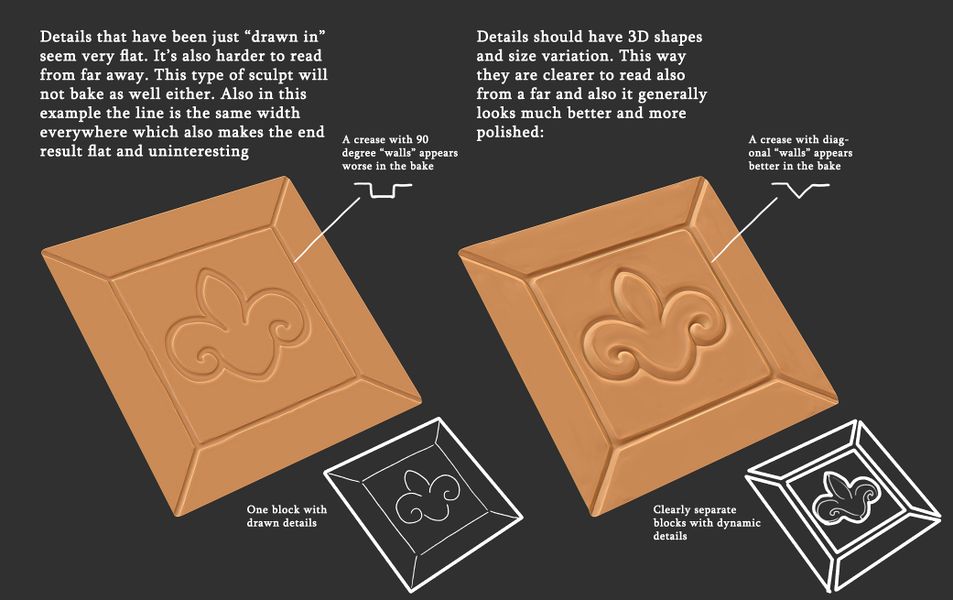
Details should have depth and not just look like they are drawn on

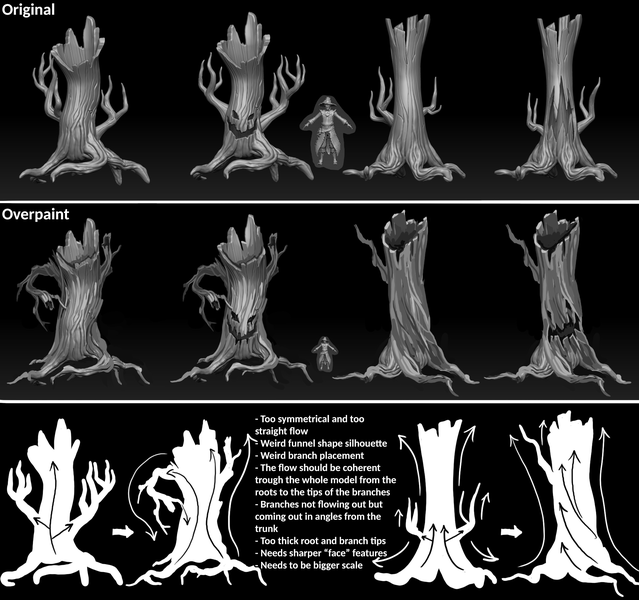
An example image of adding variation to a tree trunk
Tree flow example
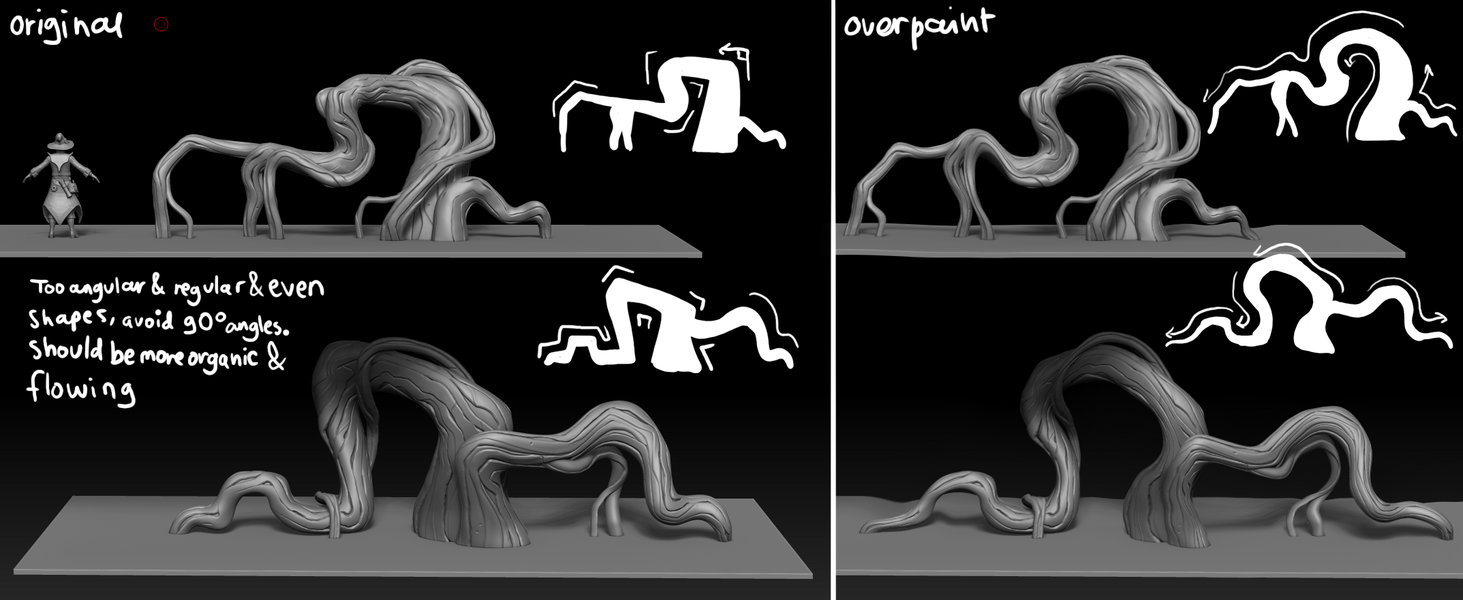
Tree flow example


Sculpting a Set
- Try to always think about the most optimal way of creating the set
- Don't create unnecessary unique pieces - recycle whenever you can!
- You can also save texture space by having tile texture or trimsheets for the whole set, or just some parts
- You can make a set of only few pieces, and use that to build various assets
- For example, if you make a chair, you can just make one chair leg
- After retopoing and UV mapping it, copy & paste the chair leg so that you have four legged chair
- For example, if you make a chair, you can just make one chair leg
- Optimizing & recycling is the key!

How Many Variations?
- Often with environmental 3D assets, the task is to sculpt a set of assets that can be used in many ways by the level artists
- It can be e.g. a set of trees or a set of modular pieces like fences, that can be combined together in several ways to create different arrangements out of the same pieces
- With organic stuff like trees, plants, rocks etc., a good amount is usually three (3) different variations of the same thing
- Having too many variations is bad, because more time is used to make them, but not much more value is added to the set
- Don't make extra variations just in case they are needed, make the optimal amount and once it's used in the game, we'll know if more variations are needed - only make them if there is a real need
- The amount of the asset variations should be optimized as well as the geometry of the model
- Level artists can work wonders even with one good rock asset by rotating and scaling it
- To create an optimal set, discuss with the level artists and ask what their preferences are
- It's important to keep general assets quite general looking, as they are used a lot around the levels
- If you make three variations of a tree/rock/etc. make sure that they are different shape/size with each other to get the maximal variation out of them
- Make the different sides of one asset look different, that way you have lots of variation even inside the one asset
- It can be copied and rotated to make look like a different asset
- One asset viewed from four directions = looks like there are four different assets:

- These three variations of the same type of tree are enough to build a forest
- Notice how they all have different shape but are still quite general:

Exporting from Zbrush
- When your sculpt is finished and decimated, it needs to be exported from ZBrush
- After that, a lowpoly mesh can be created in Modo via retopoing on top of the highpoly mesh
Decimate
- Once you are happy with the sculpt:
- Use Decimation Master to make the mesh lower resolution while keeping the details
- Decimate your sculpt using Decimation Master in the ZPlugins tab
- You'll first need to pre-process each piece, and then decimate
- You can decimate to the point just before it starts to show too much (keep the game camera distance in mind here too)
Color ID
- Apply solid colors to your sculpt using polypaint (Color > FillObject)
- This will later be used as an ID Map in Substance Painter, so use the same color when coloring parts that have the same material
- If you plan to have only one subtool/retopo mesh, you can also use polygroups instead of polypaint as IDs for faster results, but the same polypaint can be applied across subtools whereas polygroups cannot
- Clean up your subtools
- Figure out which parts of your sculpt will be separated when baking, and group them up under the same subtools
- Name the subtools consistently
- Each subtool should have a suffix such as e.g. _hp or _high - it doesn't matter as long as it's the same for all of them
- This is to separate the highpoly models from their lowpoly counterparts when paking
- Each subtool should have a suffix such as e.g. _hp or _high - it doesn't matter as long as it's the same for all of them
- An example of subtool naming:

- A highpoly sculpt with different materials masked using polypaint/vertex color:

Exporting
- You can use either FBX or OBJ for exporting meshes out of ZBrush
- FBX is usually the best option as it keeps the separate subtools as separate layers in Modo
- OBJ can be used if you only have one merged piece, and you don't need to bake any parts separately
Exporting as FBX
Exporting as FBX
- Export your sculpt using ZPlugin > FBX ExportImport
- FBX should be used since it retains the polypaint/vertex colors and named subtools in one file
- Use the following settings:
- Visible
- FBX 2014
- bin
- MayaYUp
- Then the FBX can be imported to Modo for retopo
- In Modo's FBX import dialogue, leave load mesh smoothness unchecked
- Zbrush adds two subdivisions to the FBX export - unchecking smoothness removes this
- There might be some scale issues when exporting as FBX, check the troubleshooting page if this happens
- In Modo's FBX import dialogue, leave load mesh smoothness unchecked
Exporting as OBJ
Exporting as OBJ
- One subtool can be exported as an OBJ
- It's done from the Tools menu "Import", and by selecting the file format OBJ
- OBJ format doesn't have layers like the FBX format
- OBJ scales should work nicely as is when exporting from ZBrush and importing to Modo
- Then the OBJ can be imported to Modo for retopo ("Import as static mesh" option recommended)
About export scales
- Troubleshooting
- ZBrush uses Mystery Units™ and doesn't recognize the metric system
- What ZBrush calls "scale" is actually the size of the ZTool's bounding box in Mystery Units™
- In general, we use millimeters for everything, but other units should work as well - as long as they are always the same across all applications
- 1 unit -> scaled to 1000 units = 1000mm = 1m
- To fix this, once you are ready to export, go to Tool -> Export -> Scale

Updating ZBrush
- There are two kinds of updates for ZBrush:
- Smaller updates that can be done with the ZUpgrader.exe found in the Program files (For example: C:\Program Files\Pixologic\ZBrush 2022)
- Bigger updates where the version number changes (For example from version 2021 to version 2022) and for these the ZBrush needs to be completely re-installed
- When updating ZBrush to a completely new version, you need to make some effort to get the settings from the old version to the new version
The UI and Hotkeys settings
- In the old/current version of ZBrush, make sure all your settings are up to date and saved
- Preferences -> Config -> Save UI
- Preferences -> Hotkeys -> Save
- In the new version of ZBrush you can then load the UI and Hotkeys settings you saved from the old version
- Preferences -> Config -> Load Ui -> Load the file you just saved in the previous version -> Store Config (to save as the default in startup)
- Preferences -> Hotkeys -> Load -> Load the file you just saved in the previous version -> Store (to save as the default in startup)
Plugins, Custom Brushes, Custom Materials, Custom Alphas
- Still missing from the latest version are the
- Plugins
- Custom Brushes
- Custom Materials
- Custom Alphas
- Go to the previous version's startup folder (for example C:\Program Files\Pixologic\ZBrush 2021\ZStartup)
- Copy the custom plugins from the startup folder (for example C:\Program Files\Pixologic\ZBrush 2021\ZStartup\ZPlugs64) and paste them to the new version's equivalent folder (for example C:\Program Files\Pixologic\ZBrush 2021\ZStartup\ZPlugs64)
- Do the same for the Alphas, BrushPresets and Materials and any other possible customized things that you might have in the old version
- For the ZbBush default things it's best to keep the new things and not replace them with the older versions in case there might be some changes in the new version
- For example don't replace the ZStartup -> ZPlugs64 new version folder (For example TransposeMasterData_2022) with the older version (For example TransposeMasterData_2021), those have the version year number in the end for a reason.
- If you start getting some weird pop ups about missing files when opening the new version of ZBrush, it might be that you have some old version folders accidentally copied to the new ZbBush folders
Other settings
- Document:
- Adjust up the Width and Height -> Resize to cover the full viewport area
- Bg color: Range 0
- Save as Startup Doc (The settings will be saved as default)
- Material -> Save As Startup Material
- Select a material you want to always be the default when opening ZBrush
Frozenbyte sculpt examples
Highpoly model gallery


Sources
[PHOTO: Trine Flourish Curve Style Guide.jpg] - Source list :
- Img. 1. [Barcelona Steel Door] https://www.pinterest.de/pin/293367363199673143/ (accessed June 5, 2018)
- Img. 2. [STD Privacy Gates - ALLIED GATE companyALLIED GATE company] http://www.alliedgate.com/irongates/iron-gate-photos/std-privacy-gates/ (accessed June 6, 2018)
- Img. 3. [Андрій Метельський - Різьба по дереву - різних майстрів. | OK] https://ok.ru/andry.metelsky/album/582642885456/582712663376 (accessed June 6, 2018)