3D Asset Workflow: Baking and Texturing
- Previous workflow phase 3D Asset Workflow: Retopo and UVs
- Next workflow phase Exporting Assets to Editor 3D Asset Workflow: Exporting to Editor
- This site is a part of a series of 3D asset creating process related wiki sites 3D Asset Workflow
- Good sites for more Substance Painter info:
- Substance Designer/Painter company page. See Allegorithmic (Youtube.com) : Allegorithmic - Playlist.
- Substance Painter 2 tutorial: Texturing & rendering a blade. See ChamferZone (Youtube.com) : Blade Tutorial - Part 2 - Baking & PBR Texturing - Substance Painter 2.
- Face Texturing in Substance Painter with Magdalena Dadela. See Allegorithmic (Youtube.com) : GDC 2017: Face Texturing in Substance Painter w/ Magdalena Dadela.
Baking and Texturing Steps
In the baking and texturing phase:
- The info of the high poly mesh is baked into 2D texture maps that can be used on the low poly mesh. This way you get the details of the dense high poly mesh in a much more optimized form that can be used in real time in the game.
- Using the baked maps like the normal map and the ambient occlusion maps for example the texturing can be started
- Texturing is done by using many materials, masks and generators etc. to achieve the final look that is wanted
- Once the textures are ready they are exported from Substance Painter into 2D image files
- A PSD file with all the maps combined as layers is created and saved as the work file
- Each separate map in Targa (TGA) format is saved to the base SVN and used in the game
Exporting from Modo to Substance Painter
- At this point you should have ready a high poly mesh, and a low poly mesh with UVs
- In Modo, before exporting the mesh into Substance Painter, apply a named material to it
- with the mesh selected, press 'M' and type in a name in the drop down box
- Delete all the other materials from the shaders tab, if there are any
- The material name should be the same as what your texture filename will be (e.g. sample_asset_mossy). This isn't absolutely necessary, but it will speed things up a bit later on.
- Substance Painter's export config will name the files based on the texture set name
- In case you have multiple UV-sets, you need to add a separate material for each of them, so you'll get a separate texture set for each. The naming should be the same as above.
- Remember to tick Save Materials when exporting
If you use an OBJ file
- You can use OBJ in case you don't need any of the parts baked separately
- For example if you have just one model or several models that are separate and not touching each other
- If you have multiple meshes with different UVs, add each of them their own material in Modo
- Merge all the meshes together and export as one obj
If you use an FBX file
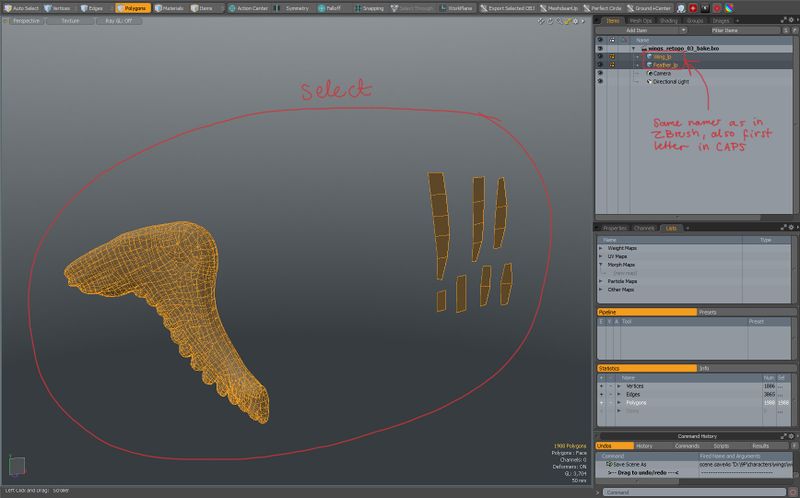
- Make sure your naming matches with the low poly and high poly
- Notice that the ZBrush always has the first letter in caps, so in modo this should also be the case.
- Select everything
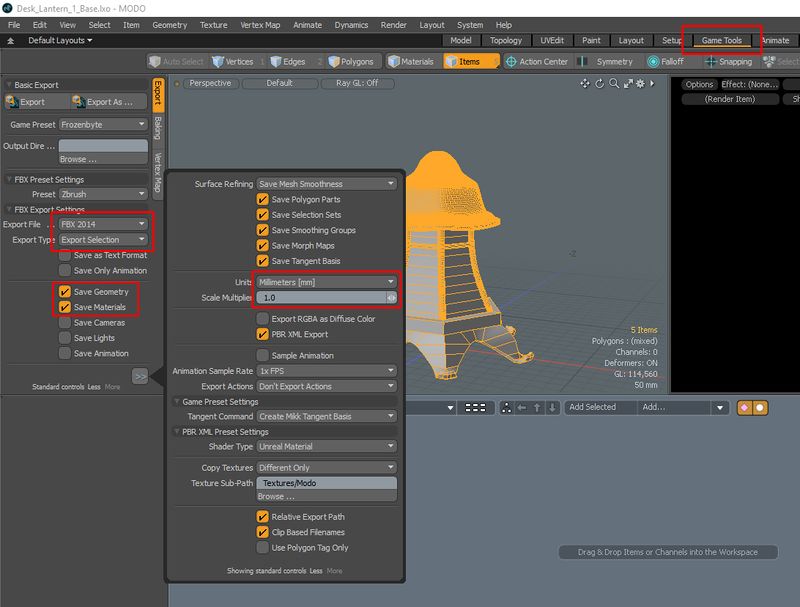
- Export the layers using the same settings when exporting to Zbrush, except remember to additionally select
- Save smoothing groups
- Save tangent basis
- Also recommended Save materials (To get texture sets to work and/or to have properly named layers when exporting the textures.)
- Modo Export FBX:
- Go to the Modo game tools tab and select the following settings & export the FBX:
Starting a New Project on Substance Painter
- Open Substance Painter and create a new project (File > New)
- Click Select and browse to your low poly mesh, then select a document resolution and click OK.
- The resolution can be changed later without quality loss. Bigger looks better, but can get slow in complex scenes.
- Select and add all the texture maps if you baked them externally, if not you'll bake them in Substance Painter
- Normal, AO and color ID maps
- Adjust the document resolution to the right size
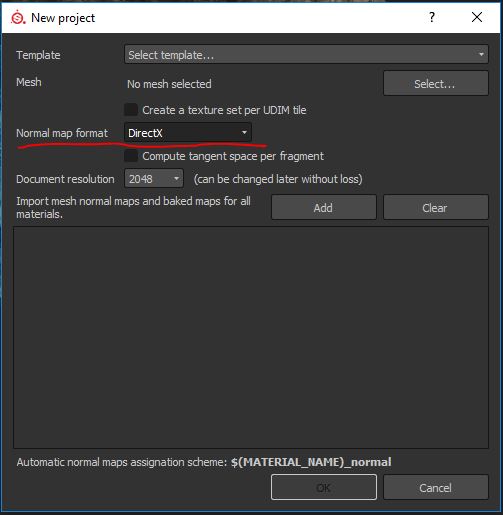
- Select DirectX as the normal map format (see image)
- For existing projects, or in case you forgot, it can be changed later by going to Edit -> project settings
- This means you don't need to flip channels in Photoshop anymore
Baking
- You can use xNormal, Substance Painter or Substance Designer for baking the texture maps for the 3D asset (both of these use the same tangent space algorithm for normal maps (mikktspace))
- As a rule of thumb use Substance Painter for baking most of the texture maps, xNormal for baking the alpha/opacity map
Baking in the Substance Painter
Baking settings
- Even if you have the basic maps baked outside the Substance Painter, you'll need to bake some extra maps that the Substance Painter uses for the mask generators etc
- Most of the settings with explanations can be found at the Baking Substance Painter Documentation, but here are some recommendations. See Allegorithmic.com : Baking.
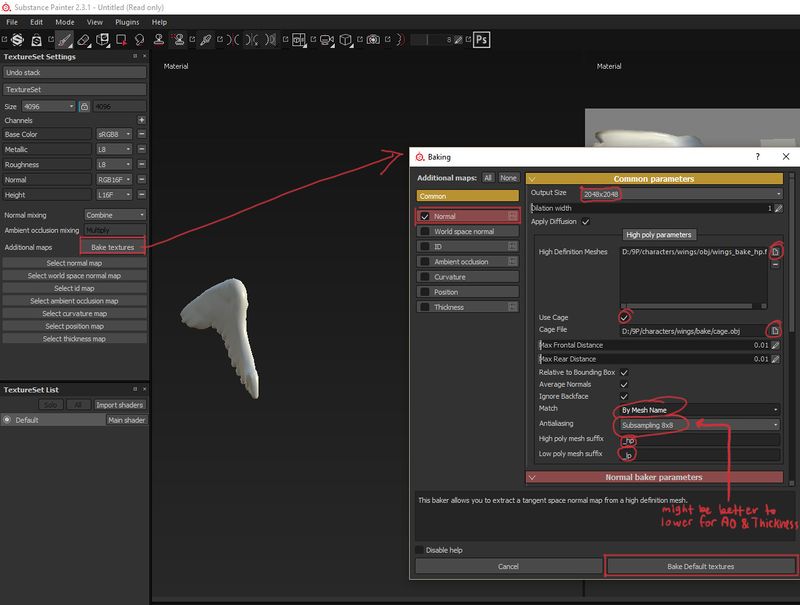
- In Texture Set Settings, select 'Bake textures'. Click on the document icon next to 'High poly meshes' and select your high poly. Output size should be relative to your final texture size. Bigger is better, but there is no use baking 4K maps for a 128x128 texture.
- You can bake additional maps (based on the normal map) in Painter to help with texturing, remember to adjust the resolution
- Dilation weight is same as padding, it could be for example 4
Bake at least these maps
- Normal, Normal map has all the sculpted detail information in it. Tips for normal maps: See ArtStation.com : ArtStation - #2 No more wrong Normal Maps!, Leonardo Iezzi.
- World space normal, it's used by many masking generators
- ID, the Color ID map will be baked based on the vertex colors of the high poly mesh. ID map is super useful in masking different material areas, use it whenever your object has more than one materials
- AO, Ambient Occlusion creates occlusion shadows that bring out the depth and shape of the model better
- Curvature, you can use curvature map with many generator masking techniques in Painter. It has cavity and convexity.
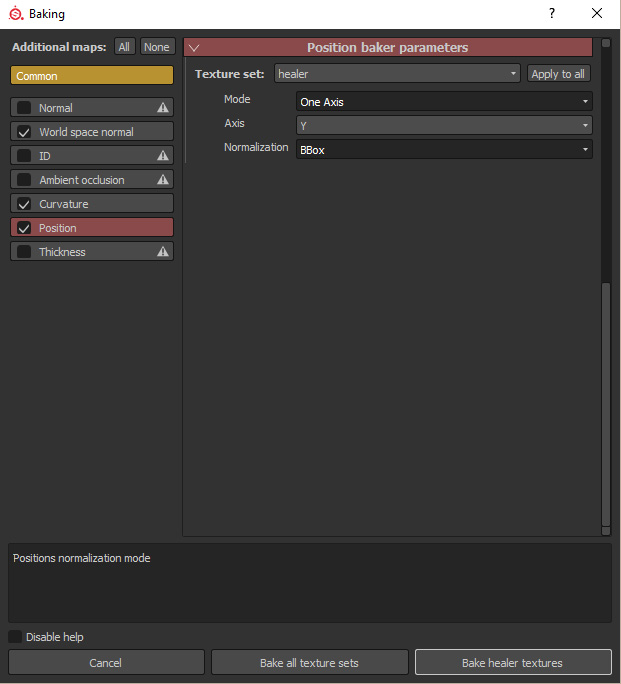
- Position, you can use position map for example for making gradient = the texture different color on the top of the character and different on the bottom of the character
Common parameters
- Diffusion:: On (Except for the color ID map)
- Ignore backface: on
- Match: By Mesh Name
- Anti-aliasing: Subsampling 8x8 (Consider lowering for AO, ID and Thickness, for example 4x4)
- High/Low poly mesh suffix: Whatever you used when naming the meshes
- Dilation: 16 (2-4 for the color ID map)
- First bake only the Normal map and test that everything works, if it doesn't work check the Troubleshooting
ID
- Color Source: Vertex Color (If you used polypaint to mask mesh parts)
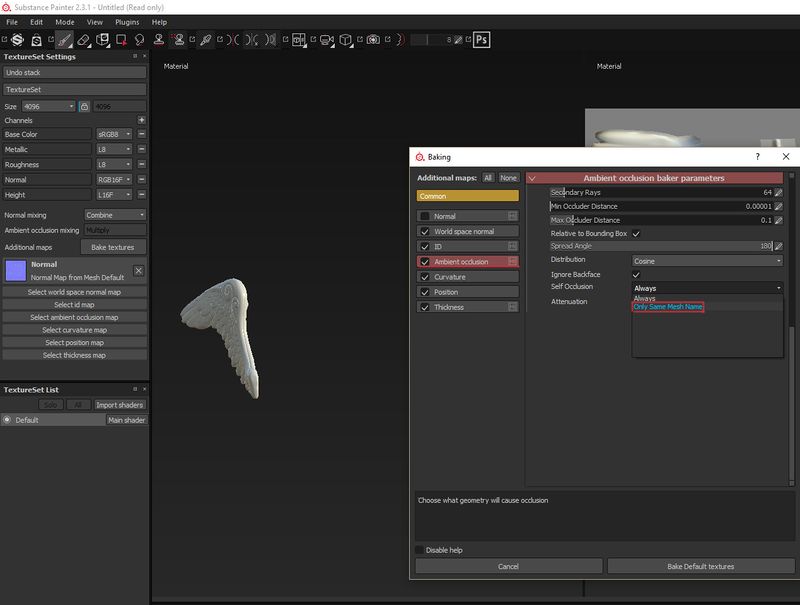
Ambient Occlusion
- Self Occlusion: By Mesh Name
- Ignore Backface: On
Thickness
- Self Occlusion: By Mesh Name
- It's a good idea to bake AO and Thickness separate from the other maps and with a lower AA setting, since they take a lot of time to bake
Position
- If you want to add a gradient on Y-axis (from top to bottom) to the whole mesh:
- Mode: One axis
- Axis: Y
- Normalization: BBox
Troubleshooting
- If nothing can be seen in the maps check that the naming is correct. You could also try to bake without the cage and get better results in some cases.
- If your maps show as black or as a weird mess you might have your scale wrong. Import your high and low poly meshes into the same scene and compare them. Marmoset Toolbag is great for this, since it can load the high poly mesh quicker than Modo. See Marmoset.co : Marmoset Toolbag.
- If your map has artifacts, holes or other problems, you might need to make a cage model
- In case you'll bakes have some weird shading in them, try triangulating those parts or the whole mesh.
- Have the low poly mesh triangulated in Modo (shift+T) before baking, but save a non triangulated version too in case the mesh needs to be edited
- In case you use a triangulated mesh for baking, the same mesh should be also the one that is used in the game
- In any case have a non-triangulated version in the Modo file in case the model will need to be edited in the future
- You can keep the triangulated version in the same file on a separate layer etc.
- Blurry ID map? Substance Painter not detecting the high poly mesh?
- Solution: Color Map From Mesh Produces Blurry (Unusable) Results. See Allegorithmic.com : Topic: Color Map From Mesh Produces Blurry (Unusable) Results.
- Have the low poly mesh triangulated before baking
- Don't use Apply Diffusion in SP baking common parameters panel
- Don't use big Dilation (padding), it should be 2-4
- If the Substance Painter crashes during exporting this might help. See Allegorithmic.com : GPU drivers crash with long computations.
Baking in the xNormal
- xNormal is a free software that we used before the Substance Painter
- It is recommended to use Substance painter for all the baking possible
- But in some cases XNormal might be needed, for example
- if the Substance Painter is buggy and slow and no other solution is available
- with alpha maps, as it's not possible to get the alpha map easily out of Substance Painter
- When baking a normal map, use setting -Y when baking because the inverted way is used in our editors
- When baking a color id map you might want to use Antialiasing x1 to create crisp edges for masking in Substance Painter
Baking an alpha map in XNormal and adding it in Painter
- Start with XNormal
- Select the low poly mesh
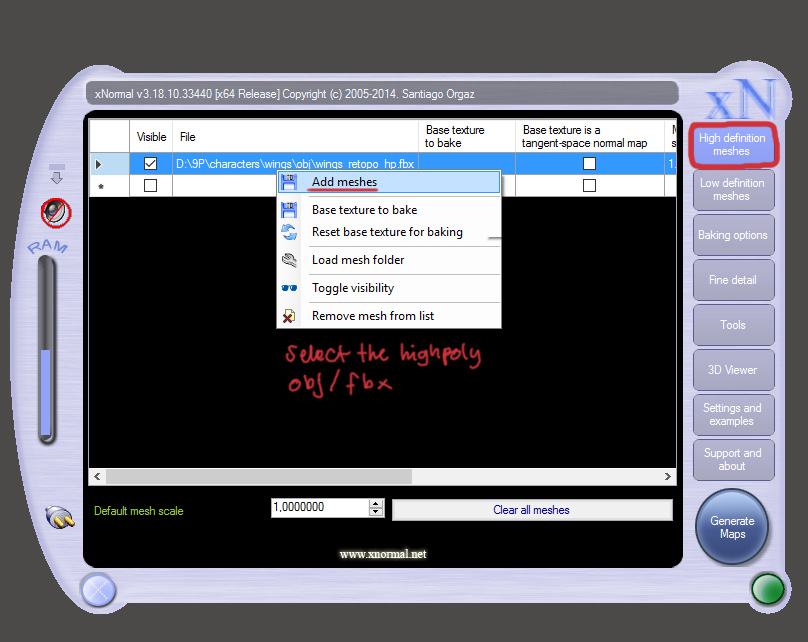
- Select the high poly mesh
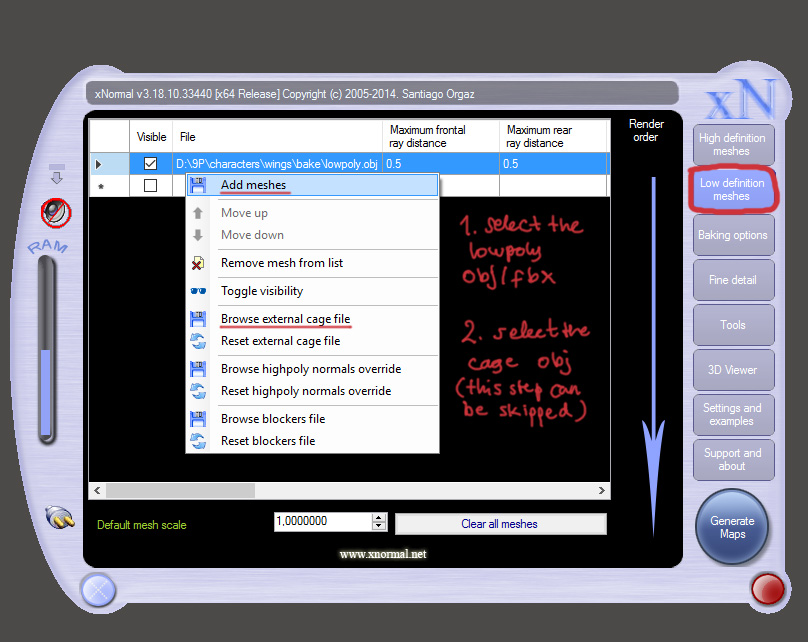
- Adjust adjustments & bake
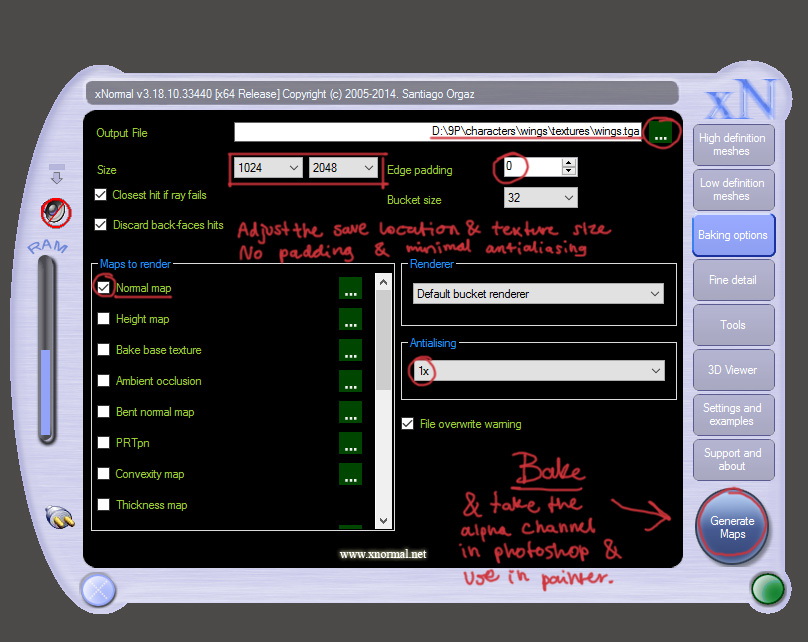
- Bake a map (for example the normal map) without any padding (unlike usually when baking maps). This way you get clear alpha map which doesn't have any unwanted padding edge around it.
- You'll get the alpha map from that texture map's alpha channel.
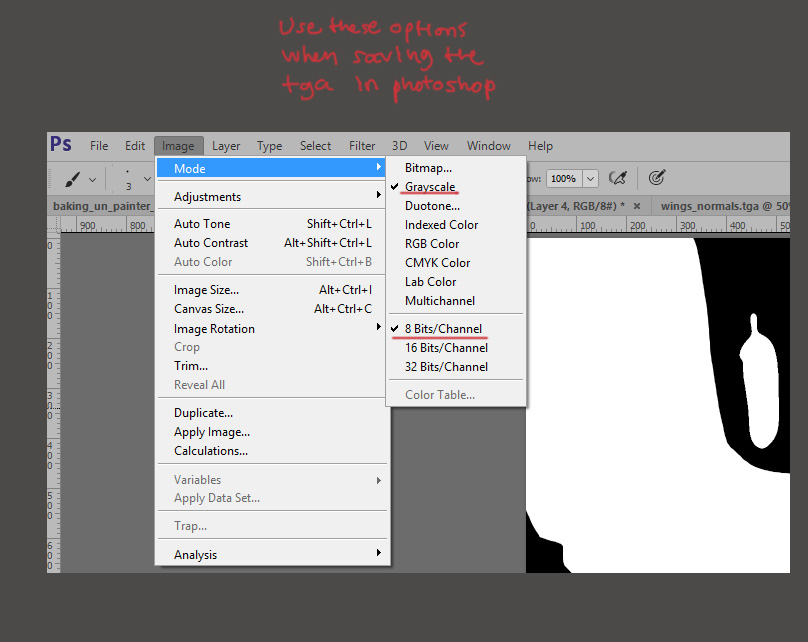
- Take the alpha channel in Photoshop and save as greyscale 8bit tga
- Proceed to the Substance Painter
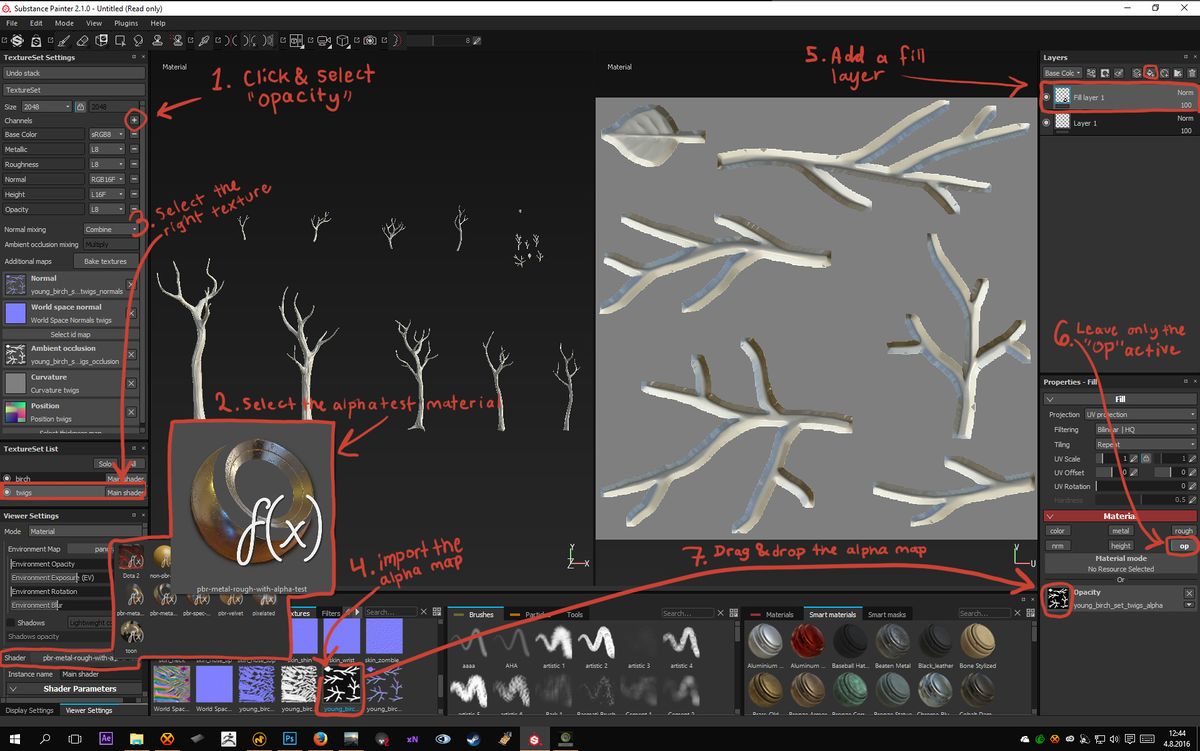
- Add opacity channel from the small plus icon at the Texture settings panel
- Select the shader "pbr-metal-rough-with-alpha-test" at the viewer settings panel
- Select the right texture set in which you want to add the opacity at the Texture Set List panel
- Import the alpha map by dragging it in the Texture shelf
- Alpha map is a map in black and white in which the white will be visible and the black will be transparent
- Add a fill layer at the layers panel
- Leave only the "op" opacity channel active from the Properties - Fill Material panel
- Drag and drop the alpha map from the texture shelf to the Base color button at the Properties - Fill Material panel
- Notice that the alpha map will not be working if you check the different channels using "C", it's only visible in the material mode "M" where you can see all the channels combined
Texturing
- The Frozenbyte engine now supports PBR (physically based rendering), meaning that what you see in Substance Painter is a good indication of what you will get in game. Not a lot of additional tweaking should be required, apart from some individual special cases. Of course the lighting and post process effects in the game affect the look of the textures.
- There are fill layers and layers in Substance Painter
- Fill layers are used not only for solid colors but also for adding maps
- Layers are used for painting on
- In Substance Painter workflow a lot of the things are done by using mask and painting the mask with black or white revealing the color of the fill layer, less of painting actual colors on things
- Each layer has color, metal, rough, normal and height channels which can be turned on and off
- With "C" you can scroll between different channels in the preview window and with "M" you can see all the channels together
- In the top of the Layers panel it's possible to change the mode to Base Color, Metallic, Roughness, Normal, Height
Setting up channels
- When creating a project, remember to set 'Normal map format' to DirectX, so you won't have to do any tweaking in Photoshop later on. You can change this later on by going to Edit -> Project configuration.
- The Frozenbyte engine supports PBR now, so the default channels should work fine. To add channels, click on the small '+' icon in the TextureSet Settings window, and '-' icon to remove them.
- Usually needed:
- Base color
- Roughness
- Normal
- Metallic
- Emissive (If needed. Engine supports only gray scale maps at the moment)
- Height, Substance Painter bakes the height map into the normals, so this should be enabled to get most out of the materials even though FB engine doesn't currently support heightmaps/displacement
- (Displacement, If you want to preview height/displacement on your mesh, you'll need to add this channel and enable parallax occlusion mapping in Viewer settings. Height doesn't directly convert to displacement, so you'll have to find a workaround.)
- Most of the time you will need only 3-4 maps: Base color, Normal, (Metallic), Roughness.
- NOTE If you use a larger document size while editing, remember to check the correct size every once in a while. You might lose a lot of detail when you export your final texture size if you only work on the higher resolutions. The switch between resolutions is lossless, so there's no harm in doing it.
Setting the Base Materials
Folders and Layers
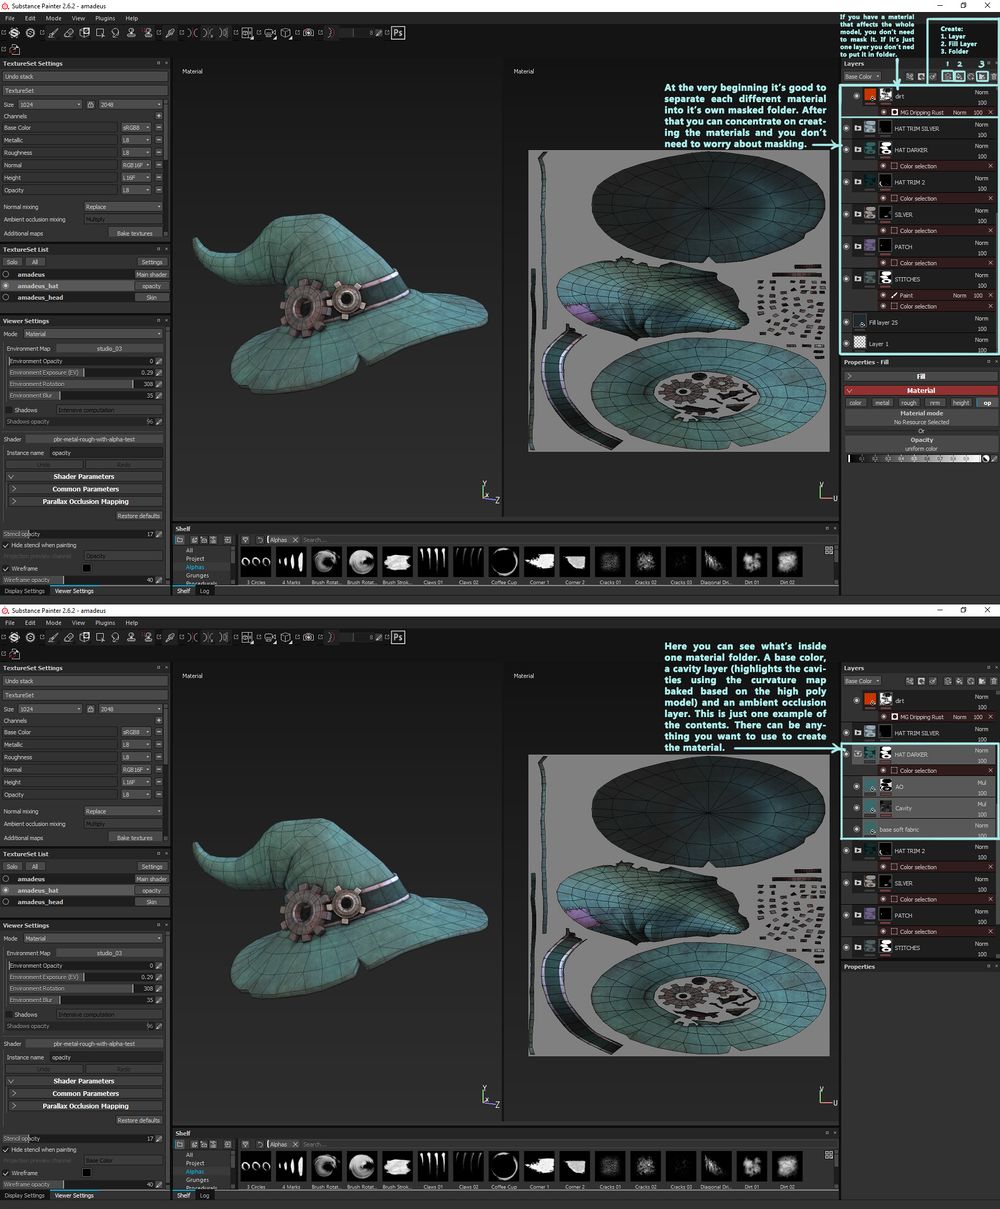
- The layer structure works similarly to Photoshop, and you can apply a mask to the folder using your baked ID map.
- Separate each material area of the character with a fill layer that is put inside a folder & create a mask for that folder that you use to define the area where that material is used
- Create this folder with a different color fill layer inside & a mask on the folder for each different material that the model has
- You can select the areas from the UVs to mask, but the easiest way is to bake a color ID map for the model based on the high poly model's colors in Zbrush
- After baking this color ID map you can use it in painter to mask each area, the colors can be crazy and loud to better use them for masking
- How to add the base colors
- In the Layers window add a fill layer by clicking the button on top of the Layers window
- In the Layers window add a folder by clicking the button on top of the Layers window
- Drag and drop the fill layer into the folder
- Name the folder and layer, for example folder: skin/hair/metal/etc, layer: base color
- At the Fill window adjust the Base color you want to use or use color picker to pick the color from anywhere on the screen
- You can also adjust the overall Metallic and Roughness from the Properties - Fill window
Masking
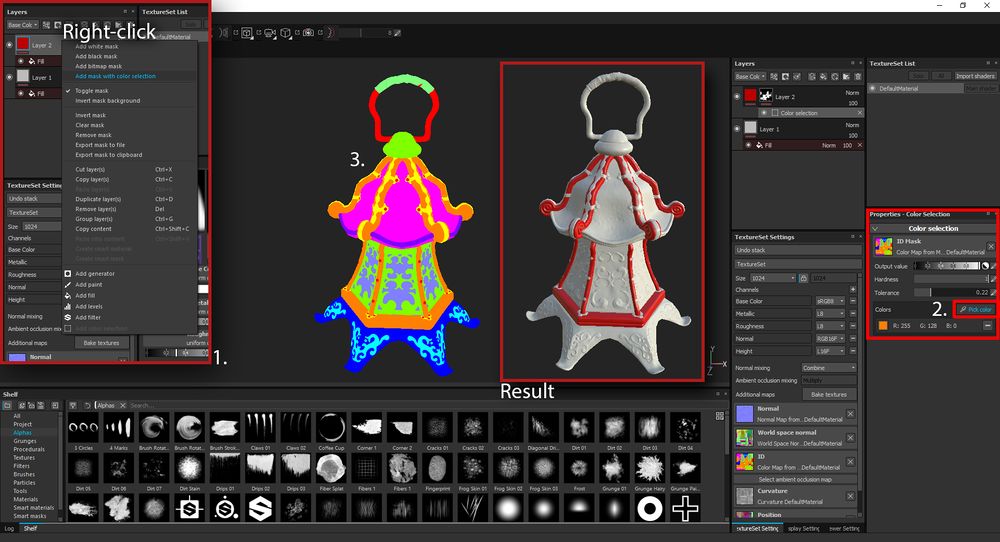
- with the fill layer selected, click the Configure mask button on top of the same Layers window
- Choose the Add mask with color selection, this let's you use the color ID map you have assigned in the TextureSet Settings Window
- At the Properties - Color Selection decide what area of the model you want to pick for this layer by clicking the Pick color and use the eye dropper to pick the color from the model or the UV texture map
- Raising the tolerance value gets rid of gaps on the mask edges, but too high values makes the mask bleed to other colors
- The end result is a mask based on the color in the color ID map. In this example the rest of the mesh is grey and the area inside the mask is red as the mask prevents the red color filling the whole mesh with red. Now you can change the red into any color you want and add layers and generators and smart materials etc. to get the material done.
- Once you have your folders set up and masked, you can add materials and paint as you like.
Smart Materials
- You can download user made smart materials, masks, etc. from Substance share website, or make your own.
- Smart materials are basically layer stacks contained in folders, so it's easy to make your own.
- Once you have created a material by layering base materials, effects etc, group them up in a folder (select all and Ctrl + G).
- Name the folder, right click it and select 'create smart material'. You'll have a new smart material with the name of the folder you just made, with all the layers and settings intact and saved, which you can use freely in other projects.
- Name a Fill layer "Opacity" etc. and keep it at the top of the layer stack to maintain the opacity
- Experiment with adding more filters to the mask stack in addition to the color selector.
You can do a lot of the same stuff as with regular layers (blending modes, texture fills, etc.), and can achieve some complex results.
Normals
- After adding all the maps to the project in the TextureSet Settings panel there might be the issue that the normal map is not showing (you can press C until you see the normal map to see if it works)
- You'll need to add a fill layer and drag and drop the normal map from the Shelf -> Textures to the Properties - Fill Normal channel. Turn all the other channels off for this layer from the same panel
- In the TextureSet Settings use the setting Normal mixing: Replace
- If you want to paint on the normal map, create a new layer and go to the Normals mode in the Layers panel, select Normal layer style to paint over. The default "NMdt" layer style means that it mixes the layers' contents but the "Normal" layer style goes on top of everything
Adding a custom shelf in Substance Painter
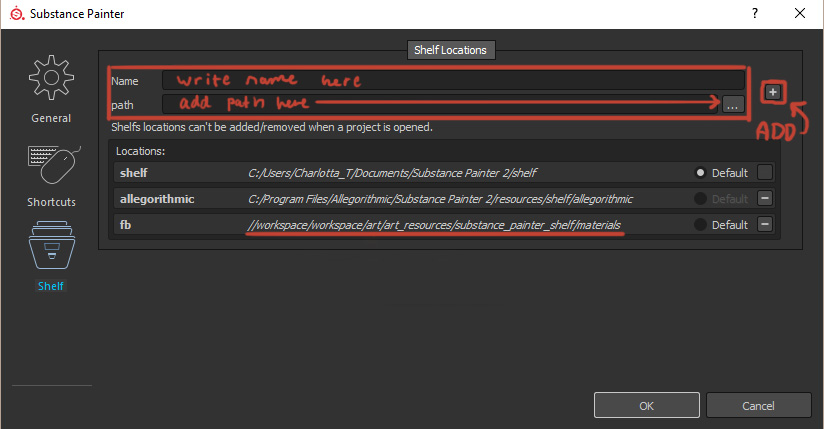
- How to add a custom Shelf
- Edit -> Settings -> Shelf
- Add Name & Path and click the plus button & OK
- Now you should be able to find the materials in that folder every time you use Substance Painter and if new materials are added there, they should appear automatically
Exporting
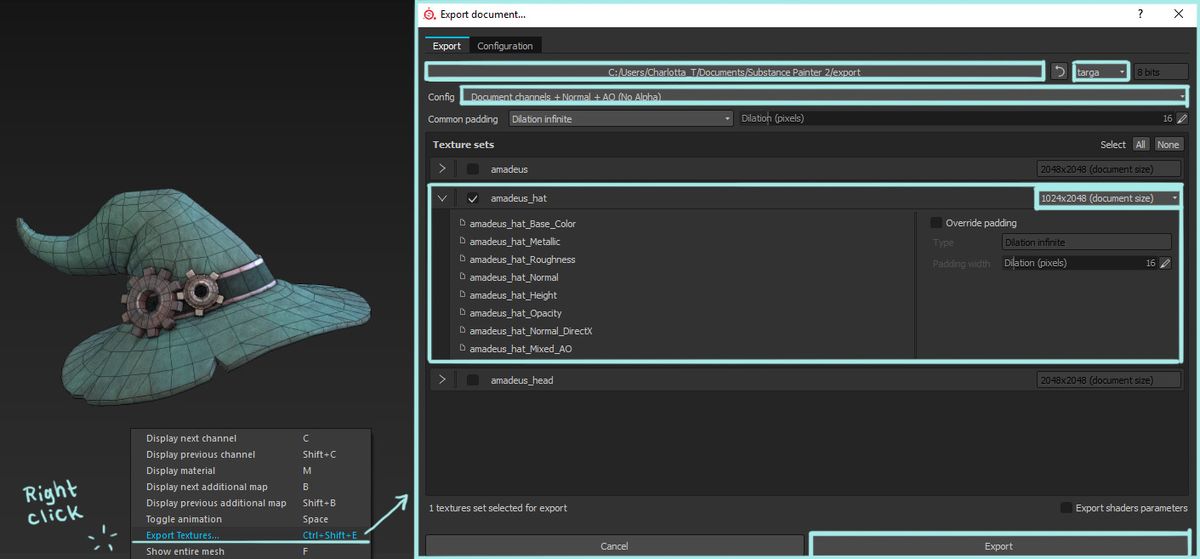
- Once you have finished texturing, go to File > Export textures, or Ctrl+Shift+E, or right click on the scene and choose Export Textures
- In the export dialogue, change the texture size to the size you want the final texture maps to be
- Point the file path to the right folder location
- File format: Up to you which one to use, either one is easy to convert to the other
- Psd (Will export all the maps into one psd-file as layers)
- Targa (You'll get all the maps as separate textures, ready to use')
- Document channels + Normal + AO
- Use the base color, metallic, roughness and normal_directX
- When the final resolution is small (say, 1024 or under) it is better to have the working resolution larger than the export resolution, instead of down scaling the working resolution and exporting that
- This results in smoother textures, since the materials are generated at a high resolution and then down scaled to the export resolution
- Doing this at high resolutions is a bad idea since 2k and above working resolutions are a pain in the ass to work with, and the downscale advantage will be close to nonexistent at this level.
- The texture files that go to the game's base SVN and into the game need to be in the Targa (TGA) format
- When you have the final texture maps you can proceed to export the model and textures into editor: 3D Asset Workflow: Exporting to Editor
Special cases
- Roughness, Only for Trine 3 or Nine Parchments use: Roughness map needs to be inverted in Photoshop.
- Normal map: Frozenbyte engine uses DirectX normal maps. If your normal map is in OpenGL format, you'll need to invert the green (y) channel.
- Other maps: Now that the engine supports PBR, you should get the same results from Painter and editor, but in some cases some tweaking in Photoshop might be needed and it might be a good idea to export the ID map and use that as an aid. You can export it along with the rest of the bakes by selecting "additional maps" from the painter export dialogue.
- If the Substance Painter crashes during exporting this might help. See Allegorithmic.com : GPU drivers crash with long computations.
Channel packing
- Channel packing means taking one or more gray scale images and pasting them into a single image file's color channels
- A shader then looks up the color channels and decides which one to use
- This saves texture memory and reduces clutter in the folders
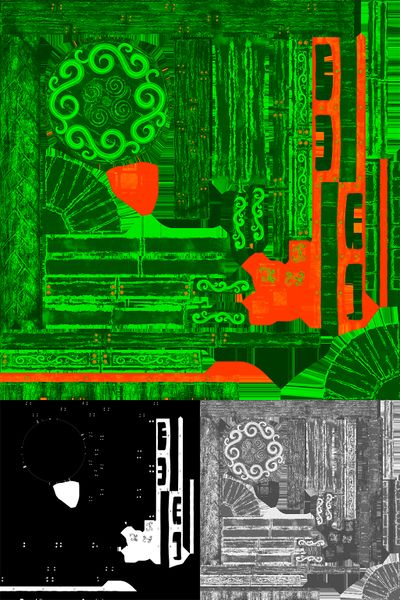
- In our case, we'll be using the red channel for metallic and green channel for roughness
- More channels may appear later
- This system should be used from now on, but separate metallic and roughness maps still work to reduce amount of time it takes to convert previous assets.
- A metallic/roughness map will look something like this. It could be all green as well in case there are no metal parts:
Channel packing by hand in Photoshop
- Open both metallic and roughness maps in Photoshop
- Copy either of them
- Go to the other map's channel list. It's the tab next to 'Layers' on the layer stack.
- If there is only one channel that says "Index", go to Image -> Mode -> RGB Color
- Select the correct color channel and paste the copied map there
- R=Metallic, G=Roughness, B=black
- Select the blue channel and fill it with black
- Done!
Naming Conventions
- The texture name should be clearly connected to the model. For example the mesh name.
- All the filenames of the resources should be written in lower case
- Allowed signs are letters (a-z), numbers(0-9) and underscore "_"
- The naming conventions are as follows:
| Map type | Suffix | Example | Notes |
|---|---|---|---|
| Albedo | sample_asset.tga | Basic color map | |
| _at_ | sample_asset_at.tga | Alpha test- Binary black&white transparency map in alpha channel. Suffix goes after filename and before other suffixes. Needs to be a 32bit Targa | |
| _ab_ | sample_asset_ab.tga | Alpha blend. Grayscale transparency map in alpha channel. Suffix goes after filename and before other suffixes. Needs to be a 32bit Targa | |
| Normal | _n | sample_asset_n.tga | RGB vector map describing surface orientation per pixel |
| Metallic/Roughness | _mr | sample_asset_mr.tga | Channel packed map containing metallic in the red channel and roughness in the green channel. Use this one |
| Metallic | _m | sample_asset_m.tga | Black&white mask to indicate metallic and non-metallic parts. Use combined metallic/roughness instead. |
| Roughness | _r | sample_asset_r.tga | Grayscale microsurface map describing a surface's matte/gloss qualities. Use combined metallic/roughness instead |
| Illumination/emissive | _e | sample_asset_e.tga | Self illumination and glow map |
| Wrap | _w | sample_asset_w.tga | Thickness map to determine how much light passes through e.g. a leaf |
Converting Old Assets to PBR
- When renaming maps etc, don't change _alphatest/_alphablend to the shorter form
- The FBX-file has the albedo map linked by name, and changing the map's name breaks that link
Other maps' conversion:
- Specular map -invert-> Roughness
- Specular mask -> Metallic
- Specular power -> Roughness
These old suffixes are for Trine 3 and Nine Parchments editor
- Color map: no suffix. The base color of the model. [RGB]
- Normal map: _normalmap. Surface normals. [RGB]
- Specular map: _specularmap. "Shininess" of an object. White = shiny, black = dull. [Grayscale]
- Specular mask: _specularmask. Defines areas with different specular values. Similar in function to PBR metallic map. White = CustomSpecular[xxx]2 values, Black = CustomSpecular[xxx] values [Grayscale]
- Emissive map: _illummap. Object self illumination. Enable SelfIlluminationMap in editor and set the SelfIllumination color to non-black. Other useful properties: GlowAmount and GlowAmountColor. [Grayscale]
- Wrap map: _wrapmap. Translucency for vegetation. White = translucent, black = opaque. [Grayscale]
