3D Asset Workflow: Exporting to Editor
Revision as of 13:56, 11 June 2018 by SaanaFB (talk | contribs) (Created page with "* Previous workflow phase 3D Asset Workflow: Baking and Texturing * This site is a part of a series of 3D asset creating process related wiki sites 3D Asset Workflow...")
- Previous workflow phase 3D Asset Workflow: Baking and Texturing
- This site is a part of a series of 3D asset creating process related wiki sites 3D Asset Workflow
Contents
Exporting Steps
- Preparing the models
- Preparing the textures
- Exporting the models and textures
- Importing the models and textures to the Editor
- Adjusting the models in the Editor if needed
Exporting the Texture Maps from Substance Painter
Exporting Models from Modo to the Editor
- In Modo, once the 3D asset and its textures are finished, check that there isn't anything extra on the "Shading" and "Clips" tab.
- Layer name defines the model name in editor, so name the layers properly. For example 'geysir_lantern_small_1'.
- If you have extra meshes you don't want imported into the editor, such as dump/test layers you don't want to delete yet, place an underscore (_) in front of the layer name (e.g. '_geysir_lantern_small_1').
- After the scene is prepared and mesh layers are named, apply a material to the meshes by pressing 'M', and name the material in the pop-up.
- More info about adding materials in Modo
- Copy the texture files to the correct editor folder: [Project SVN base]\binary\data\root\instance_base\entity\object\[folder path]
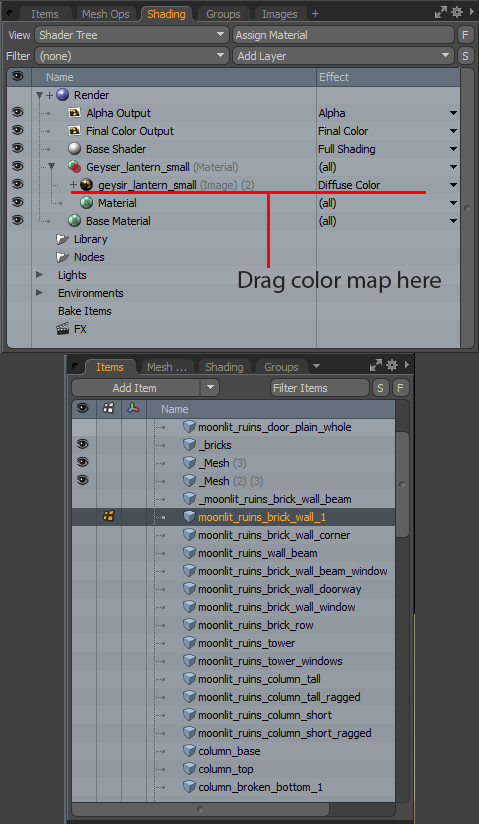
- Then open the shading tab in Modo, find the material you just created, and click on the dropdown arrow next to the material. Drag the albedo map only from the editor folder to the material.
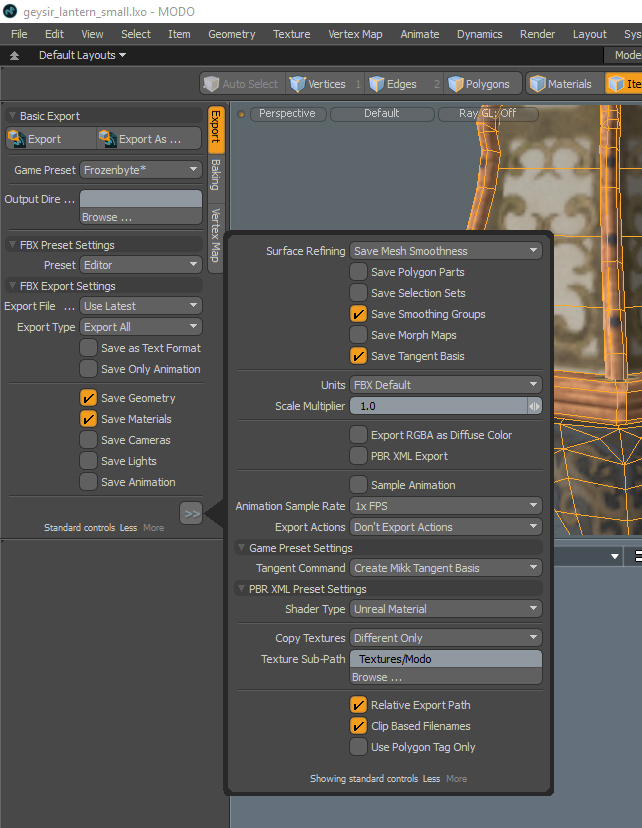
- Export the scene as FBX from the Game Tools Tab with the following settings. Export location is the same where you copied the textures.
- Export File: FBX 2014 (or 2010)
- Export Type: Export All (When exporting an asset with a broken version, always use Export All or it doesn't work! )
- 'Save as text format' and 'Save only animation' unchecked
- Check only the following
- Save Geometry
- Save Materials
- Save Smoothing Groups
- Save Tangent Basis
- Surface Refining: Save Mesh Smoothness
- Units: FBX Default
- Scale Multiplier: 1.0
- NOTE It's important that the texture maps are named correctly. See Naming conventions.
Importing Models and Textures to the Editor
- Go to editor, it will open a window with everything you exported, it should update the old types and create a new one for new models
- If there are no errors, click ok (if there are errors there might be missing items because of changed names etc)
- Press Process resources with the light blue button on top of the editor UI. This processes the resources and calculates the correct sizes of the textures etc. to an FBR file.
- REMEMBER TO SAVE RESOURCES in the editor, File -> Save resources
- Done! Now everybody should be able to find the new assets in Editor
Troubleshooting
- In case your model is black/has no textures, processing the meshmaterial usually fixes this (right-click model/type -> Locate type model resource -> find the corresponding meshmaterial -> right-click -> process resource)
- If your asset appears transparent and dark in the editor, check that your normal maps DON'T have alpha channel in them. Also re-assign the textures and materials in Modo and re-export the fbx.

