3D Asset Workflow: Tintmask
Summary
- A tintmask is a texture, in which different areas of the model are masked to separate color channels
- The albedo of the model can then be colored in the Editor using these channels
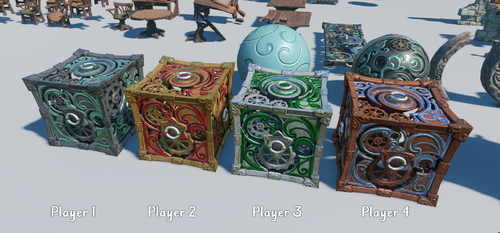
- Tintmasks are very useful for creating multiple differently colored variations of the same model, without having to make Alternative Textures for all of them
- When using tintmasks, it's important to always adjust the default colors to be nice and usable as is
- Otherwise the model will be black, and additional adjusting is needed
- Some general Editor tips for tintmasks can be found from 3D Asset Workflow: General Tips#Editor
How Tintmasks Work
- Tintmasks are used to control an object's surface color using an RGB mask and color pickers in the Editor
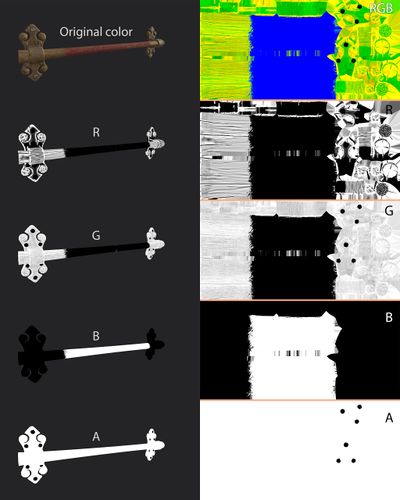
- The mask has 3 layers - 1 in each color channel, and a base layer in the alpha channel
- The colors are blended together based on the masks' grayscale values, and the chosen layer order
- The alpha channel (Base layer) controls the tint's overall blending with the original texture, meaning that an alpha channel with some amount of white is always needed
- The color channels correspond to certain layers by default, but they can be switched around in the meshmaterial
- The default layers are listed further below
- The tinting is applied through linear interpolation, meaning the the tint is applied more like paint, covering the color on the previous layer, instead of showing anything through
- This makes the layer ordering important, since the result varies depending on the order in which the layers are applied
Creating Tintmasks
- Tintmasks can be created in Substance Painter
- The color channels must be made separately on custom texture channels
- The T4_asset_export configuration merges these automatically into a ready tintmask
- In order to get a correct tintmask out of Substance Painter, you must add the proper User channels
- The texture channels and their corresponding mask channels are listed below:
| Texture channel | Color channel | Mask layer | Use |
|---|---|---|---|
| User7 | Red | Deco layer | Small details, accents |
| User6 | Green | Simple layer | |
| User5 | Blue | Areas layer | Large areas |
| User4 | Alpha | Base layer | Overall blending. Affects every layer |
- The user channels are found in the same list as other special channels, like emission or scattering
- You can rename the channels in Painter to make them easier to work with, it won't affect the export config
- The alpha channel (Base layer) is the only mask that is absolutely required
- The Base layer controls the masks' overall blending, so without one, the mask does nothing
- Even when there is the alpha channel in the tintmask, the texture files don't need to have at or ab in their name, unless they really use alpha
- The layer names and uses are arbitrary when it comes to which layer affects what, but it is a good idea to keep things consistent for the sake of level artists
- User channels generally don't show up on the mesh when texturing in Painter, but you can view them by cycling the single channel views
- Hotkey C to switch to next texture channel, and shift + C to switch to the previous
- Hotkey M returns you to the material view
- Anchor points help immensely when creating masks based on texture elements
- Anchor points allow you to refer to an earlier layer in the stack, so any changes made there will transfer over the anchor point
- In this case, by adding a fill effect to a layer, and to that fill assign the anchor point
- Here's a video explaining anchor points:
- Anchor points allow you to refer to an earlier layer in the stack, so any changes made there will transfer over the anchor point
Video:Sources
Using the Tintmasks in the Editor
- To tint an object, it needs a tintmask, which needs to be applied in the object's meshmaterial
- Name the tintmask texture as [texturename]_tintmask.tga
- To find the meshmaterial, right click on the object (or its type) and select locate type model resource
- Right-click the meshmaterial (under MeshMaterialResources) in the model resource's properties, and selecting Locate GUID
- Click on the three dots at the TintColorMaskTexture and navigate to the mask texture
- Then save resources or it might not appear
- In the meshmaterial, you can also set which color channels correspond to which tint layers
- To enable tinting, select EnableTintColor in the ModelComponent properties
- Then you can adjust the tinting with the rest of the settings
- TintLayerOrder determines the order in which the layers are applied
Creating a Tintmask for an Existing Asset
- If you add a tintmask for an existing asset that already has textures, you'll need to:
- Make the albedo map grey
- Re-adjust the colors for the default look you want for the asset in the Editor
- The default look should be nice and not require adjusting each time
Sources
Video 01 : Substance. [accessed June 7, 2018] 09 - Using Anchors Available at: https://youtu.be/w44yuMFtFyM


