Toolbar
The toolbar includes all kinds of useful actions and toggles, some being quite visible and self-explanatory and others being hidden under easy to miss drop down menus. This page will go through the most commonly useful ones.
Contents
File commands
The first four are quite self-explanatory. All options listed here can also be found under "File".
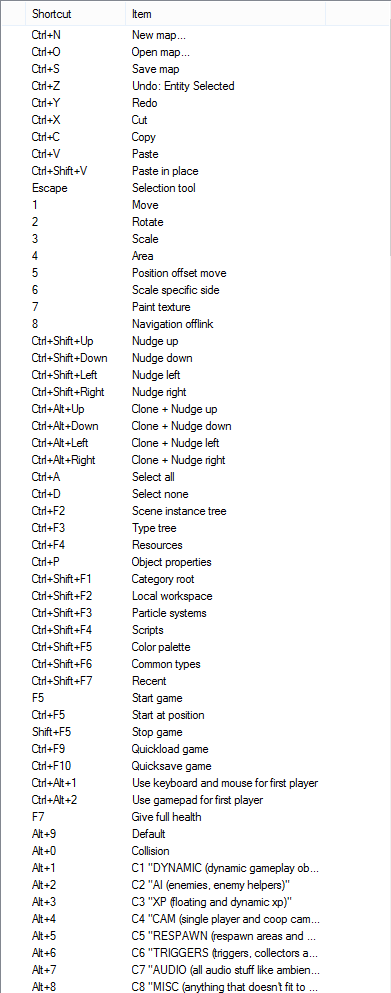
- New [Shortcut: Ctrl + N] gives you an empty map to start building on.
- Open [Shortcut: Ctrl + O] brings a new window from where you can choose a map to open and start editing or playing.
- Save [Shortcut: Ctrl + S] simply saves your current map if you're already assigned a directory and a filename for it. If not, you're first prompted to enter a name for your map and choose where to save it.
Processing commands
If a level doesn't seem to be working correctly in the editor, it might be solved by pressing the processing icons. It's usually a good idea to press at least the process resources and build navigation mesh buttons when opening a level in the editor for the first time.
- Process resources

- Process model instancing

- Process occlusion culling

- Process particle resources

- Build navigation mesh

For a beginner, it's not really important even if you don't understand all the words - just know that pressing the processing icons may prevent or solve problems. For more detailed explanations, refer to the Editor Glossary.
Tools
This section contains the most used tools in building a map.
- Selection tool simply lets you select an object in the editor view and examine it's different properties. The object you've selected becomes highlighted.
- Move tool [Shortcut: 1] allows you to select an object and move it. You can choose to move it along any single or multiple axises you wish to.
- Rotate tool [Shortcut: 2] allows you to select an object and rotate it. You can choose to rotate it along any single or multiple axises you wish to.
- Scale tool [Shortcut: 3] allows you to select an object and scale it. You can choose to scale it along any single or multiple axises you wish to. This option doesn't support scaling on a global axis.
- Area tool [Shortcut: 4] allows you to select an object's component area and move it. You can choose to move it along any single or multiple axises you wish to.
- Position offset move tool [Shortcut: 5] allows you to select an object and move it's position without touching it's model. This let's you essentially separate the model from the object and have all it's functions work elsewhere, making you unable to interact with the visible model. Be warned that Ctrl + Z will NOT undo the changes made with this tool!
- Scale specific side tool [Shortcut: 6] allows you to select an object and scale it's sides. This lets you choose a side of the object and scale it individually from the chosen point along any single or multiple axises you wish to.
- Vertex snap tool [Shortcut: V] allows you to select an object, choose one of it's vertexes and align it with a vertex of another object. This moves the first chosen object to a new location based on the chosen vertexes without any modifications to it's rotation or scale.
- Snap to grid contains several useful options in it's dropdown menu.
- Snap Z/X snaps your current object's gizmo to both the nearest Z and X grid borders.
- Snap X snaps your current object's gizmo point to the nearest X grid border.
- Snap Y snaps your current object's gizmo point to the nearest Y grid border.
- Snap Z snaps your current object's gizmo point to the nearest Z grid border.
- Reset rotation [Shortcut: Ctrl + R] resets your object's rotation to it's original state.
- Reset Scale [Shortcut: Ctrl + Shift + R] resets your object's scale to it's original state.
- Flip around Z-axis [Shortcut: Ctrl + F] flips your object 90 degrees around the Z-axis.
- Tool configuration contains several useful options in it's dropdown menu.
- Local move [Shortcut: Space] allows you to move an object along it's local orientation.
- Global move [Shortcut: Space] allows you to move an object along the global orientation.
- Screen space move [Shortcut: Space] allows you to move an object along the editor view orientation.
- Move snap lets you change the snap settings for the move tool. You can change the snap distance from here by choosing from preset values.
- Visualize displays the grid as you move your objects.
- Global rotate [Shortcut: Space] allows you to rotate an object along it's local orientation.
- Local rotate [Shortcut: Space] allows you to rotate an object along the global orientation.
- Screen space rotate [Shortcut: Space] allows you to rotate an object along the editor view orientation.
- Wheel rotate allows you to toggle whether your mouse scroll will rotate an object around the Z-axis. It works by the rotation snap and also functions without rotate tool being active by overriding the zoom function. Be warned that every scroll input registers individually so Ctrl + Z will only allow you to undo one rotation snap point at a time!
- Rotate snap lets you change the snap settings for the move tool. You can change the snap distance from here by choosing from preset values.
- Local position offset move is the forced default for position offset move tool.
- Clear position offsets in selection allows you to clear any changes made to an object by using position offset move tool.
- Scale snap lets you change the snap settings for the move tool. You can change the snap distance from here by choosing from preset values.
- Parent transform affects children allows you to move or rotate all children of an selected parent at the same time. This doesn't support the scale tool.
- Insert multiple entities by default allows you to place multiple objects or entities selected from the type tree without selecting it again from there. Toggling this off will allow you to place a single selected object or entity and then deactivates the function automatically.
- Multiple object rotation and scale handling lets you change the rotation and scaling setting for multiple objects at the same time.
- Rotate multiple objects independently allows you to rotate all selected objects by their own gizmos rather than an unique shared gizmo average.
- Scale multiple objects independently allows you to scale all selected objects by their own gizmos rather than an unique shared gizmo average.
- Hide visualizations during dragging allows you to hide all visualization helpers while modifying an object by dragging it, such as it's highlight and gizmo.
- Selection highlight self illumination [Shortcut: Ctrl + H] allows you to toggle whether an object will be highlighted when selected.
- Moving objects changes keyframes too allows you to change an objects keyframes by modifying it in any way. Toggling it off will just make the whole animation be modified.
Camera tools
- View -> Area allows you to assign your current editor view for a selected camera entity. The camera will use the set angle when the player steps into its activation area.
- Area -> View allows you to check the view of a currently selected camera entity.
NOTE: The camera options above aren't used in Shadwen.
Layers
Everything that exists in your map will be sorted on these layers to help editing and filter unwanted selections. You may only edit objects on the selected layer at at time (this can also be disabled by choosing Selection -> Selection filter locking -> Allow selection on active layer only and disabling it). Remember to select some other layer than local which is the default when starting the editor if you're planning to make the changes visible to others as well.
- Prefab layer contains all prefab objects placed in your map.
- Collision layer contains all collision objects placed in your map.
- Art layer contains all art objects placed in your map.
- Lights layer contains all light entities placed in your map.
- Fog layer contains all fog effects placed in your map.
- Props layer contains all props placed in your map.
- Events layer contains all event entities placed in your map.
- AI layer contains all enemies and enemy helpers placed in your map.
- Items layer contains all items placed in your map.
- Audio layer contains all audio entities placed in your map.
- Miscellaneous layer contains everything that doesn't fit into any of the aforementioned layers.
- NoSave layer everything placed on this layer will NOT get saved when saving your map. It's meant for purely temporary modifications so make sure you don't place anything here.
- Local layer everything placed on this layer will be saved but they will only be accessible by you, making others unable to access the changes made to this layer. By definition, all changes will be local only.
Grid
- Toggle grid will toggle the grid visibility on or off while still retaining it's functions.
- Toggle snap to grid will toggle whether objects and entities will snap to the grid. The size of the grid can be changed from Tool configuration and choosing one of the snap options displayed. Holding Ctrl while doing modifications will temporarily enable the opposite option.
- Grid size: -- will allow you to change the visual grid size.
More about grid and it's functionalities can be found here
Editor Options
- All the editor options can be found under *Tools -> Options
- These include various things you can set and all the default options for the tools.
- These can all be customized to suit your need.
Help
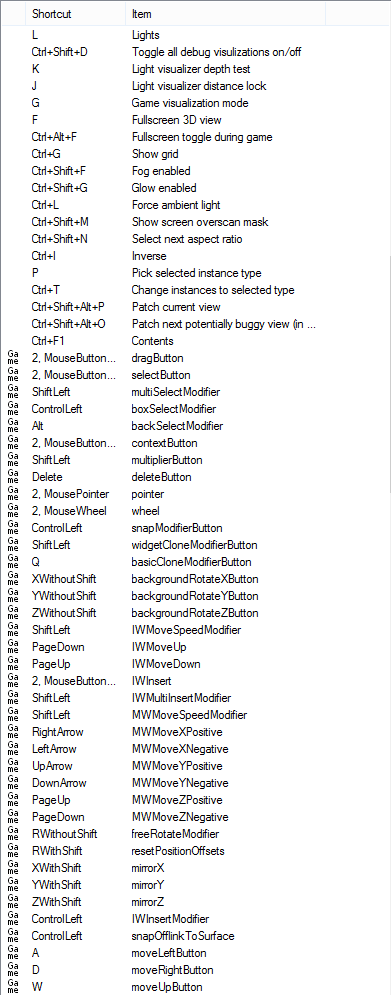
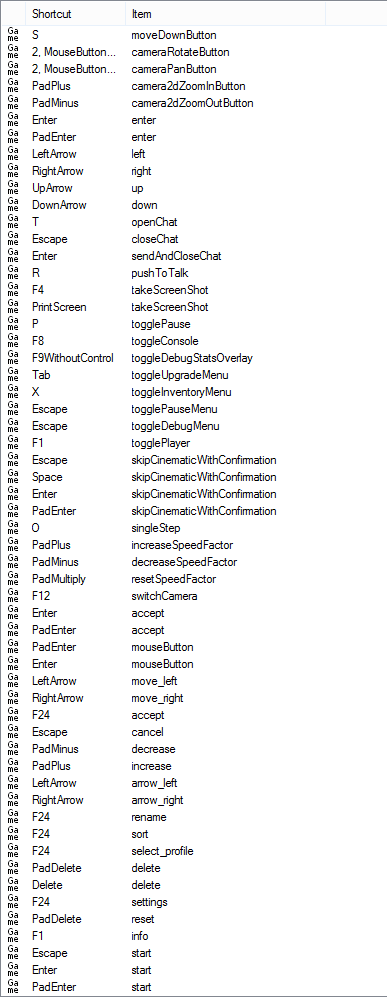
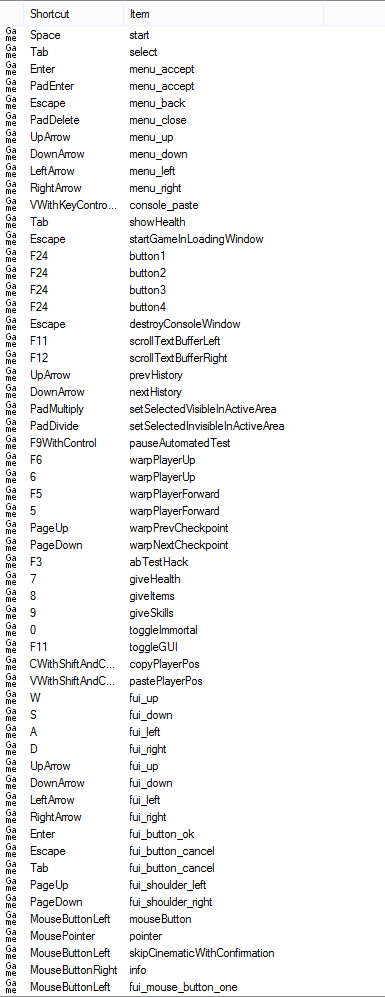
The Help section contains a list of Editor keyboard shortcuts.
Happy face
This happy face is delighted to tell you that you're able to customize your toolbar by dragging the different function bars around!


