3D Asset Workflow: Sway
Jump to navigation
Jump to search
- ◇ Main Steps
- 3D Asset Workflow: Concepting
- 3D Asset Workflow: Sculpting
- 3D Asset Workflow: Retopology
- 3D Asset Workflow: UV Mapping
- 3D Asset Workflow: Baking
- 3D Asset Workflow: Texturing
- 3D Asset Workflow: Asset Assembling
- 3D Asset Workflow: Naming the Asset
- 3D Asset Workflow: LODs
- 3D Asset Workflow: Exporting to Editor
- 3D Asset Workflow: Completed asset checklist
- ◇ Additional Steps
- 3D Asset Workflow: Alternative Textures
- 3D Asset Workflow: Billboards
- 3D Asset Workflow: Blocksets
- 3D Asset Workflow: Collisions
- 3D Asset Workflow: Sikailu
- 3D Asset Workflow: Sway
- 3D Asset Workflow: Tile Textures and Trimsheets
- 3D Asset Workflow: Tintmask
- 3D Asset Workflow: Vegetation
- ◇ General Tips and Troubleshooting
Summary
- This wiki page guides you through the process of how to:
- Create swaymaps
- Make them work in the Editor
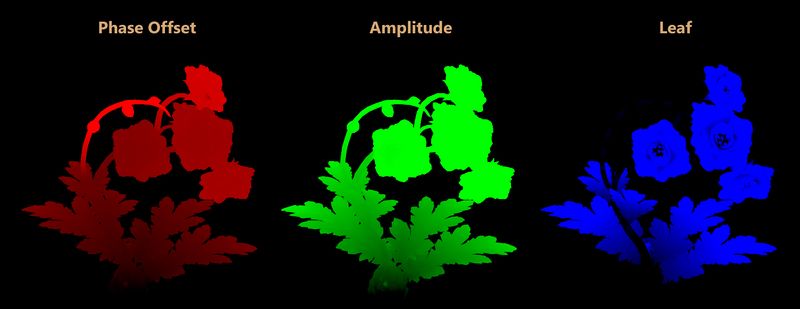
- The sway map is essential for any vegetation or foliage to appear moving in the wind
- The way sway works in Editor is by using vertex color
- Each color channel has a different function, separately they look like in the picture below

Workflow Steps
Creating Swaymaps in Modo
- Note: We use an in-house Modo script for creating sway map, and that is not listed on this public wiki page series
- In essence, you paint phase offsets by hand, create a sway texture map in Substance Painter or Photoshop for the leaves, and the scripts handle the rest
- You select a starting vertex, and the script crawls through the mesh, creating a gradient from root to top
- After this, the leaf texture is transferred to the marked leaves' vertex colors
- You select a starting vertex, and the script crawls through the mesh, creating a gradient from root to top
Checking the Sway in Modo
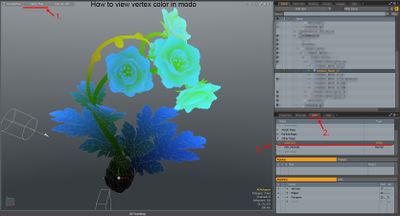
- You can check assets sway vertex colors by:
- Changing the view port to display vertex color
- From the List, select Other maps
- In Other Maps, select the channel that has RGBA type (picture below showing this)
- Black color means less sway, and other colors work like in the picture on the top of this page
- Black color means less sway, and other colors work like in the picture on the top of this page
Second uv channel
- Vegetation needs to have second uv-channel for leaf_map, this enables the leafs to have sway as well
- To create a second uv-channel in Modo:
- Lists → UV Maps click (new map)
- Rename it “leaf_map”
- Right click on the Texture UV channel, press copy, right click → paste to the new “leaf_map” channel
- Now you should have same UVs on both channels
- You might have to do changes in the second UV channel, so that the leaf UV islands are not touching each other, i.e. add padding
- You can have overlapping UV islands, but makes sure leaves have same direction in those cases
- You might have to do changes in the second UV channel, so that the leaf UV islands are not touching each other, i.e. add padding
Backfaces
- All planes that will sway (e.g. vegetation) need to have backfaces
- Simplest way to create these in Modo is to select all the planes' UV islands, copy paste the selection in the Modeling Window, and flip polygons
- Note: Don't merge the vertices of the planes together, they're easier to control that way
- If you need to remove the backfaces, Modo’s “Mesh cleanup” function can do it
Making Changes to Existing Sway Maps
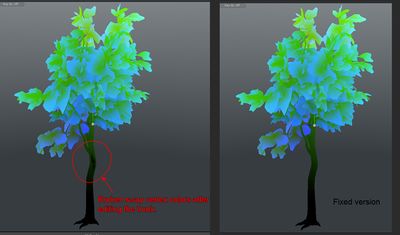
- If you need to make changes to an asset after sway has already been created for it, make sure that the sway and vertex colors still looks correct after your edits
- E.g., welding triangles might break it, and create strong color change on some edge
- For smaller broken vertex coloring issues you can do fixes yourself
- Larger changes might require you to run the scripts again
- Larger changes done after sway can be e.g.:
- Big rotations to branches or leafs
- Big scale changes in the mesh
- To fix those small vertex color issues you need a plugin for Modo, that enables you to pick color from the mesh
- With the plugin you can paint correct vertex colors to any places where the color has broken, by color picking the right color from next to the area that has the colors broke
- You can also use the Sway Creator script to separate the color map into its components, and edit them separately
- Note that if you are editing an fbx, the separate maps function won't work without running Mesh Cleanup with 'Merge Disco Values' only selected
- The separator only works if the map's name is 'ah_swaycolor_complete'
- Tutorial on how to vertex paint in Modo
- Name the vertex color map you area painting on to be "color"
- Otherwise color picking wont work
- Make sure you have the model set to be visible in the item list
- After editing an asset like this, always check in Editor that the sway still works!
How to Make the Assets Sway in the Editor
- Once the swaymaps are done, you need to make them work in the Editor
Part A: Ensure the .fbxmodel resource supports sway to begin with
- Ensure View -> Resources (Ctrl+F4) and Properties (Ctrl+P) panels are open and visible.
- Look for the .fbxmodel resource(s) you want to enable Sway on in the Resources panel and select them.
- Enable AllowVertexColors in the .fbxmodel Resource Properties.
- If it's already enabled and committed, you can skip the rest of this section.
- Reprocess the resource after flipping the checkbox by Right-Click -> Process Resource(s) on the resource in the Resources panel, otherwise the changes may not apply.
- Alternatively File -> Save resources should also reprocess the resource while also saving it.
- Remember to save and commit this change.
Part B: Creating and adding SwayComponent to the .fbxmodel type(s)
- Navigate to the .fbxmodel type(s) in the Types panel.
- Select one of the .fbxmodels you want to add SwayComponents on
- Right-Click and Add component type on the .fbxmodel type in the Types panel.
- In the dialog that opens, search for SwayComponent
- Look for a component that is closest to your needs, e.g. TreeSwayComponent for trees or VegetationSwayComponent for any grassy assets.
- Select the closest candidate and 'then Add and inherit' a new one.
- Note: SwayComponent uses a different naming convention from 3D-assets in the type tree, please name the new component manually to match. E.g. for a set of poplar trees it could be something like a PoplarTreeSwayComponent, or for meadow flower set it could be like a MeadowFlowerVegetationSwayComponent.
- If you're not sure, you can simply "Add" some existing component first and see how they play out before deciding, delete the component from the Type afterwards and repeat the process.
- Ensure the asset works as intended by selecting it from the Types panel and placing it into the scene.
- You can search for the newly inherited SwayComponent variation in the Types panel and tweak settings if needed. Mainly you'll find the Frequency, Amplitude, Direction and Leaf variations of that interesting. You can read more behind SwayComponent or ask animators or level artists for more info or tips.
- Once you're satisfied enough, you can then select all the .fbxmodels in the Types panel you want to apply this to.
- Right-Click the selected .fbxmodels and again Add component type
- In the dialog that opens, search for the SwayComponent variation that was created. Select it and now press Add
- The component has now been added to all the 3D-asset types. You can go through them and ensure they all work.
- Once everything is in order, File -> Save Types
- Commit all the .fbt files that were created or modified.

