Difference between revisions of "3D Asset Workflow: Exporting to Editor"
m (→Subsurface Scattering) |
m |
||
| Line 1: | Line 1: | ||
| + | <div style="border-bottom:2px solid #99aac7; background:#d0def5; padding:0.4em 0.5em; font-size:130%; margin-bottom: 25px; text-align: center; float:top;"> | ||
| + | ⬑ [[3D Asset Workflow]]</div> | ||
| + | |||
| + | <div style="padding-right: 10px; padding-left: 1000px; padding-top: 60px; padding-bottom: 80px;"> | ||
| + | {{#lst:3D Asset Workflow}} <!-- Link list transcluded from main 3D Asset Workflow page --> | ||
| + | </div> | ||
| + | |||
= Summary = | = Summary = | ||
* Exporting and importing your models to the Editor and making sure they work as intended is also an important part of the 3D Asset Workflow | * Exporting and importing your models to the Editor and making sure they work as intended is also an important part of the 3D Asset Workflow | ||
Revision as of 15:41, 28 July 2023
- ◇ Main Steps
- 3D Asset Workflow: Concepting
- 3D Asset Workflow: Sculpting
- 3D Asset Workflow: Retopology
- 3D Asset Workflow: UV Mapping
- 3D Asset Workflow: Baking
- 3D Asset Workflow: Texturing
- 3D Asset Workflow: Asset Assembling
- 3D Asset Workflow: Naming the Asset
- 3D Asset Workflow: LODs
- 3D Asset Workflow: Exporting to Editor
- 3D Asset Workflow: Completed asset checklist
- ◇ Additional Steps
- 3D Asset Workflow: Alternative Textures
- 3D Asset Workflow: Billboards
- 3D Asset Workflow: Blocksets
- 3D Asset Workflow: Collisions
- 3D Asset Workflow: Sikailu
- 3D Asset Workflow: Sway
- 3D Asset Workflow: Tile Textures and Trimsheets
- 3D Asset Workflow: Tintmask
- 3D Asset Workflow: Vegetation
- ◇ General Tips and Troubleshooting
Contents
Summary
- Exporting and importing your models to the Editor and making sure they work as intended is also an important part of the 3D Asset Workflow
- This way the level artists can start using them right away
- E.g. assets with tintmaks should have assigned colors already, so they're not black when taken out of the Type Tree
- If you have any issues with exporting/importing your models to the Editor, check 3D Asset Workflow: Troubleshooting
Exporting Steps
- Preparing the models
- Preparing the textures
- Compressing targa files
- Exporting the models and textures
- Importing the textures to the binary SVN
- Linking the albedo texture from the binary SVN to the model
- Importing the models to the Editor
- Opening the Editor so that it will create the correct resource, type, and meshmaterial files
- Making sure everything works as intended
- Adjusting the models in the Editor (if needed)
Exporting Models from Modo to the Editor
- Rename the UV Set into map1 in Modo
- Modo > Lists > UV Maps > Texture (change the "Texture" word into "map1")
- Make sure all the separate objects have sensible pivots
- In Modo, the origo presents the pivot of the model
- For most models, the pivot should be in the center of the model, but in e.g. doors it should be in the hinges, to make them easier to manipulate in the Editor
- Name the asset correctly - the mesh layer name defines the model name in Editor
- Make LODs
- In Modo, check that there isn't anything extra on the "Shading" and "Clips" tab
- After the scene is prepared and mesh layers are named, apply a material to the meshes by pressing 'M', and name the material in the pop-up
- More info about adding materials in Modo
- Remember the "_mat" suffix for materials, so there are no clashing names
- Modo uses greyed out (number) suffix with clashed names, there shouldn't be any of these in your FBX
- Copy the texture files to the correct binary SVN folder
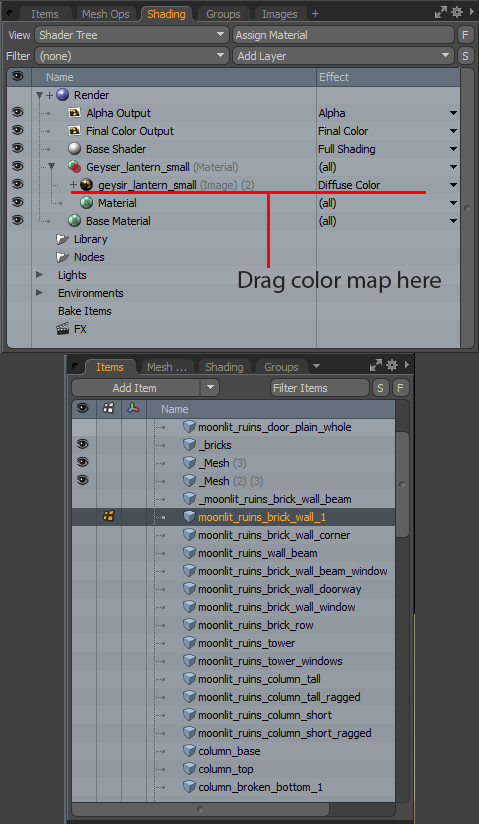
- Then open the Shading tab in Modo, find the material you just created, and click on the dropdown arrow next to the material
- Drag the albedo map only from the binary SVN folder to the material
- Then open the Shading tab in Modo, find the material you just created, and click on the dropdown arrow next to the material
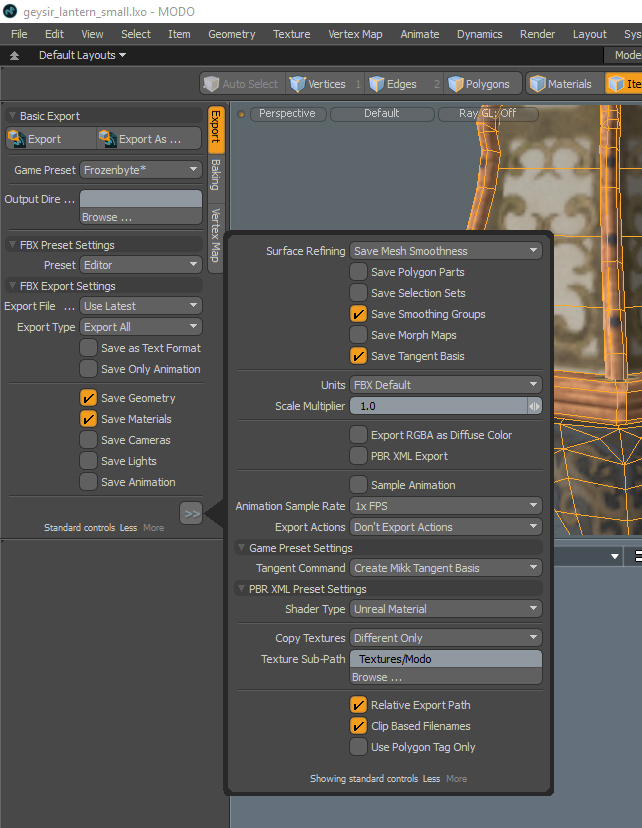
- Export the meshes as FBX from the Game Tools Tab (settings down below)
- Export the FBX to a local folder first, and then copypaste it to the same folder the textures are in
- If you export directly to the binary, the Editor can try to create a _tmp mesh, which is not wanted
Exclusion: Models That Will Be Animated
- Models that will be animated need to be rigged first - thus, the animator will export the FBX to the binary SVN once done
- However, the 3D artist should:
- Export and commit the texture files to the correct place in the project's binary SVN
- Link the texture files from the binary SVN to the model
- Export and commit the model to the workspace SVN
- Tell the animator where to find the model
- Now, when the animator opens and later exports the model, the textures work correctly
Export Settings in Modo
- Export File: FBX 2014 (or 2010)
- Export Type: Export All (when exporting an asset with a broken version, always use Export All or it doesn't work! )
- 'Save as text format' and 'Save only animation' unchecked
- Check only the following
- Save Geometry
- Save Materials
- Save Smoothing Groups
- Save Tangent Basis
- Surface Refining: Save Mesh Smoothness
- Units: FBX Default
- Scale Multiplier: 1.0
- NOTE It's important that the texture maps are named correctly
Importing Models and Textures to the Editor, and Committing
- After moving the textures and models to the project's binary SVN folder:
- Open the Editor
- The Editor will now open a resource and/or type generation dialogue, depending on the files you imported
- If there are files missing from either dialogue, you can press OK, but also check that all the resource files are generated properly
- When importing models for the first time, the Editor will also generate a meshmaterial file for each distinct texture set
- The Editor will now open a resource and/or type generation dialogue, depending on the files you imported
- Check for errors (if there are errors there might be missing items because of changed names etc)
- Go to the Resource window and go through each new added resource file (models, textures, FBX files, etc)
- If you're making a normal 3D asset, make sure that none of the ticks is ticked in the properties
- If you're making a player asset (e.g. Amadeus's conjurable object), make sure AlwaysIncluded is ticked
- Afterwards, save resources from the tiny save icon in the top left of the Resource window, or from File -> Save resources
- CHECK THAT ALL RESOURCES ARE GENERATED!
- Each file you put in should have a resource file associated with it, denoted by the .fbr filetype. This includes .fbxmodel, .tga, .fbx, etc. files
If there are resource files missing, it will generate prompts for other people after you commit!
- If the Editor doesn't create resource files you can try the following to force the resources to generate:
- Restarting the Editor
- Finding the file in Resource window and right-click -> Process resource
- Re-importing the file
- SET RESOURCE AND TYPE PROPERTIES
- Moving objects such as characters, vegetation with sway and other dynamic objects must have static shadows disabled
- This will prevent them from casting static shadows that will not update with the object when it moves
- To disable type's static shadows, find RenderToPasses category from the ModelComponent
- Set EnableStaticPointShadowPass and EnableStaticSpotShadowPass both to 0
- Moving objects such as characters, vegetation with sway and other dynamic objects must have static shadows disabled
- SAVE RESOURCES AND TYPES in the Editor, File -> Save resources, Save types
- Check that the save window contains only resources that you have modified or created
- If there are other resources/types, save only those you have modified, and commit
- Afterwards, run a SVN cleanup, which will purge all local changes that are not committed
- Check that the save window contains only resources that you have modified or created
- Restart the Editor, and make sure the asset works in game before you commit
- Save resources and types if you made any modifications to them
- Commit the modified files on the binary SVN and the workspace SVN. Select commit a couple of folders up from the import folder, (or straight from the root folder, if you want to be sure). Otherwise you might miss some important resource/type files for the directory folders
- The commit window should only contain files and folders you have generated or modified! If there are other things there, leave them unchecked and run revert and cleanup after commit
- Keep the commit window clean, if your commit window has lots of uncommitted stuff all the time it'll be harder for you to notice what new there is and you might miss some important resource files.
- Done! Now everybody should be able to find the new assets in Editor
Adjusting the Model in Editor
- Two ways to adjust the model:
- Make adjustments to the instance, and then apply them to the type
- Add the model to a scene (any scene will do) from the Type Tree
- Click the model, open it's model component properties
- Make needed adjustments to the instance, and Apply them to the Type (right click the property in the model component properties -> Apply to Type)
- Make adjustments straight to the type
- Click the model's name in the Type Tree
- Open model component properties, make changes
- No need to apply them to the type, as this way they go into it directly
- You can preview the changes by hovering your mouse to the scene, but don't add the model to the scene
Emission
- Make sure the meshmaterial has the UseColoredEmissiveTexture and LerpEmissiveWithAlbedo checked in its properties
- From model component properties edit the EmissiveIntensity and EmissiveIntensityFactor
- Make sure the emissive texture map is selected in the mesh material properties' textures array
Tintmask
- 3D Asset Workflow: Tintmask
- Make sure the default settings look good already

