3D Asset Workflow: Texturing: Difference between revisions
Jump to navigation
Jump to search
mNo edit summary |
|||
| (3 intermediate revisions by the same user not shown) | |||
| Line 1: | Line 1: | ||
<div style="border-bottom:2px solid #99aac7; background:#d0def5; padding:0.4em 0.5em; font-size:130%; margin-bottom: 25px; text-align: center; float:top;"> | |||
⬑ [[3D Asset Workflow]]</div> | |||
<div style="border-bottom:2px solid #99aac7; background:#d0def5; padding:0.4em 0.5em; font-size:130%; float:right; margin-bottom: 25px;"> | |||
Next step: [[3D Asset Workflow: Asset Assembling]] →</div> | |||
<div style="border-bottom:2px solid #99aac7; background:#d0def5; padding:0.4em 0.5em; font-size:130%; float:left; margin-bottom: 25px;"> | |||
← Previous step: [[3D Asset Workflow: Baking]]</div> | |||
<div style="padding-right: 10px; padding-left: 1000px; padding-top: 60px; padding-bottom: 80px;"> | |||
{{#lst:3D Asset Workflow}} <!-- Link list transcluded from main 3D Asset Workflow page --> | |||
</div> | |||
= Summary = | = Summary = | ||
* We have our own Frozenbyte shelf where all the '''custom materials''' are added | * We have our own Frozenbyte shelf where all the '''custom materials''' are added | ||
| Line 111: | Line 122: | ||
* Make sure in your brush settings only the normal channel is active, if you forgot to do this and the brush strokes appear on all the channels, you can just adjust the opacity of the layer to 0% in the "Base color" mode and other modes if needed | * Make sure in your brush settings only the normal channel is active, if you forgot to do this and the brush strokes appear on all the channels, you can just adjust the opacity of the layer to 0% in the "Base color" mode and other modes if needed | ||
* Having the normal fix layer in a folder doesn't seem to work | * Having the normal fix layer in a folder doesn't seem to work | ||
=== Tintmask === | === Tintmask === | ||
| Line 155: | Line 163: | ||
== T4 Asset Export Config == | == T4 Asset Export Config == | ||
* The T4 Asset Export Configs should appear automatically to your Substance Painter export settings if you have the Frozenbyte shelf set up [[3D_Asset_Workflow:_Baking_and_Texturing#Adding_a_custom_shelf_in_Substance_Painter]] | * The T4 Asset Export Configs should appear automatically to your Substance Painter export settings if you have the Frozenbyte shelf set up | ||
** [[3D_Asset_Workflow:_Baking_and_Texturing#Adding_a_custom_shelf_in_Substance_Painter|Instructions for adding a custom shelf]] | |||
# Use the export config T4_asset_export(_alphatest/-blend) in Substance Painter | # Use the export config T4_asset_export(_alphatest/-blend) in Substance Painter | ||
#* ''Optional:'' Use the custom layer export script to save layers from the psd-file | #* ''Optional:'' Use the custom layer export script to save layers from the psd-file | ||
Latest revision as of 08:19, 4 September 2023
Next step: 3D Asset Workflow: Asset Assembling →
← Previous step: 3D Asset Workflow: Baking
- ◇ Main Steps
- 3D Asset Workflow: Concepting
- 3D Asset Workflow: Sculpting
- 3D Asset Workflow: Retopology
- 3D Asset Workflow: UV Mapping
- 3D Asset Workflow: Baking
- 3D Asset Workflow: Texturing
- 3D Asset Workflow: Asset Assembling
- 3D Asset Workflow: Naming the Asset
- 3D Asset Workflow: LODs
- 3D Asset Workflow: Exporting to Editor
- 3D Asset Workflow: Completed asset checklist
- ◇ Additional Steps
- 3D Asset Workflow: Alternative Textures
- 3D Asset Workflow: Billboards
- 3D Asset Workflow: Blocksets
- 3D Asset Workflow: Collisions
- 3D Asset Workflow: Sikailu
- 3D Asset Workflow: Sway
- 3D Asset Workflow: Tile Textures and Trimsheets
- 3D Asset Workflow: Tintmask
- 3D Asset Workflow: Vegetation
- ◇ General Tips and Troubleshooting
Summary
- We have our own Frozenbyte shelf where all the custom materials are added
- It is recommended to use these materials when possible to keep a coherent look for all of the assets
- Texturing means using the baked 2D maps to create a textured lowpoly model
- That is achieved by using many materials, masks, and generators etc, to achieve the final look that is wanted
- In most cases, the final asset will have the following maps:
- Albedo Map (with an alpha channel or not)
- Normal Map
- A combined Roughness + Metalness Map
- The Trine texturing style isn't photorealistic, but leans to a more simplified and "playdough-y" art direction instead
- Super noisy and deep fried areas should be avoided, to create a coherent and unified texture that fits and blends in with the other existing assets
- The Frozenbyte Editor supports PBR (Physically Based Rendering), meaning that what you see in Substance Painter is a good indication of what you will get in the game!
Texturing Steps
- Import the baked maps you created in the previous step to the Substance Painter
- Use materials, masks, and generators to achieve the final look
- Paint the masks to reveal the material/color underneath
- Once the textures are ready, export them into targa files
- Use the correct naming
- You may need to open the files once and save them again in Photoshop to compress them - this reduces their file size considerably
- Each separate map is saved to the project's binary SVN
- The location should be the same your model will be in
- Link the albedo map to the lowpoly model
- Note that the linked map should be in the binary, not on your computer locally
- Move onto assembling your model
Texturing can be changed and updated easily later as well, when the asset is already in the game, especially if UV maps will stay untouched
TIP: Always compress your TGA files before committing them to the SVN!
Texturing in Substance Painter
- In the Substance Painter, there are Fill Layers and Layers:
- Fill layers are used for solid colors as well as adding maps/materials
- Most of your work is done with Fill Layers and masks
- Layers are used for painting
- Fill layers are used for solid colors as well as adding maps/materials
- By default, each layer has color, metal, rough, normal, and height channels, which can be turned on and off
- With "C" you can scroll between different channels in the preview window
- With "M" you can see all the channels together
- In the top of the Layers panel, you can change the mode to Base Color, Metallic, Roughness, Normal, or Height
TIP: To disable baked AO showing up on your model, go to Viewer Settings -tab on the bottom of TextureSet Settings panel, and adjust AO Intensity in Shader parameters -> Common parameters
Setting up Channels
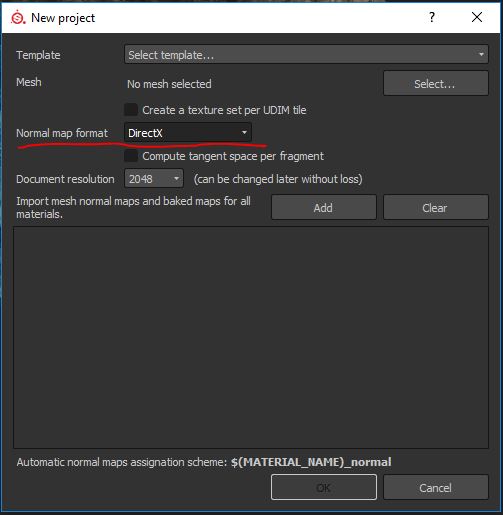
- When creating a project, remember to set 'Normal Map Format' to DirectX
- You can change this later on by going to Edit -> Project configuration
- This flips the green channel of the Normal Map, so it will work correctly in our Editor
- The Normal Map's green channel can be flipped later in Photoshop as well, if needed
- To add channels, click on the small '+' icon in the TextureSet Settings window
- To remove channels, click on the small '-' icon in the TextureSet Settings window
- Channels that are usually needed:
- Base color - albedo
- Roughness
- Normal
- Metallic
- Emissive - if your model has parts that are self-illuminated)
- Height - Substance Painter bakes the height map into the normals, so this should be enabled to get most out of the materials even though our Engine doesn't support heightmaps/displacement
- (Displacement, If you want to preview height/displacement on your mesh, you'll need to add this channel and enable parallax occlusion mapping in Viewer settings. Height doesn't directly convert to displacement, so you'll have to find a workaround)
- Most of the time you will need only 3-4 maps: Base color, Normal, (Metallic), Roughness
- NOTE If you use a larger document size while editing, remember to check the correct size every once in a while
- You might lose a lot of detail when you export your final texture size, if you only work on the higher resolutions
- The switch between resolutions is lossless, so there's no harm in doing it
Setting the Base Materials
Folders and Layers
- The layer structure works similarly to Photoshop, and you can apply a mask to the folder
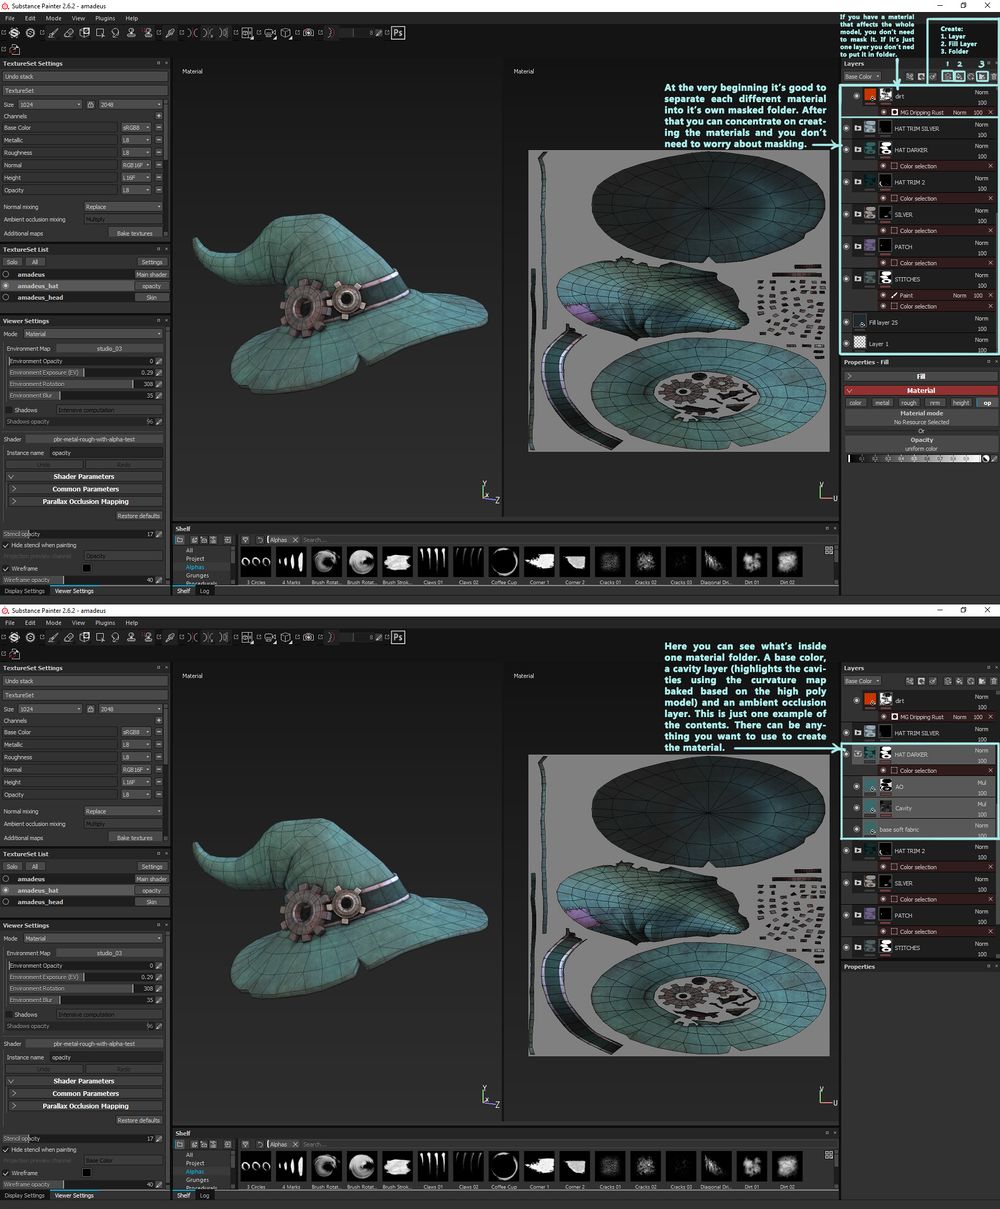
- Separate each material area of the asset with a Fill Layer that is put inside a folder, and create a mask for that folder
- Use the mask to define the area where that material is used
- You can select the areas from the UVs to mask, but the easiest way is to bake a color ID map (based on the high poly model's colors in Zbrush)
- After baking the color ID map, you can use it in Painter to mask each area - the colors can be crazy and loud, to better use them for masking
- How to add the base colors
- Add a Fill Layer by clicking the button on top of the Layers window
- Add a Folder by clicking the button on top of the Layers window
- Drag and drop the Fill Layer into the folder
- Name the folder and layer, e.g. Folder: skin/hair/metal/etc, and Layer: base color
- In the Fill window, adjust the Base color you want to use
- You can also adjust the overall Metallic and Roughness from the Properties - Fill window
Masking
- With the Fill Layer selected, click the Configure Mask button on top of the same Layers window
- You can either select UV islands/polygons/models to make the mask, or use a baked color ID map:
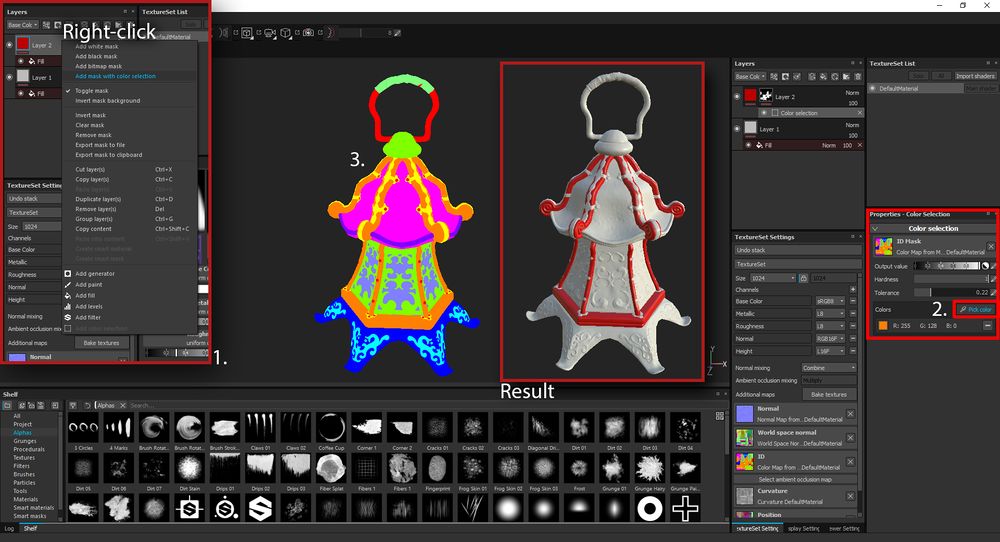
- Choose the Add mask with color selection - this let's you use the color ID map you have assigned in the TextureSet Settings window
- In the Properties - Color Selection, decide what area of the model you want to pick for this layer by clicking the Pick color and use the eye dropper to pick the color from the model or the UV texture map
- Raising the tolerance value gets rid of gaps on the mask edges, but too high values makes the mask bleed to other colors
- The end result is a mask based on the color in the color ID map
- In this example, the rest of the mesh is grey, and the area inside the mask is red as the mask prevents the red color filling the whole mesh with red
- Now you can change the red into any color you want and add layers and generators and smart materials etc, to get the material done
- Choose the Add mask with color selection - this let's you use the color ID map you have assigned in the TextureSet Settings window
- Once you have your folders set up and masked, you can add materials and paint as you like
Smart Materials
- You can download user made Smart Materials, masks, etc from Substance share website, or make your own
- Smart Materials are basically layer stacks contained in folders, so it's easy to make your own
- Once you have created a material by layering base materials, effects etc, group them up in a folder (select all and Ctrl + G)
- Name the folder, right click it and select 'Create Smart Material'
- You'll have a new Smart Material with the name of the folder you just made, with all the layers and settings intact and saved, which you can use freely in other projects
- Experiment with adding more filters to the mask stack in addition to the color selector
- You can do a lot of the same stuff as with regular layers (blending modes, texture fills, etc), and achieve some complex results
Normals
- If the Normal Map isn't showing (you can press C until you see the normal map to see if it works):
- You'll need to add a Fill Layer and drag and drop the normal map from the Shelf -> Textures to the Properties - Fill Normal channel
- Turn all the other channels off for this layer from the same panel
- In the TextureSet Settings use the setting Normal mixing: Replace
- If you want to paint on the normal map, create a new layer and go to the Normals mode in the Layers panel, select Normal layer style to paint over. The default "NMdt" layer style means that it mixes the layers' contents but the "Normal" layer style goes on top of everything
- Make sure in your brush settings only the normal channel is active, if you forgot to do this and the brush strokes appear on all the channels, you can just adjust the opacity of the layer to 0% in the "Base color" mode and other modes if needed
- Having the normal fix layer in a folder doesn't seem to work
Tintmask
Texture Details
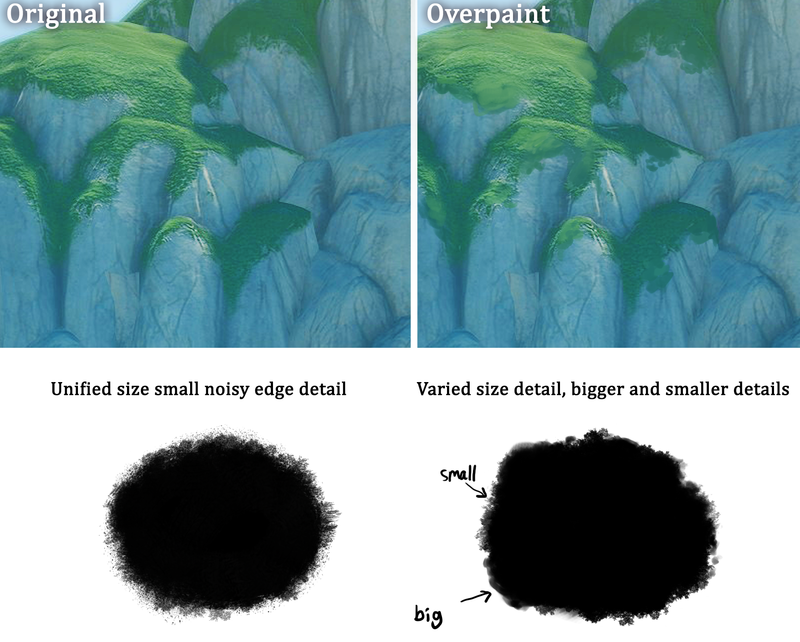
- In the Trine Style, the texture details shouldn't be too noisy and sharp - i.e., not super realistic, but more stylized
- The aim is to have clear readable forms and the textures should also support this
- As with everything, also with the texture details the variation is key to appealing looking assets
- Make sure to use varied sized details in textures too
- Big, Medium, Small
Adding a Custom Shelf in Substance Painter
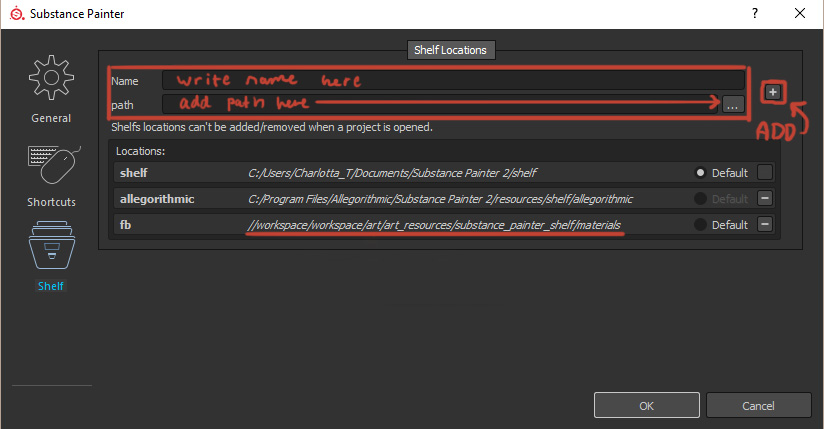
- We have our own Frozenbyte shelf where all the custom materials are added
- Most of these custom materials are done by our former employees, Juha Kinnunen Antti Heikkinen
- It is recommended to use these materials when possible to keep a coherent look for everybody's assets
- How to add a custom Shelf
- Edit -> Settings -> Shelf
- Add Name & Path and click the plus button & OK
- Now you should be able to find the materials in that folder every time you use Substance Painter and if new materials are added there, they should appear automatically
- NOTE: Don't mark the Frozenbyte self as the "Default" then you might accidentally save changes to it
- "Default" means that's the self you'll be able to make modifications like add, edit and delete stuff so it's better to have your local shelf as the default unless you want to make changes to the Frozenbyte shelf
Exporting
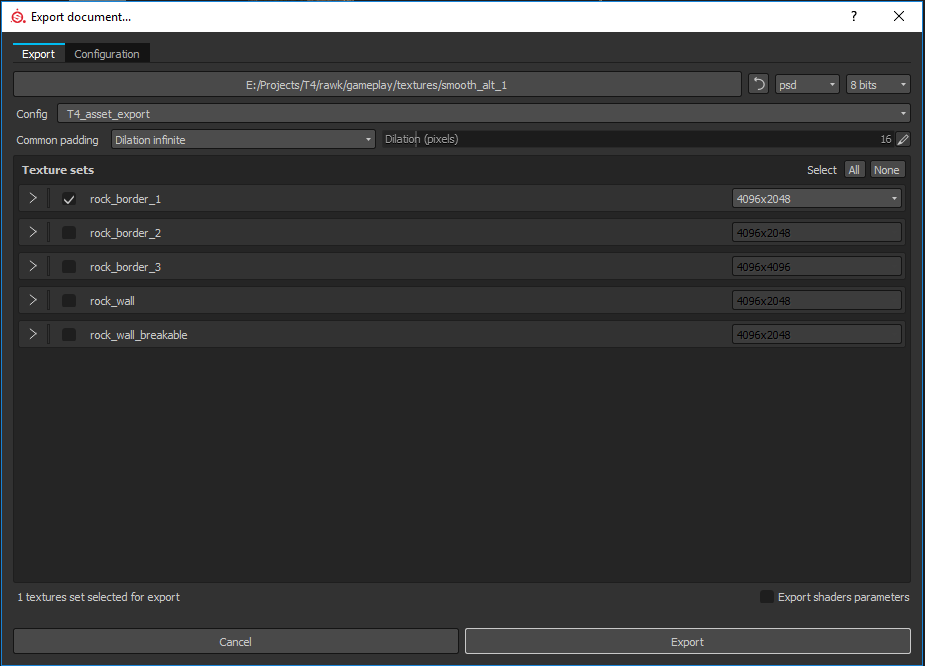
- Once you have finished texturing, go to File > Export textures, or Ctrl+Shift+E, or right click on the scene and choose Export Textures
- In the export dialogue, change the texture size to the size you want the final texture maps to be
- Point the file path to the right folder location
- File format: Up to you which one to use, either one is easy to convert to the other
- Targa (You'll get all the maps as separate textures, ready to use')
- TGA is used for game texture files, can also be used for storing textures to workspace SVN
- PSD (Will export all the maps into one psd-file as layers)
- PSD can be used to store workfiles in the workspace SVN
- If you're exporting alpha textures as PSD, use the custom export config 'T4_asset_export_alphatest/-blend (PSD)'
- Painter doesn't export alphas made with our workflow into PSD, so these make it into a separate layer
- Targa (You'll get all the maps as separate textures, ready to use')
- When the final resolution is small (1024 or under), it is better to have the working resolution larger than the export resolution
- This results in smoother textures, since the materials are generated at a high resolution and thendown scaled to the export resolution
- Doing this at high resolutions is a bad idea, since 2k and above working resolutions require a lot of computing power and the downscale advantage will be close to nonexistent
T4 Asset Export Config
- The T4 Asset Export Configs should appear automatically to your Substance Painter export settings if you have the Frozenbyte shelf set up
- Use the export config T4_asset_export(_alphatest/-blend) in Substance Painter
- Optional: Use the custom layer export script to save layers from the psd-file
- The Substance painter export config T4_asset_export names your maps automatically for use with the Frozenbyte Editor
- Make sure your texture set name is set to whatever you want your textures to be called (e.g. sample_asset_mossy_mat)
- To change texture set names, right click on a texture set, and select Edit name
- The export config then automatically packs the channels, and adds proper suffixes
- After texturing your asset, press Ctrl+Shift+E to export your materials (see image below)
- Config: T4_asset_export(_alphatest/-blend)
- Note: To get the sub surface scattering (sss) map exported with this config, you'll need to export the textures in tga format, it doesn't work for the psd format
Channel Packing
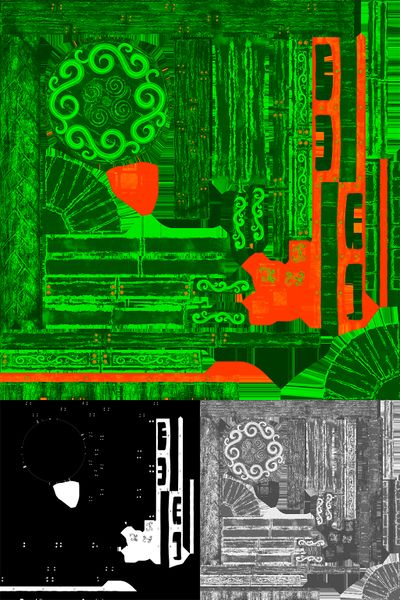
- Channel Packing = taking one or more gray scale imagesm and pasting them into a single image file's color channels
- A shader then looks up the color channels and decides which one to use
- This saves texture memory and reduces clutter in the folders
- The Frozenbyte Editor has support for a combined metallic + roughness map
- Use the red channel for metallic and green channel for roughness
- Channel packing will happen automatically when using the export config T4_asset_export, so in most cases you shouldn't have to do it by hand
PSD Layers to Files
- Install this script into your Photoshop scripts folder (\Program Files\Adobe\Adobe Photoshop CC 2018\Presets\Scripts).
- Export layers, no prefix: \\workspace\workspace\art\art_resources\layer_export_script
- The script is a slightly modified version of Photoshop's own export layers to files -script
- It's the same as the original, but it will not create any unwanted prefixes
- Open your exported PSD file in Photoshop, and go to File -> Export -> Layers to files No Prefix...
- In the window that opens, set your destination folder, make sure File name prefix is empty, and set file type to Targa 24bit
- Now you have your textures ready to import into the Editor
- NOTE: Alphatest and alphablend albedo textures will need to be saved separately as 32bit Targa to preserve their alpha channel
- NOTE: Always compress your targa files to reduce their file size!
Channel packing by hand in Photoshop
- Open both metallic and roughness maps in Photoshop
- Copy either of them
- Go to the other map's channel list. It's the tab next to 'Layers' on the layer stack.
- If there is only one channel that says "Index", go to Image -> Mode -> RGB Color
- Select the correct color channel and paste the copied map there
- R=Metallic, G=Roughness, B=black
- Select the blue channel and fill it with black
- Done!
Naming Conventions
3D Asset Workflow: Naming the Asset#Naming Conventions for Textures
- Using T4 Asset Export Config should take care of the suffixes for you, but make sure the base name is done correctly