Difference between revisions of "3D Asset Workflow: Baking"
m (→Baking Settings) |
m |
||
| Line 1: | Line 1: | ||
<div style="border-bottom:2px solid #99aac7; background:#d0def5; padding:0.4em 0.5em; font-size:130%; margin-bottom: 25px; text-align: center; float:top;"> | <div style="border-bottom:2px solid #99aac7; background:#d0def5; padding:0.4em 0.5em; font-size:130%; margin-bottom: 25px; text-align: center; float:top;"> | ||
⬑ [[3D Asset Workflow]]</div> | ⬑ [[3D Asset Workflow]]</div> | ||
| + | <div style="border-bottom:2px solid #99aac7; background:#d0def5; padding:0.4em 0.5em; font-size:130%; float:right; margin-bottom: 25px;"> | ||
| + | Next step: [[3D Asset Workflow: Texturing]] →</div> | ||
| + | <div style="border-bottom:2px solid #99aac7; background:#d0def5; padding:0.4em 0.5em; font-size:130%; float:left; margin-bottom: 25px;"> | ||
| + | ← Previous step: [[3D Asset Workflow: UV Mapping]]</div> | ||
<div style="padding-right: 10px; padding-left: 1000px; padding-top: 60px; padding-bottom: 80px;"> | <div style="padding-right: 10px; padding-left: 1000px; padding-top: 60px; padding-bottom: 80px;"> | ||
Latest revision as of 09:19, 4 September 2023
Next step: 3D Asset Workflow: Texturing →
← Previous step: 3D Asset Workflow: UV Mapping
- ◇ Main Steps
- 3D Asset Workflow: Concepting
- 3D Asset Workflow: Sculpting
- 3D Asset Workflow: Retopology
- 3D Asset Workflow: UV Mapping
- 3D Asset Workflow: Baking
- 3D Asset Workflow: Texturing
- 3D Asset Workflow: Asset Assembling
- 3D Asset Workflow: Naming the Asset
- 3D Asset Workflow: LODs
- 3D Asset Workflow: Exporting to Editor
- 3D Asset Workflow: Completed asset checklist
- ◇ Additional Steps
- 3D Asset Workflow: Alternative Textures
- 3D Asset Workflow: Billboards
- 3D Asset Workflow: Blocksets
- 3D Asset Workflow: Collisions
- 3D Asset Workflow: Sikailu
- 3D Asset Workflow: Sway
- 3D Asset Workflow: Tile Textures and Trimsheets
- 3D Asset Workflow: Tintmask
- 3D Asset Workflow: Vegetation
- ◇ General Tips and Troubleshooting
Contents
Summary
- Baking means transfering the high poly mesh's information to a 2D texture map
- This way you get the details of the dense highpoly mesh in a much more optimized form, that can be used in real time in the game
- Baked maps are used when texturing the model
- We use Substance Painter for texturing
Good sites for more Substance Painter info:
Baked Texture Maps Terminology
Baked Texture Maps Terminology
- Normal Map
- Normal map has all the sculpted detail information in it
- Tips for normal maps: No more wrong Normal Maps
- World space normals
- Is used by many masking generators
- Color ID Map
- The Color ID map will be baked based on the vertex colors of the high poly mesh
- The Color ID map is super useful in masking different material areas - use it whenever your object has more than one material
- AO Map
- Ambient Occlusion creates occlusion shadows that bring out the depth and shape of the model better
- Curvature Map
- You can use curvature map with many generator masking techniques in Painter
- Curvature map has cavity and convexity
- Make sure to always bake the World space normals map at the same time you bake the curvature map, as it'll use the World space normals to create the curvature map!
- Position Map
- You can use the position map for example for making an axis based gradient on the model
- Thickness Map
- Thickness map can be used to create subsurface scattering on for example skin and plants
Baking Steps
- Prepare your highpoly and lowpoly models for baking by making sure they're named correctly, and that their scales and positions match
- Bake your model
- If needed, make a cage
- Use the baked maps to texture your model in Substance Painter
Exporting the UV mapped Lowpoly Model from Modo
- At this point, you should have a finished highpoly mesh, and a finished (but untextured) lowpoly mesh with UVs
- Make sure the mirrored UV islands are not on top of each other
- Apply a material to your mesh
- With the mesh selected, press 'M' and type in a name
- Substance Painter's export config will name the files based on the texture set name
- In case you have multiple UV sets, you need to add a separate material for each of them
- Delete all the other materials from the Shaders tab, if there are any
- If needed, triangulate the meshes for better baking results, but keep the nontriangulated mesh saved
- It's easier to edit the non-triangulated mesh, and as a general rule, animated meshes should never be triangulated when they're sent to the animators
- Remember to tick Save Materials when exporting
FBX Export Settings
- Select everything
- Export the layers using the same settings when exporting to Zbrush, except remember to additionally select the following:
- Save smoothing groups
- Save tangent basis
- Save materials

- Go to the Modo's Game Tools tab, and select the following settings & export the FBX:

Starting a New Project on Substance Painter
- Open Substance Painter and create a new project (File > New)
- Click Select and find your lowpoly mesh, then select a document resolution and click OK
- The resolution can be changed later without quality loss - bigger is more exact, but can get slow in complex scenes
- Click Select and find your lowpoly mesh, then select a document resolution and click OK
- If you have baked texture maps externally, select and add all the texture maps - if not, you can bake them in Substance Painter
- Normal, AO, and color ID maps
- Adjust the document resolution to the right size
- Select DirectX as the normal map format (see image)
- Normal map format can be changed later by going to Edit -> Project settings
- Select DirectX as the normal map format (see image)


Baking
Related: General tips: Lowpoly/UVs/Baking
- You can use xNormal, Substance Painter, Substance Designer, or Marmoset Toolbag for baking the texture maps for the 3D asset
Baking in Substance Painter
Baking Order
- It's good to first test baking just the normal map, and see if everything works on lower settings
- This way you don't have to wait for very long while a lot of stuff is baking, only to see that there are e.g. artifacts
- You can bake all the maps at once except the Color ID, Thickness, and the Ambient Occlusion, as they have different common settings
- Baking order:
- Normal first on lower resolution to check that everything works
- Normal (if it still needs re-baking), World space normal, Curvature, Position
- Color ID and Thickness if needed
- Ambient Occlusion
Baking Settings
- Even if you have the basic maps baked outside the Substance Painter, you might need to bake some extra maps that the Substance Painter uses for the mask generators etc
- Most of the settings with explanations can be found at the Substance Painter Documentation, but here are some recommendations:
- In Texture Set Settings, select 'Bake textures'
- Click on the document icon next to 'Highpoly meshes' and select your highpoly
- Output size should be relative to your final texture size
- You can bake additional maps (based on the Normal Map) in Painter to help with texturing, just remember to adjust the resolution
- Dilation weight is the same as padding, e.g. 4
- In Texture Set Settings, select 'Bake textures'
Common parameters
Common parameters
- Diffusion: On (Except for the Color ID and AO Maps)
- Ignore backface: On
- Match: By Mesh Name
- Anti-aliasing: Subsampling 8x8 (consider lowering for AO, Color ID, and Thickness, e.g. 4x4)
- High/Low poly mesh suffix: Whatever you used when naming the meshes
- Dilation: 16 (2-4 for the Color ID Map)
- First bake only the Normal Map and test that everything works - if there are any issues, check the Troubleshooting

Color ID Map
Color ID Map parameters
- Color Source: Vertex Color (if you used polypaint to mask mesh parts)
- Common Parameters:
- Diffusion: Off
- Anti-aliasing: Sub-sampling lower than usually, for example 4x4
- Dilation: 2-4
Ambient Occlusion Map
Ambient Occlusion Map parameters
- Self Occlusion: By Mesh Name
- Ignore Backface: On
- Common Parameters:
- Diffusion: Off
- Anti-aliasing: Sub-sampling lower than usually, for example 4x4

Thickness Map
Thickness Map parameters
- Self Occlusion: By Mesh Name
- It's a good idea to bake AO and Thickness separate from the other maps and with a lower AA setting, since they take a lot of time to bake
- Common Parameters:
- Diffusion: Off
- Anti-aliasing: Sub-sampling lower than usually, for example 4x4
Position Map
Position Map parameters
- If you want to add a gradient on Y axis (from top to bottom) to the whole mesh:
- Mode: One axis
- Axis: Y
- Normalization: BBox

Baking Opacity Maps in Substance Painter
- Once you have sculpted something you'll need a transparent background for, add a plane behind it in ZBrush/Modo
- Duplicate the plane, fill it with a vertex color, resize it a little bigger and place it between the lowpoly plane and the highpoly sculpt
- It doesn't matter what this vertex color plane's size is, as long as it is bigger than the lowpoly plane
- If it's any smaller than the lowpoly plane itself, the uncovered portions of the lowpoly will not be transparent in the baked Opacity Map

- Merge the vertex color plane with your highpoly sculpt, so that they will be exported in the same highpoly FBX file
- Once the highpoly object and the vertex color plane are used for the baking in Substance Painter, it's possible to assign a transparent background for the object
- A problem with this method is that you won't get a proper edge padding around the leaf, but it will be created around the plane
- This can be solved by texturing the whole plane using the same Substance Painter layer, meaning that you have all of it's vertex colors/Color ID Map colors assigned with Color Selection
- You can also handpaint some of the areas surrounding the object, if needed
- In the image below, you can see what the diffuse around the leaf looks like - it will serve it's purpose as a padding

- If you are not getting the Opacity Map exported the way intended in Substance Painter, you might need to create a white Fill Layer, with only the Opacity Channel activated and create a Black Mask with Color Selection

Troubleshooting
- If your maps show as black or as a weird mess you might have your scale wrong
- Check that the naming is correct, note that capitalization matters
- Import your high and lowpoly meshes into the same scene and compare them, to see if their scales match
- Marmoset Toolbag is great for this, since it can load the highpoly mesh quicker than Modo
- If your map has artifacts, holes, or other problems
- Make sure the mirrored UV islands are not on top of each other Mirrored UVs in Substance Painter
- In case you'll bakes have some weird shading in them, try triangulating those parts, or the whole mesh
- Have the lowpoly mesh triangulated in Modo (shift+T) before baking, but save a non triangulated version too in case the mesh needs to be edited
- In case you use a triangulated mesh for baking, the same mesh should be also the one that is used in the game (excluding animated models)
- Remember to update vertex normals after triangulating
- In any case, have a non-triangulated version in the Modo file when committing the workfile to the workspace SVN
- You can keep the triangulated version in the same file on a separate layer
- Blurry Color ID map? Substance Painter not detecting the highpoly mesh?
- Solution: Color Map From Mesh Produces Blurry (Unusable) Results
- Have the lowpoly mesh triangulated before baking
- Don't use Apply Diffusion in SP baking common parameters panel
- Don't use big Dilation (padding), it should be 2-4
- If the Substance Painter crashes during exporting, this might help
- Curvature Map not showing all the detail that should be there? Make sure to always bake the World Space Normals Map at the same time you bake the Curvature Map, as it'll use the World Space Normals to create the Curvature Map
Cage
- If the bake comes out with problems like transparent holes or weird looking artifacts/other bake errors:
- You can first try to fix the problem without a cage in Substance Painter
- In some cases without cage you can get transparent areas to the ID bake (easiest to notice) and other bakes
- It might help to slightly change the max frontal & rear distance, for example from 0.01 -> 0.03 but if this is too much there will be artifacts
- If adjusting the max frontal & rear distance doesn't help, you'll need to use cage
- Often if the model has small gaps etc a cage is needed for a clean bake
- The cage is an inflated version of the model that covers the actual model, and lets the baking program know where the mesh starts and ends
- The cage should be done after the mesh is finished and has the UVs and everything, the cage should have the exact same UVs as the actual model
- You can use Modo's deformation tool Push for making the cage of the mesh:
- Duplicate the model on new layer (all layers need to be merged so there's only one layer) & use push to inflate it so that the high poly mesh is mostly covered with the cage mesh
- Make sure not to inflate too much, try to keep the cage as small as possible so that it neatly covers the high poly and doesn't go inside itself in any tough spot
- If the cage goes inside itself or doesn't cover enough, you can edit it by moving the vertices around by hand. This is pretty much always the case when a cage is needed for a clean bake.
- A good starting point is to cover most of the mesh using push but then adjust the rest by hand
- ATTENTION! If your model has several texture sets, each set should have a separate cage and the maps need to be baked in Painter one at a time for each texture set

Baking in xNormal
https://xnormal.net
- XNormal is good for baking transparency/alpha, because it has many different baking options for it
- The software looks old and funky, but is still used in the industry by many artists due to its reliability
- When baking a normal map use setting -Y, because the inverted way is used in our Editor
- When baking a color id map you might want to use Antialiasing x1 to create crisp edges for masking in Substance Painter
- It is highly recommended to triangulate your lowpoly and cage mesh for XNormal
- Otherwise you might get errors in the bake
- Remember to change the file name after a successful bake
- Otherwise it will overwrite the file if you bake another map with xNormal
Baking Opacity Maps in xNormal
- Images below show how to bake opacity maps with XNormal:


- When baking opacity, set the texture resolution one step higher than what it should be for the asset you are making
- After baking, reduce the size of the baked opacity to the correct size
- This gives you smoother edges to the alpha map, because Photoshop does a good job of smoothing when sizing down pixels
- Remember to also have no padding in your opacity bake!
- After the bake you will have to also delete the alpha channel from the texture for it to work properly in Substance Painter
- Delete the alpha channel from the baked highpoly base texture map, too
- Picture below shows how to do that
- In Photoshop it's also handy to now make an inverted alpha map for Modo
- Below pictures show steps for that, too
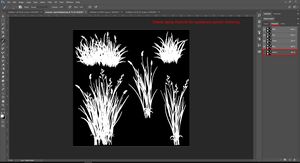
Delete alpha channel
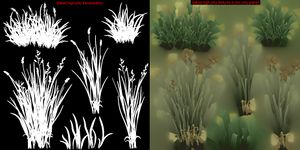
Two maps baked with Xnormal from HP
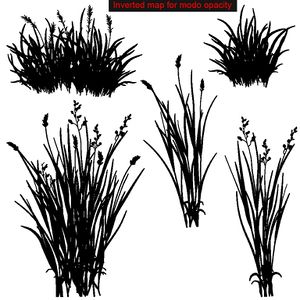
Inverted opacity map for Modo
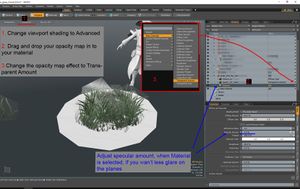
How to view opacity in Modo


Baking Vertex Colors in xNormal
- Related: 3D Asset Workflow: Vegetation
- If you are not using textures from the highpoly model, but want to bake vertex colors, XNormal can do that too
- You can also do it in Substance Painter - in it the vertex colors will be baked to the ID Map slot
- Make sure you have padding on
- Without padding, wrong colors will bleed to the edges of the transparency map, when e.g. the vegetation switches to LOD
- Pictures below show how to bake vertex color with XNormal:


Adding an Externally Baked Opacity Map to a Substance Painter Project
- Add opacity channel from the small plus icon at the Texture Settings panel
- Select the shader "pbr-metal-rough-with-alpha-test" at the Viewer Settings panel
- Select the right texture set in which you want to add the opacity from the Texture Set List panel
- Import the Opacity Map by dragging it in the Texture Shelf
- Opacity Map is a black and white map, in which the white will be visible, and the black will be transparent
- Add a Fill Layer from the Layers Panel
- Leave only the "op" Opacity Channel active from the Properties - Fill Material panel
- Drag and drop the alpha map from the Texture Shelf to the Base color button at the Properties - Fill Material Panel
- Notice that the Opacity will not be working if you check the different channels using "C" - it's only visible in the material mode "M", where you can see all the channels combined


