3D Asset Workflow: Retopo and UVs
- Previous workflow phase 3D Asset Workflow: Sculpting
- Next workflow phase 3D Asset Workflow: Baking and Texturing
- This site is a part of a series of 3D asset creating process related wiki sites 3D Asset Workflow
- For retopo & UVs you'll probably find a lot of useful general info on the Modo site
- You might find these sites useful too:
Contents
Retopo
- Retopology means creating a low-poly mesh based on the high-poly sculpt
- It's like creating a low-density shell on top of the high density sculpt
- We use Modo for this work phase.
- In retopo it's very important to keep the scale of the object in mind so that the mesh is not too low resolution nor too high resolution
- The topology should be optimal, not too dense so it'll needlessly burden the performance nor too low so that it'll look too angular and like it came from a 90's 3D game
- Notice that we are usually not making mobile games but games for PC and gaming consoles
- So the low poly models shouldn't be super low poly if polygons are needed to make the round shapes look nice and curvy without blocky silhouette
- Use as much polygons as needed to achieve a good looking model but don't add polygons to areas where they aren't needed
- You'll need to also consider the baking while retopoing, some smaller details can be flat in the retopo as the normal map will do the work but some bigger forms will need to be seen in the silhouette of the low poly as well
- The low poly model is the one that ends up in the game so it must be neat
- It's good to keep all the models of one environment asset set in one Modo file
- For example if you have a big set of furniture for a specific level, keep them all in one Modo file
Retopo Workflow
- Once your sculpt is exported from Zbrush (Exporting from Zbrush) it's time to retopo the models.
- Retopo the sculpt using topology tools and basic modeling tools or start with a decimated triangle mesh and optimize and clean it up.
- You can of course use both methods partially in one mesh.
- Think carefully if you should mirror some of the UVs or not, avoid the butterfly effect at any cost, but you can save some texture space by mirroring areas that aren't so easily noticed, if the mirroring doesn't really save UV space so much, it's better not to mirror.
- Add hard edges using the Vertex Normal Toolkit. Usually hard edges need to be added for any angle 90 degrees or more (be it outwards or inwards turning angle).
- Once the model is ready and has hard edges assigned it's time to make the UVs.
- You can use the hard edges as selection set when making UVs, just select all the hard edges with the one button and you already have some of the UV seams selected.
- If there is a hard edge in the model, it should always also have a UV seam on it.
- Make sure the texel density is right with the Texel Density Toolkit.
- Once the UVs are done check that there is only one texture on the Lists -> UVMaps area (the model can have several texture maps/materials, but this is the UVs, a different thing).
- In the end it's good to check that there are no holes nor n-gons (polygon with more than 3 or 4 vertices) in the mesh and perform the Mesh Cleanup command.
- But be careful, the Mesh Cleanup merges the vertices that are in the same position, so if you have duplicated alpha planes (in a tree foliage for example), they'll be merged.
- Add a material/materials if needed. The materials added in Modo will each be separate texture sets in the Substance Painter.
- The final Modo file should have all the assets on right layers, named properly and without any extra stuff.
- Keep the model's polygons quads as it'll be easier to edit if needed, our editor can deal with quads and triangles with no problem.
- If there is extra stuff on the mesh list but you want to keep it, add a "_" in the beginning of the name, then our editor will ignore it.
- Make sure there are no extra materials on the shader tab nor images on the image tab, just the one diffuse/albedo map in the end (once you are done with the texturing and are doing the FBX export for the game editor).
- Make the final work file as described above, but in case the mesh seems to be working much better triangulated than as quads: make a separate file for baking where the meshes are triangulated (Shift+T) for better baking results but do not triangulate the meshes in the final Modo file!
- In this case the final model exported to the editor needs to be triangulated as well, and the triangulation must be the same to avoid shading errors.
- But in case it seems that the mesh works fine in baking as a quad mesh, there is no need to triangulate it in any phase.
- You can also triangulate individual quads if needed and those can be left as triangles for good in all the files
- In short: if you need to triangulate the whole quad mesh, keep the Modo workfile safe, of course if there was no quad mesh to begin with, you can have the work mesh as triangle mesh at all times.
- Then it's time to bake and make textures.
- You might need to do a cage model for a trickier model, cage is an inflated version of the model that covers the actual model and lets the baking program know where the mesh starts and ends.
Importing
Retopo in Modo
- Check Modo for more detailed info on Modo's configuration, modeling tools and hotkeys
- Check especially the Topology Tools section
- You should now have a hi poly reference mesh in your Modo scene
- Create a new mesh layer and name it as [partname]_[suffix], where [partname] matches with the name you gave to the subtool in Zbrush and [suffix] is similar to the one we used in Zbrush, but different from that (e.g. _lp or _low).
- For example, if you want to retopo a part which was named as 'Hobbitfoot_hp' in Zbrush, you should name your mesh layer as 'Hobbitfoot_lp'. Note that the naming is case sensitive

Two ways to retopo
- More detailed info at Topology Tools
- Retopoing by hand: Nice and clean mesh that is easy to UV and that deforms nicely in animation
- Zbrush generated triangle mesh aka "Triangelihuttu" quick and dirty method for assets that don't need to have nice quad geometry
- Here you can see the both retopo results, most of the owl model is made with the hand made topology but the wing feathers are made with the triangulated mesh method as the form is very organic and there is no need to deform the feathers radically:

Retopoing by hand
If you have an animated character or a symmetrical and/or some quite basic geometrical shape model you'll probably want to use this method.
Switch to Topology tab and start retopo. Here are a couple of useful videos explaining how the retopo tools work:
- See Youtube.com : Modo 701 Retopology.
- See Youtube.com : Zbrush to Modo 801 Retopology Workflow.
- Results in a mesh made from quads (and triangles in the areas where needed)
- Usually takes more time than the triangle method, but can also be surprisingly faster in some cases
- Easy to edit & optimize
- Easy to see if the topology of the mesh is optimal in all the areas
- Easy to make UVs as the edge loops are easy to select
- Deforms nicely when rigged & animated
"Triangelihuttu": A decimated triangle mesh made in Zbrush & cleaned up in Modo
If you have an organic, non symmetrical, not clearly any basic geometric shape model that is not going to be animated nor deformed you can use this method. Sometimes this is even better method than the hand retopo one. For example you might lose time needlessly by making a clean retopo by hand for a rock model. If it's not really necessary to have clean edge loops, use this method!
- More about the Triangle mesh workflow
- Results in a mesh made from triangles
- Can be much faster than retopoing by hand but it depends on the case
- Can have some nasty geometry that needs to be fixed by hand
- Needs to be cleaned up and optimized in Modo, for example by welding geometry and using the Reduction Tool for the whole mesh or selected parts
- Harder to edit & optimize
- Harder to see if the topology of the mesh is optimal in all the areas
- Harder to make UVs as the edge loops are harder to select
- Deforms badly if rigged & animated

How Dense the Low poly mesh should be?
- A low poly mesh can be very optimized or actually very dense mesh depending on the purpose of the mesh

Vertex Normals
- Please check this site for more info on the Vertex normal toolkit Modo: How to Use the Vertex Normal Toolkit
- Each time you edit the model (modeling, mirroring, rotating) the vertex normals will need to be recalculated so that they look right
- The Vertex Normal Toolkit is used for this (in the Game Tools tab or you can setup the plugin to get it working on any tab). See Foundry.com : Vertex Normal Toolkit.
- This toolkit is also used for determining where there are hard edges on the model (usually for any edge 90 degrees or more steep), remember that each hard edge needs to be also a UV seam
- Don't put hard edges on pretty flat areas, only for the steep spots where the shading needs it to look good
- Organic models often have continuous surfaces and don't need hard edges

UV mapping
- Check more info on Modo's UV tools here,
- Modo's UV tools and the Texel Density Toolkit explained
The power of two rule
- In short it's a set of simple criteria ensuring 2D image assets conform to regulated sizes and dimensions, which typically manifest as;
- width/height being divisible by "8", and/or
- width/height that can be doubled-up or divided-down by "2".
- In other words any image that is "8", "16", "32", "64", "128", "256", "512", "1024", "2048" (or higher for more modern games) pixels in one or more width/height direction, is considered valid and properly optimized for quick loading into a game and processing into memory.
- These two simple points in practice means texture assets being "64 x 64", "128 x 64", "2048 x 512" and so on.
- Design note: modern games have preference for square ("1:1" height/width), or limited rectangular dimensions ("2:1"/"1:2" height/width) for ease of use/speed of loading/processing. This is notwithstanding the additional preference for the use of texture 'sheets' where a single image may contain several areas that are independently mapped to completely separate objects.
- See KatsBits.com : Make Better Textures, The 'Power Of Two' Rule & Proper Image Dimensions.
Optimizing the UVs
- It's important to optimize the UV space so that you can use as small texture size as possible
- But do keep the texel density in mind, the textures should be consistent resolution throughout the game, not too low resolution nor too high resolution
- In our projects the texel density varies depending on the asset:
- Environment assets: 200px/m or 2 pixels per cm (environment assets meant for far background use can have less, for example huge mountains, but they shouldn't be used at a close distance because of this )
- Characters: 1500px/m
- Character head that is seen close up in the cut scenes: 3400px/m
- Texel Density Toolkit can be used to easily assign the desired texel density to the model's UVs
When and How to Optimize
- Note that sometimes, though not often, you might want to give more UV space to a particular part of the model.
- For example, when making a model that's meant to be viewed in first person, you might want to give more space to the parts that will be closer to the camera (such as the stock, handle or sights of a gun), and less to those further away (such as the tip of the barrel, or the bottom parts of a gun).
- This way, the most important parts will have better texture quality, and the parts that will not be seen up close will be slightly worse, but not very noticeable.
- How much you can/should optimize will depend on a couple of factors:
- The intended use of the model: if the model will only be seen from far away, there is no need to optimize as much as for a first-person model for example, but it's always a good practice.
- The intended texture size: if you have small textures, and your UV islands are close together, the texture will most likely bleed from one island to the next. In this case you should leave more space between the islands.
- The shape of the model and the UV islands: sometimes, especially with organic models, the UVs can be pretty round/curved/wavy. These kinds of UVs will naturally have more wasted space; UVs for hard-surface models can be easier to optimize.
- How much you're willing to cut/break to make the UVs fit better: cutting the UVs into smaller bits can make it easier to fit them tightly together, but this can result in unwanted seams. Again, hard-surface models might have an easier time with this.
- It's much easier to optimize the UVs of a hard surface model compared to an organic model, but do your best to save the UV space:


- Left: UVs for a gun model arranged by hand with very little space between UV islands. Right: UVs arranged with "pack UVs" feature creates more empty areas between UV islands:


- Left: UVs for a saw tool model arranged by hand with almost no space between UV islands. Right: UVs arranged with "pack UVs" feature creates more empty areas between UV islands:


One Big Map or Several Small Maps?
- It's good to consider different situations and what works the best and is the most optimal: When to use several smaller maps instead of one bigger map and when to use one big map instead of several separate maps?
- One map:
- Each separate texture map will add one more draw call so it's often better to have one big texture than several small textures
- If you can assume that the set of models will be often used in the same scene, do try to put them in one texture map
- Generally it's good to have same sized assets having the same texture map
- Several maps:
- If you have some huge maps with for example big rock textures, it might be a good idea not to put the tiny pebbles in the same big map, if you are quite sure the small pebbles will often be used separately off the big rocks
- If the pebbles only are used in the level the engine still needs to load the huge texture map each time for them
- If the pebbles are in a separate map they can have for example a quite small map like 128px x 128px so it would be bad to have to load the huge 4096px x 4096px size map containing the huge rock textures
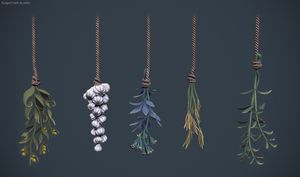
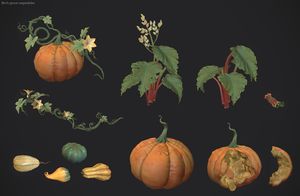
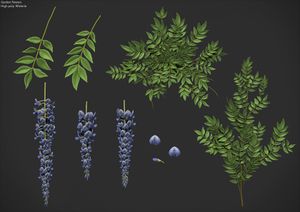
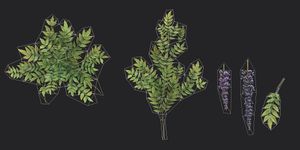
Mirroring, Recycling and Tile Maps
- If you have a set of similar items like trees, consider if some of the tree parts could use the same map, this way you'll save lots of texture space
- Don't make unique textures for things that don't need unique textures, just recycle the same texture for all those parts
- Remember that if you mirror/recycle/tile something, it can't have anything too special in the texture
- For example there can't be a big noticeable scar/crack/dirt/etc. details as it'll be very easy to notice them repeating right away
- This type of pieces need to have pretty general detailing so that it's not easy to see the repeating if the piece is copied a lot
- Recycling the same models with the same texture:

- UVs of a symmetrical model can be mirrored to save a lot of UV space, but this can create really unnatural look if not used with caution
- For example mirroring a character's face from the center line is a bad idea if there will be close ups of the face
- Mirroring any asset along the center line usually looks bad
- Mirroring Problems:

- Mirror UVs whenever you can do it so that it's not easily noticeable
- A more sophisticated way of mirroring is to keep the center line and it's surroundings unique, but mirror the "edge" areas
- For example if you make a cat model, keep the head and torso unique and mirror only the legs

- If you have a big/long surface of something like wall/rope/floor/ground it's probably best to make a tile texture
- Tile textures can be tricky as they need to be general enough so that it's not easy to notice the tile pattern
- There are tile map sculpting features in Zbrush but the best tool for making tile textures is the Substance Designer
- Often a lot of the tile pattern can be hidden in level art by adding decals, vegetation, etc. on the surfaces
Consider the Sway Maps When Making Trees
- Sway is a shader that makes the model seem like it's swaying
- For any plant objects that will use sway shader all the textures need to be in one map
- For example if you make a tree: the trunk, branches and foliage/leaves need to use the same one texture map
- The method of getting a plant sway "in the wind" is achieved by adding a grey scale sway map (animators add it) that tells to the model what areas sway
- If for example the leaves are in a separate texture map/have separate UVs the sway maps don't work correctly as they can't identify the location of the trunk in relation to the leaves
Fixing Geometry
- Once you think your model is ready to go it's good to check a couple of things
- It's good to check that there are no holes nor n-gons (polygon with more than 3 or 4 vertices) in the mesh and perform the Mesh Cleanup command
- More info on fixing geometry
Materials
Adding Materials in Modo
- Give the mesh a properly named material in Modo before exporting to Painter, to have the textures named from the get-go
- Before you have your textures done you'll need to add a material in Modo to each model/set of models
- The models in the Substance Painter will be separated according to the materials that are assigned to them in Modo before importing to Substance Painter
- Once your high poly mesh and a UV'd low poly mesh are finished apply a named material to it in Modo
- (with the mesh selected, press 'M' and type in a name in the drop down box)
- In case you have multiple UV sets, you need to add a separate material for each of them, so you'll get a separate texture set for each. The naming should be the same as above. Remember to tick Save Materials when exporting.
- The material name should be the same as what your texture filename will be (e.g. sample_asset_mossy). This isn't absolutely necessary, but it will speed things up a bit later on. Substance Painter's export config will name the files based on the texture set name.
- If you want to recycle a Substance Painter layer stack from a previous project, you need to have assigned your Material with the same name as in this previous project.
- Delete all the irrelevant materials from the shaders-tab, if there are any.
- If you don't use the Material in the scene anymore it will disappear from the list. If you want to delete all Materials, just delete everything from your Shader Tree. After that select all polys and assign them the Material "Default" from the list. If you still have item masks in the Shader Tree it will appear as a new material - it is the base material every item has when you start fresh.
- Adding texture maps in Modo
- Once the model and textures are finished, you'll need to add the albedo/diffuse map to the models in Modo before exporting the final FBX for the editor, no other maps should be added (like normal map, roughness map etc) here because the editor knows how to find them based on the albedo/diffuse map alone. But you can preview the other maps in Modo if you want to
- Normal maps: Drag the normal map to the Mesh Item's Material in the Shading tab. If you are viewing normal maps intended for the Frozenbyte Editor, you will need to invert the Green Channel in Modo by going to Properties > Texture Layers and check Invert Green.
- Opacity Maps: When placing Alpha planes you need to Invert your opacity map in Photoshop before bringing it to Modo. Also, change Mode from Indexed Color to Grayscale in Photoshop. After these changes, drag the inverted opacity map into Modo, to Shading Tab on the right, under the Texture map, and change Effect to Basic Channels>Transparent Amount. Change View to Default or Advanced to see the opacity map working.
- If your model is showing super-glossy, take down the Fresnel amount from 100% to 0%. You can find Fresnel from Properties>Material Ref tab.

Cage
- If the bake comes out with problems like transparent holes or weird looking artifacts/ other bake errors:
- You can first try to fix the problem without a cage in Substance Painter
- in some cases without cage you can get transparent areas to the ID bake (easiest to notice) and other bakes
- It might help to slightly change the max frontal & rear distance, for example from 0.01 -> 0.03 but if this is too much there will be artifacts
- If adjusting the max frontal & rear distance doesn't help, you'll need to use cage
- Often if the model has small gaps etc a cage is needed for a clean bake
- The cage is an inflated version of the model that covers the actual model and lets the baking program know where the mesh starts and ends
- The cage should be done after the mesh is finished and has the UVs and everything, the cage should have the exact same UVs as the actual model
- You can use Modo's deformation tool Push for making the cage of the mesh:
- Duplicate the model on new layer & use push to inflate it so that the high poly mesh is mostly covered with the cage mesh
- Make sure not to inflate too much, try to keep the cage as small as possible so that it neatly covers the high poly and doesn't go inside itself in any tough spot
- If the cage goes inside itself or doesn't cover enough, you can edit it by moving the vertices around by hand. This is pretty much always the case when a cage is needed for a clean bake.
- A good starting point is to cover most of the mesh using push but then adjust the rest by hand
- ATTENTION! If your model has several texture sets, each set should have a separate cage and the maps need to be baked in Painter one at a time for each texture set

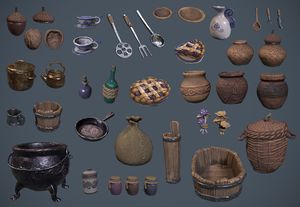
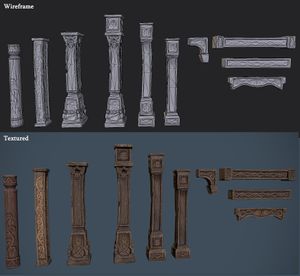
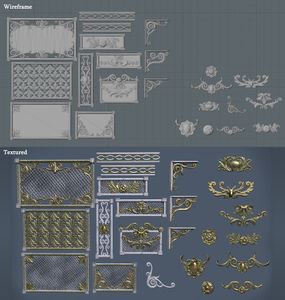
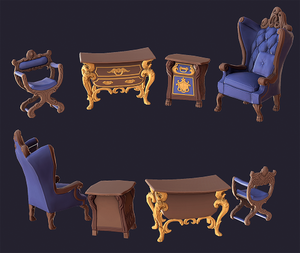
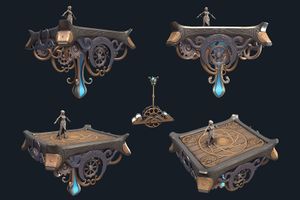
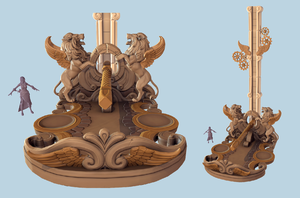
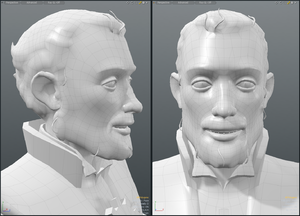
Frozenbyte Lowpoly Model examples
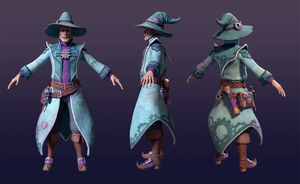
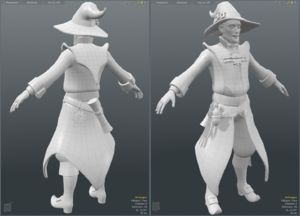
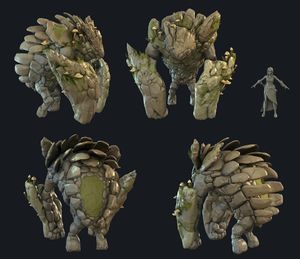
Amadeus wire frame, about 13500 polygons (25000 triangels in the game engine)
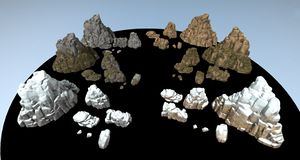
Pieces used to build bigger arrangements
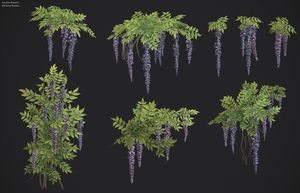
Arrangements built from smaller pieces
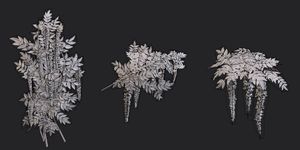
Model wire frames
Flat piece wire frames