Difference between revisions of "3D Asset Workflow: Vegetation"
(Created page with "= Summary = * This wiki page guides you through the process of how to: # Create swaymaps # Make them work in the Editor * The sway map is essential for any vegetation or folia...") |
m |
||
| Line 1: | Line 1: | ||
| + | <div style="border-bottom:2px solid #99aac7; background:#d0def5; padding:0.4em 0.5em; font-size:130%; margin-bottom: 25px; text-align: center; float:top;"> | ||
| + | ⬑ [[3D Asset Workflow]]</div> | ||
| + | |||
| + | <div style="padding-right: 10px; padding-left: 1000px; padding-top: 60px; padding-bottom: 80px;"> | ||
| + | {{#lst:3D Asset Workflow}} <!-- Link list transcluded from main 3D Asset Workflow page --> | ||
| + | </div> | ||
| + | |||
= Summary = | = Summary = | ||
| − | * | + | * Creating 3D vegetation has lots of different tricks to it - there is no single solution to what works for everything |
| − | # Create | + | ** Some techniques used for one type of vegetation might work for other type of vegetation too, but not for others |
| − | # Make | + | * From this page, you can find: |
| − | * | + | # More general sense of how to create vegetation |
| − | ** | + | # How to take sway into account |
| − | ** | + | # Separate sections for some different types of vegetation |
| − | [[File: | + | |
| + | = General Methods for Creating Vegetation = | ||
| + | |||
| + | * '''Start by gathering lots of reference''' | ||
| + | ** Best way is to look for what real nature has to offer, and starting to twist the ideas from there | ||
| + | ** This is best way to make vegetation look natural! | ||
| + | ** Photo bashing, drawing concepts, and quick sketch sculpts all work nicely | ||
| + | ** Once you have done a few vegetation assets, it's also easy to quickly experiment with existing different sculpted pieces, and try if you can make something new with them | ||
| + | * '''If some vegetation asset seems tricky to create, check other games, and try to look how they might have solved similar issues''' | ||
| + | <br> | ||
| + | * Usually the biggest thing when making vegetation are the '''leaves''' | ||
| + | ** Stalks / stems can often be vertically tileable material | ||
| + | * '''Plan what your texture map might look like early on''' | ||
| + | ** By having even a rough plan at this stage, you avoid creating unnecessary parts, and can make notes for yourself for e.g. different color variations | ||
| + | ** If possible, use one material for all of your vegetation (meaning, leafs and stalks/stems of the same model in the same texture) | ||
| + | *** More materials mean more drawcalls in the Editor, making the asset a bit heavier to use | ||
| + | |||
| + | <gallery widths=300px heights=300px mode="nolines"> | ||
| + | File:textureSheetUsagePlan-1.jpg| Simple texture map plan | ||
| + | File:tom-deerberg-02-whitebox-paint.jpg| Roughly painted texture map plan. Source: https://www.artstation.com/tom_deerberg | ||
| + | </gallery> | ||
| + | |||
| + | * One good way to start making highpoly leaves is to use reference image of a real life leaf | ||
| + | ** You can also do the same progress using your own photo-bashed / concept drawing as basis | ||
| + | # Create the silhouette of the leaf with Modo's Pen Tool | ||
| + | # Make that in to flat polygonal plane, and export it to ZBrush | ||
| + | # In ZBrush, run ZRemesher function for the leaf shape | ||
| + | # Add thickness with Panel Loops found under Geometry → EdgeLoop | ||
| + | # Tweak the Panel Loops settings to get the kind of result you want | ||
| + | # Usually Polish at 0, low bevel amount and elevation set to -100 give good results | ||
| + | # Thickness amount value depends on the size of the mesh | ||
| + | # Start twisting and bending the leaf shapes from real nature's leaf | ||
| + | # Before you start subdividing, you can do simple project unwrapping for the ZRemeshed leaf in Modo | ||
| + | #* This way you can have e.g. some simple color gradient in your highpoly | ||
| + | |||
| + | <gallery widths=300px heights=300px mode="nolines"> | ||
| + | File:moonleafs_progress_01.jpg| | ||
| + | File:moonleafs_progress_02.jpg| | ||
| + | File:moonleafs_progress_03.jpg| | ||
| + | File:moonleafs_progress_04.jpg| | ||
| + | File:simple_leaf_sculpting.jpg|Basic leaf sculpting tip | ||
| + | File:Leaf_sculpting_02.jpg|Leaf sculpt breakdown. | ||
| + | File:unsymmetrical_leaf_veins02.jpg|Veins on leafs are often not symmetrical, break their symmetry to create more natural look. | ||
| + | </gallery> | ||
| + | |||
| + | == Coloring Highpoly Vegetation == | ||
| + | * This section covers instructions for how to color your highpoly vegetation with either textures or vertex colors | ||
| + | * Having base colors on your highpoly mesh before you go to baking can speed up your texturing later, and in some cases, it might be really hard to precisely texture some really small parts without the base colors | ||
| + | * Texture or vertex color for is not necessary all vegetation | ||
| + | ** E.g. a simple, big leaf does not benefit much from this, since you will be texturing it in Substance Painter anyways | ||
| + | ** Usually highpoly vegetation pieces that are in groups are helped by having color/texture already on them | ||
| + | |||
| + | === Projection Type Unwrap === | ||
| + | * Simplest way to add some color to your highpoly mesh is by just doing a '''projection type unwrap''', and by using few gradients | ||
| + | ** More detail can be added in Substance Painter later | ||
| + | # Model the highpoly leaves in Modo by having them be really lowpoly | ||
| + | # Preview with subdivision key how they will loo, when subdivided (default is tab key) | ||
| + | # Create support edges where they're needed, just like in hard edge modeling | ||
| + | # Example pictures below show how this was done for these grass and hay highpoly models: | ||
| + | |||
| + | <gallery widths=300px heights=300px mode="nolines"> | ||
| + | File:GrassGradient.jpg|Simple gradient texture used for grass high poly | ||
| + | File:grass_project_unwrap.jpg| | ||
| + | File:grass_final_project_unwrap.jpg| | ||
| + | File:hay_final_project_unwrap.jpg|High poly hay projection unwrap | ||
| + | </gallery> | ||
| + | |||
| + | * You can model the leaf even more in Modo, and have better unwrapping and more detailed texture for it | ||
| + | ** However, be careful to not create something too detailed or it will look noisy in game | ||
| + | * Example images below show steps Tom Deerberg used in making one of his vegetation assets: | ||
| + | <gallery widths=300px heights=300px mode="nolines"> | ||
| + | File:Tom-deerberg-03-hp-texture-extraction-from-refs.jpg|Plan and map for hp textures. Source:https://www.artstation.com/tom_deerberg | ||
| + | File:tom-deerberg-04-split-elemnts-and-arange-them.jpg|Split elements. Source:https://www.artstation.com/tom_deerberg | ||
| + | File:tom-deerberg-05-cut-elemnts.jpg| Cut elements. Source:https://www.artstation.com/tom_deerberg | ||
| + | File:tom-deerberg-08-arange-for-texture-sheet.jpg|High poly meshes in grayscale. Source:https://www.artstation.com/tom_deerberg | ||
| + | File:tom-deerberg-white-flower.jpg|High poly mesh with textures. Source:https://www.artstation.com/tom_deerberg | ||
| + | </gallery> | ||
| + | |||
| + | * When you import the unwrapped highpoly meshes to Zbrush, be careful to not break your unwrapping on them | ||
| + | ** This can happen easily when you e.g. merge meshes | ||
| + | [[File:zbrushMergeUvMesh.jpg|400px]]<br/> | ||
| + | |||
| + | * Remember that Zbrush requires that textures are inverted vertically<br/> | ||
| + | [[File:zbrush_texture_flip.jpg|400px]]<br/> | ||
| + | |||
| + | === Using Vertex Colors === | ||
| + | * If you do not want to deal with having textures for highpoly meshes, you can also transform the textures into vertex color for the sculpt | ||
| + | ** If you do this, your highpoly needs to have lots of subdividions, because the vertex paint detail precision is dependent on vertex amount on the mesh | ||
| + | ** Later you need to bake highpoly vertex color map in XNormal, or use the map that Substance Painter bakes for ID slot | ||
| + | *** If you do this method, you will lose ID selection, unless you have another version of the highpoly with simple ID colors that you bake too | ||
| + | ** '''Using complex vertex coloring for the highpoly can make the mesh really heavy to handle, so this method is not always recommended''' | ||
| + | * Images below show how to transfer texture into vertex color in ZBrush:<br/> | ||
| + | |||
| + | [[File:textureMapToVC_01.jpg|400px]][[File:textureMapToVC_02.jpg|400px]]<br/> | ||
| + | |||
| + | == Baking and Texturing Lowpoly Vegetation == | ||
| + | * Once you are done with your highpoly models: | ||
| + | # Simplest way to create lowpoly versions is usually by making '''reference meshes of your highpoly meshes''' | ||
| + | # Decimate your highpoly a lot, name it (e.g. flower_hp_reference) | ||
| + | # Import that highpoly to Modo, and create the low poly planes with the Pen Tool | ||
| + | #* At this stage it does not matter if your lowpoly plane is completely flat | ||
| + | #** In fact, it's more helpful to bend and modify the lowpoly planes later, because creating cages for flat lowpoly models is really easy | ||
| + | # Move your lowpoly planes behind the highpoly meshes for baking | ||
| + | # When unwrapping the planes, you can have some overlap in the UV islands to get the maximum space out of the texture | ||
| + | #* Be careful though and don't over do this | ||
| + | #** Otherwise you might have problems later when you are editing the lowpoly version, and need to maybe need to move some edge or reduce triangle count - only to notice that other plant parts are now showing in the plane | ||
| + | # Also if you try to squeeze more resolution with some overlapping UV islands, remember to tweak them properly for sway (check "Sway for vegetation" section) | ||
| + | # Image below shows the setup of lowpoly, highpoly, and cage models in Modo for baking grass. <br/> | ||
| + | |||
| + | [[File:vegetation_baking_01.jpg|400px]] | ||
| + | [[File:vegetation_cage_meshes.jpg|400px]] | ||
| + | |||
| + | === Baking Opacity Maps and Vertex Maps in xNormal === | ||
| + | * Follow the instructions from [[3D_Asset_Workflow:_Baking#Baking_in_xNormal|3D Asset Workflow: Baking in xNormal]] | ||
| + | |||
| + | * Once you have highpoly texture and the opacity map baked, [[3D_Asset_Workflow:_Baking#Adding_an_Externally_Baked_Opacity_Map_to_a_Substance_Painter_Project|import them to your Substance Painter project]] | ||
| + | * In Substance Painter, bake the rest of the maps for the lowpoly planes, like you normally would | ||
| + | ** Usually high antialiasing is good to have when baking vegetation, because of the small details in them | ||
| + | * After that, create two Fill Layers for XNormals opacity map and the baked highpoly texture map | ||
| + | ** On top of these you can start to do texturing | ||
| + | * Export the textures from Substance Painter using the "T4_asset_export_alphatest" export settings | ||
| + | |||
| + | === Baking your opacity map without using xNormal === | ||
| + | |||
| + | There is another way of baking your alpha without using xNormal. Substance painter and Photoshop are required. Although Substance painter won't bake a perfect ready to use for the opacity. You will have to bake a texture without any padding then tweak it in Photoshop. The process is quite simple and short. | ||
| + | |||
| + | *Import first your low poly and bake the way you usally do. | ||
| + | |||
| + | [[File:alpha_substancepainter_01.JPG|400px]] | ||
| + | |||
| + | *Now we are going to bake a texture (Normal) without any dilation Width. Untick "Apply diffusion" so we won't have any padding. This texture will be use as a base for the Opacity map. | ||
| + | |||
| + | [[File:alpha_substancepainter_04.JPG|400px]] | ||
| + | |||
| + | *Go to your Shelf > Textures. You will find your Normal map texture without any padding. Right click on it then "Export resource". Find the texture in your folder then open it in Photoshop. The transparency layer is required so the texture should be a PNG. | ||
| + | |||
| + | [[File:alpha_substancepainter_05.JPG|400px]] | ||
| + | |||
| + | *In photoshop, we are going to create the Opacity map ready for Substance painter. Black area is the transparency so you have to create a black background. Create a new layer placed at the bottom of you list and fill it with black color. Then double click on your layer 1 and create a color overlay with white color. Your opacity texture is ready ! | ||
| + | |||
| + | [[File:alpha_substancepainter_11.JPG|400px]] | ||
| + | |||
| + | *Import your freshly made texture in Substance painter. In Texture Set Settings add a new "Opacity" channel. Create a new layer and disable everything except OP (opacity) and drag and drop your texture in the opacity material from your shelf. | ||
| + | |||
| + | [[File:alpha_substancepainter_09.JPG|400px]] | ||
| + | |||
| + | *And the last step is to display your opacity map on your model in Substance painter ! By default Substance painter display on "PBR". There is not alpha treatment. To render the display you have to go to your shader settings and change it for PBR with alpha test. Done ! | ||
| + | |||
| + | [[File:alpha_substancepainter_10.JPG|400px]] | ||
| + | |||
| + | = Sway for Vegetation = | ||
| + | * [http://wiki/index.php/3D_Asset_Workflow:_Script_Documentation#Swaymap_Creator Swaymap creator for Modo] | ||
| + | * [[3D Asset Workflow: Sway]] | ||
| + | ** Includes instructions for how to make the sway work in the Editor | ||
| + | |||
| + | = Vertex Normals for Vegetation = | ||
| + | * New vertex normals are usually needed for large leaf plane groups | ||
| + | * Vertex normals can be captured from another mesh, so that they look like one mass, and not separate planes | ||
| + | ** Usually a sphere is used for capturing the vertex normals | ||
| + | * Example gif image below shows what the vertex normal transfer does to tree leafs | ||
| + | ** Source: [http://ericchadwick.com/ Eric Chadwick] | ||
| + | [[File:Eric_Chadwick_tree.gif|none|600px]] | ||
| + | * You can capture vertex normals in Modo with '''Vertex Normal Tools window''' | ||
| + | # Switch to Tools tab, and use Transfer Normals | ||
| + | # Make sure that only the leaf mass and the half sphere are visible | ||
| + | #* If you separate some of your meshes into different layers for transferring normals, remember to copy and paste them back together | ||
| + | #** Don't use Modo's Merge Layers command, as that often seems to break the normals! | ||
| + | # Transfer the normals from the visible, inactive mesh(es) to the active mesh | ||
| + | <gallery widths=300px heights=300px mode="nolines"> | ||
| + | File:VertexTranferSphere02.jpg|Simple normal capture | ||
| + | File:VertexTranferSphere03.jpg|Multiple normal capture meshes | ||
| + | File:vegetation_coverage_normal_capture.jpg|Normal capture mesh | ||
| + | </gallery> | ||
| + | |||
| + | = Vegetation Specific Tips = | ||
| + | == Trees == | ||
| + | === Ways to Unwrap Trees === | ||
| + | * There are few ways to unwrap your tree | ||
| + | # One way is to do custom UVs for the trunk and branches | ||
| + | #* This is done when more unique material and shapes are needed | ||
| + | # Second way is to use tiling texture for trunk | ||
| + | #* This is useful when lots of variations are needed for the trunks | ||
| + | * Pictures below showing the two ways | ||
| + | [[File:tree_unwrapping_way01.jpg|400px]][[File:tree_unwrapping_way02.jpg|400px]] | ||
| + | |||
| + | === Deciduous Trees === | ||
| + | * For deciduous trees, e.g. trees with leaves, '''it is not good idea to create every single leaf as a separate plane''' | ||
| + | ** If each leaf is a separate plane, the lowpoly of it will be too heavy to use in the end, or not many of them can be used in a same level | ||
| + | * Instead, '''make branches that have multiple leaves on them''' | ||
| + | ** When you create different branches, try to make few with different overall silhouette | ||
| + | *** E.g. one filler branch, with much more leaves in it, and more simple silhouette | ||
| + | *** Then other branches with less leaf mass for the outer edges of the overall leaf mass of the tree | ||
| + | *** Usually '''3-5 different kind of branch variations get the job done''', you don't need tons of different variations | ||
| + | * Try to keep the leaf branches relatively flat in the sculpting phase | ||
| + | ** It is good to have height difference in the branches of the plane, but too much difference will make a bad looking normal map, that can cause weird shadowing | ||
| + | * Example image of leaf branches below.<br/> | ||
| + | <gallery widths=300px heights=300px mode="nolines"> | ||
| + | File:ElmTreeBranches.jpg| | ||
| + | File:leaf_branch_side_view.jpg| | ||
| + | File:tom-deerberg-capture-001-01042015-141812.jpg|Steps Tom Deerberg used to create branches. Source:https://www.artstation.com/tom_deerber | ||
| + | File:tom-deerberg-capture-004-01042015-141911.jpg|Leafs made in to groups. Source:https://www.artstation.com/tom_deerber | ||
| + | File:tom-deerberg-capture-011-01042015-174157.jpg|Final lowpoly branches, that have groups combined to larger branches. Source:https://www.artstation.com/tom_deerber | ||
| + | </gallery> | ||
| + | |||
| + | === Coniferous Trees === | ||
| + | * Coniferous tree branches can be made easily with Modo's Mesh Paint Instance Tool | ||
| + | # First, create 1-3 different needles, that have different sizes, shapes, and bends | ||
| + | # Unwrap those needles, and create texture for the highpoly | ||
| + | #* Creating texture for the highpoly needles is very important, because without it texturing them would be very hard later in Substance Painter | ||
| + | # Test with Modo's subdivision preview how they look when subdivided | ||
| + | #* Default is tab key for subdiv preview | ||
| + | # Center those needles, and make each of them as a separate object | ||
| + | # Name the needles logically so you know which is which kind, when you start to duplicate/clone them | ||
| + | # Model a few very simple thin branch shapes, where you will next use Mesh Paint Instance Tool and paint them full with needles | ||
| + | * Below images show steps | ||
| + | |||
| + | <gallery widths=300px heights=300px mode="nolines"> | ||
| + | File:needle_variation.jpg|First create needles | ||
| + | File:starting_needles.jpg|Needle attachment points must be at origin. | ||
| + | File:mesh_paint_instance_in_modo.jpg|How to paint clone meshes in Modo. | ||
| + | File:needle_tutorial_branches_to_z.jpg|Modo part for needles complete. | ||
| + | File:needle_instance_modification.jpg|Quick modifications for instance meshes. | ||
| + | File:silhouetteNeedles.jpg|Check often silhouette of your branches | ||
| + | File:pine_high_poly_needles.jpg|Final high poly branches to be baked on to a planes. | ||
| + | File:Different tree needles.jpg|Couple other kinds of needle branches made with same methods. | ||
| + | </gallery> | ||
| + | |||
| + | * Below are some example trees | ||
| + | <gallery widths=300px heights=300px mode="nolines"> | ||
| + | File:Trine_4_pinetree_wip_07_20_12_2018.jpg| | ||
| + | File:Trine_4_pinetrees_18_01_2019.jpg | ||
| + | File:SpruceRender03.jpg | ||
| + | </gallery> | ||
| − | = | + | === Billboards === |
| − | == | + | * Usually trees also require billboard versions of them done, for background use |
| − | * | + | * Check this wiki page for instructions on how to create those: [[3D Asset Workflow: Billboards]] |
| − | |||
| − | |||
| − | |||
| − | == | + | == Very Large Vegetation == |
| − | * | + | * With very large foliage, '''think first if leaves should be just modeled meshes, instead of thin planes''' |
| − | + | ** This depends very much on each case | |
| − | + | ** A good rule is, that when leaves start to be bigger than a character, they might work better as thicker mesh than planes | |
| − | + | ** Advantage of planes is that their silhouette does not show any lowpolyness | |
| − | + | *** When sculpting leaves for large plant, you can already quickly make a decimated version of that leaf, and check in Modo, what kind of a triangle count that kind of a leaf might have | |
| − | + | *** Reduce the triangle count further with Modo’s reduction tool (found under the Polygon Tab) to see a bit more accurately what the triangle count might be at the end | |
| + | *** If the triangle counts seem crazy, then cheaper option might be to use a plane with transparency | ||
| + | **** Huge transparent planes, that use alpha maps, can be heavy on the performance, if they are starting to cover large parts of the screen - so in those cases too, think if just a mesh would be better | ||
| + | * For large trees, it might be better that the trunk is modular, and branches with leaves are added as separate assets entirely | ||
| + | ** This way, the level artists can assemble different variations | ||
| + | ** Trees like this are very large and more of a special case | ||
| − | + | <gallery widths=300px heights=300px mode="nolines"> | |
| − | + | File:Trine_4_modular_tree_trunk_set_sculpt_trunks.png|Modular tree trunk set | |
| − | + | File:LeafPlatfroms01.jpg|Leaf platforms, with no alpha planes for thicker leaf look. | |
| − | + | </gallery> | |
| − | |||
| − | |||
| − | |||
| − | |||
| − | |||
| − | == | + | == Grass and Hay == |
| − | * | + | * Easiest way to make grass is to model the highpoly grass blades with texturing in Modo |
| − | * | + | ** Some small tweaks can be also done in ZBrush after |
| − | * | + | # Start by modeling single grass blade and unwrap it' |
| − | ** | + | # Keep the grass blade very lowpoly and check with Modo’s subdivision toggle how the highpoly will look like when the mesh is later subdivided |
| + | #* Default hotkey for it in Modo is Tab | ||
| + | # Now, depending on how far you want to go with your highpoly's textures, you can either do simple project unwrapping for simple texture map (like gradient), or do proper unwrap for more detailed texture | ||
| + | # Might be good idea to also make couple of duplicates of the blade and map them, to use slightly different a color variation | ||
| + | * For grass, it’s good to make the normals blend more with the ground | ||
| + | ** Easy way to do this is to select all the bottom vertices of grass planes, and then run Transfer Normals when a separate planar object is under the grass and is set to be visible | ||
| − | === | + | <gallery widths=300px heights=300px mode="nolines"> |
| − | + | File:Grass_and_hay_in_editor.jpg|Different sized groups of grass in editor | |
| − | + | File:Grass_and_hay_texturing_wip_01.jpg|textured grass planes | |
| − | + | File:Grass and hay wip1.jpg|Mix some additional details to your grass and hay for interest. | |
| − | + | File:grass_wide_plane_closeup.jpg|High poly grass with gradient texture | |
| − | + | File:grass_Detailed_hp_texture.jpg|For grass high poly blades more detailed texture could also work in some cases. Source: https://www.tonytextures.com/tutorial-how-to-make-render-super-realistic-3d-grass-with-3ds-max/ | |
| − | + | </gallery> | |
| − | |||
| − | |||
| − | |||
| − | * | + | == Vegetation Coverage Assets == |
| − | ** ' | + | * These are assets that are meant to cover up a large are with e.g. leaves |
| − | ** | + | ** They help dressing a level quickly with vegetation, and give an illusion of lush nature easily |
| + | ** More specific vegetation might be added on top of these later | ||
| + | * It's good to have a value difference in the leaf planes, so that darker are at the bottom, and on top of those layer more bright leaf planes | ||
| + | ** Also the leaf planes at the bottom should be more full of leafs to cover and hide more, while the next layer on top of those can have less leaves to create interesting silhouettes to the outer edges of the leaf mass, and to also show the darker color underneath, and give depth from the layers under them | ||
| + | * Remember to also [[3D_Asset_Workflow:_Vegetation#Vertex_Normals_for_Vegetation|capture normals]] for vegetation coverage assets - this is crucial especially for them, so they look like on mass when light hits them in game | ||
| + | <gallery widths=300px heights=300px mode="nolines"> | ||
| + | File:leafplane_values.jpg|Value difference in leaf planes | ||
| + | File:FlatLeafs.jpg|parts of a leaf coverage model. | ||
| + | File:vegetation_coverage_mesh_parts.jpg|Low poly model broken down. | ||
| + | File:vegetation_coverage_normal_capture.jpg|Normal capture mesh | ||
| + | File:LeafCoverageMeshes01.jpg|assembled Leaf coverage models. | ||
| + | File:LeafCoverageMeshes04.jpg | ||
| + | File:LeafCoverageMeshes03.jpg | ||
| + | File:tom-deerberg-wallcover-bush-04b.jpg|Good example images by [https://www.artstation.com/tom_deerberg Tom Deerberg], that shows wall covering ivy | ||
| + | File:tom-deerberg-wallcover-bush-10b.jpg|Source: https://www.artstation.com/tom_deerberg | ||
| + | File:tom-deerberg-wallcover-bush-00b.jpg|Source: https://www.artstation.com/tom_deerberg | ||
| + | File:tom-deerberg-wallcover-bush-08b.jpg|Source: https://www.artstation.com/tom_deerberg | ||
| + | File:tom-deerberg-wallcover-bush-07b.jpg|Source: https://www.artstation.com/tom_deerberg | ||
| + | File:tom-deerberg-wallcover-bush-06b.jpg|Source: https://www.artstation.com/tom_deerberg | ||
| + | </gallery> | ||
| − | [[ | + | == Small Undergrowth and Flowers == |
| − | + | * General workflows for vegetation work for small undergrowth, except oftentimes the UV map does not need space for as many variations on the type of leaves one plant might have | |
| − | * | + | * Triangle count is also very important, and it's best to keep it low as possible |
| − | + | * Some undergrowth also benefits from [[3D_Asset_Workflow:_Vegetation#Vertex_Normals_for_Vegetation|capturing normals]] from a sphere or other smooth shape | |
| + | * When making undergrowth, have one single plant asset and groups made of that same asset | ||
| + | ** This helps level artist to fill levels faster | ||
| − | + | <gallery widths=300px heights=300px mode="nolines"> | |
| − | + | File:vegetation_undergrowth_01.jpg| | |
| − | + | File:flower_breakdown.jpg| | |
| − | + | File:flower_breakdown02.jpg| | |
| + | File:Trine_4_heather_flowers_25_01_2019.jpg|These Heather flowers were done much the same way as grass was | ||
| + | File:Undergrowth_plant_01.jpg | ||
| + | File:Undergrowth_plant_02.jpg | ||
| + | File:Lakka_new_02.jpg | ||
| + | File:Undergrowth_textured_wip02.jpg | ||
| + | </gallery> | ||
| − | == | + | == Decals == |
| − | * | + | * Tips on how to create variation to ground decals |
| + | [[File:Decal composition.jpg|none|800px]] | ||
| − | == | + | == Are the Leaves Too Noisy? == |
| − | + | * Sometimes your leaves might look too noisy in the Editor | |
| − | + | ** One reason could be that the normals have too much going on in the individual leaf shapes | |
| − | + | ** Too much depth difference in the leaves especially can do this | |
| − | + | ** You can try to tone down the effect by quickly smoothing your highpoly leaves, and baking another normal map from them | |
| − | + | *** Then, in Substance Painter, you can mix it with the original normal map and adjust how much the leafs get smoothed | |
| − | + | ** This same thing can also happen if the high poly leaf plane has too much height differences in it's placement of small branches | |
| − | + | : Smoothed leaves example: | |
| + | [[File:SmoothedLeafs_01.jpg|none|600px]] | ||
| − | = | + | =Sources= |
| − | + | <small> | |
| − | + | Video 01 : pixelfondue. [accessed June 7, 2018] <i>MODO - Create Grass and Hair Alpha Maps. </i> Available at: https://youtu.be/E_QYtANycq4<br> | |
| − | + | Video 02 : pixelfondue. [accessed June 7, 2018] <i>MODO - Using Fur to Create Polygon Strips</i> Available at: https://youtu.be/gfmJyg_qIg4<br> | |
| − | + | </small> | |
| − | |||
| − | |||
| − | |||
| − | |||
| − | |||
| − | |||
| − | |||
| − | |||
| − | |||
| − | |||
| − | |||
| − | |||
Latest revision as of 16:39, 28 July 2023
- ◇ Main Steps
- 3D Asset Workflow: Concepting
- 3D Asset Workflow: Sculpting
- 3D Asset Workflow: Retopology
- 3D Asset Workflow: UV Mapping
- 3D Asset Workflow: Baking
- 3D Asset Workflow: Texturing
- 3D Asset Workflow: Asset Assembling
- 3D Asset Workflow: Naming the Asset
- 3D Asset Workflow: LODs
- 3D Asset Workflow: Exporting to Editor
- 3D Asset Workflow: Completed asset checklist
- ◇ Additional Steps
- 3D Asset Workflow: Alternative Textures
- 3D Asset Workflow: Billboards
- 3D Asset Workflow: Blocksets
- 3D Asset Workflow: Collisions
- 3D Asset Workflow: Sikailu
- 3D Asset Workflow: Sway
- 3D Asset Workflow: Tile Textures and Trimsheets
- 3D Asset Workflow: Tintmask
- 3D Asset Workflow: Vegetation
- ◇ General Tips and Troubleshooting
Contents
Summary
- Creating 3D vegetation has lots of different tricks to it - there is no single solution to what works for everything
- Some techniques used for one type of vegetation might work for other type of vegetation too, but not for others
- From this page, you can find:
- More general sense of how to create vegetation
- How to take sway into account
- Separate sections for some different types of vegetation
General Methods for Creating Vegetation
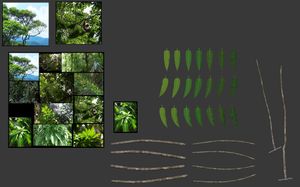
- Start by gathering lots of reference
- Best way is to look for what real nature has to offer, and starting to twist the ideas from there
- This is best way to make vegetation look natural!
- Photo bashing, drawing concepts, and quick sketch sculpts all work nicely
- Once you have done a few vegetation assets, it's also easy to quickly experiment with existing different sculpted pieces, and try if you can make something new with them
- If some vegetation asset seems tricky to create, check other games, and try to look how they might have solved similar issues
- Usually the biggest thing when making vegetation are the leaves
- Stalks / stems can often be vertically tileable material
- Plan what your texture map might look like early on
- By having even a rough plan at this stage, you avoid creating unnecessary parts, and can make notes for yourself for e.g. different color variations
- If possible, use one material for all of your vegetation (meaning, leafs and stalks/stems of the same model in the same texture)
- More materials mean more drawcalls in the Editor, making the asset a bit heavier to use
Simple texture map plan
Roughly painted texture map plan. Source: https://www.artstation.com/tom_deerberg


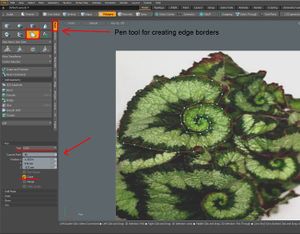
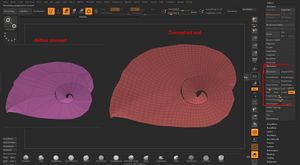
- One good way to start making highpoly leaves is to use reference image of a real life leaf
- You can also do the same progress using your own photo-bashed / concept drawing as basis
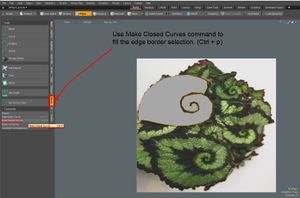
- Create the silhouette of the leaf with Modo's Pen Tool
- Make that in to flat polygonal plane, and export it to ZBrush
- In ZBrush, run ZRemesher function for the leaf shape
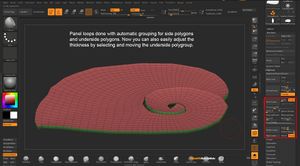
- Add thickness with Panel Loops found under Geometry → EdgeLoop
- Tweak the Panel Loops settings to get the kind of result you want
- Usually Polish at 0, low bevel amount and elevation set to -100 give good results
- Thickness amount value depends on the size of the mesh
- Start twisting and bending the leaf shapes from real nature's leaf
- Before you start subdividing, you can do simple project unwrapping for the ZRemeshed leaf in Modo
- This way you can have e.g. some simple color gradient in your highpoly
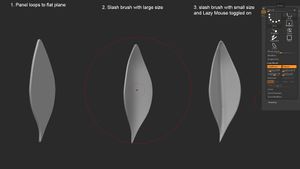
Basic leaf sculpting tip
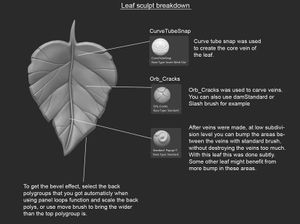
Leaf sculpt breakdown.
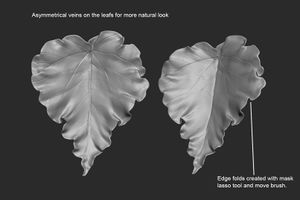
Veins on leafs are often not symmetrical, break their symmetry to create more natural look.


Coloring Highpoly Vegetation
- This section covers instructions for how to color your highpoly vegetation with either textures or vertex colors
- Having base colors on your highpoly mesh before you go to baking can speed up your texturing later, and in some cases, it might be really hard to precisely texture some really small parts without the base colors
- Texture or vertex color for is not necessary all vegetation
- E.g. a simple, big leaf does not benefit much from this, since you will be texturing it in Substance Painter anyways
- Usually highpoly vegetation pieces that are in groups are helped by having color/texture already on them
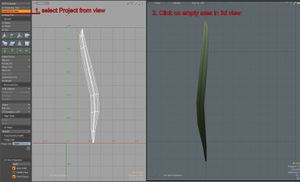
Projection Type Unwrap
- Simplest way to add some color to your highpoly mesh is by just doing a projection type unwrap, and by using few gradients
- More detail can be added in Substance Painter later
- Model the highpoly leaves in Modo by having them be really lowpoly
- Preview with subdivision key how they will loo, when subdivided (default is tab key)
- Create support edges where they're needed, just like in hard edge modeling
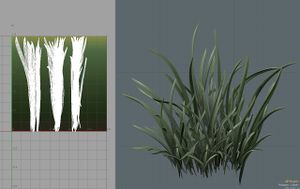
- Example pictures below show how this was done for these grass and hay highpoly models:

Simple gradient texture used for grass high poly
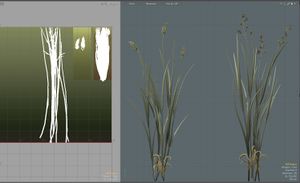
High poly hay projection unwrap


- You can model the leaf even more in Modo, and have better unwrapping and more detailed texture for it
- However, be careful to not create something too detailed or it will look noisy in game
- Example images below show steps Tom Deerberg used in making one of his vegetation assets:
Plan and map for hp textures. Source:https://www.artstation.com/tom_deerberg
Split elements. Source:https://www.artstation.com/tom_deerberg
Cut elements. Source:https://www.artstation.com/tom_deerberg
High poly meshes in grayscale. Source:https://www.artstation.com/tom_deerberg
High poly mesh with textures. Source:https://www.artstation.com/tom_deerberg


- When you import the unwrapped highpoly meshes to Zbrush, be careful to not break your unwrapping on them
- This can happen easily when you e.g. merge meshes

- Remember that Zbrush requires that textures are inverted vertically

Using Vertex Colors
- If you do not want to deal with having textures for highpoly meshes, you can also transform the textures into vertex color for the sculpt
- If you do this, your highpoly needs to have lots of subdividions, because the vertex paint detail precision is dependent on vertex amount on the mesh
- Later you need to bake highpoly vertex color map in XNormal, or use the map that Substance Painter bakes for ID slot
- If you do this method, you will lose ID selection, unless you have another version of the highpoly with simple ID colors that you bake too
- Using complex vertex coloring for the highpoly can make the mesh really heavy to handle, so this method is not always recommended
- Images below show how to transfer texture into vertex color in ZBrush:


Baking and Texturing Lowpoly Vegetation
- Once you are done with your highpoly models:
- Simplest way to create lowpoly versions is usually by making reference meshes of your highpoly meshes
- Decimate your highpoly a lot, name it (e.g. flower_hp_reference)
- Import that highpoly to Modo, and create the low poly planes with the Pen Tool
- At this stage it does not matter if your lowpoly plane is completely flat
- In fact, it's more helpful to bend and modify the lowpoly planes later, because creating cages for flat lowpoly models is really easy
- At this stage it does not matter if your lowpoly plane is completely flat
- Move your lowpoly planes behind the highpoly meshes for baking
- When unwrapping the planes, you can have some overlap in the UV islands to get the maximum space out of the texture
- Be careful though and don't over do this
- Otherwise you might have problems later when you are editing the lowpoly version, and need to maybe need to move some edge or reduce triangle count - only to notice that other plant parts are now showing in the plane
- Be careful though and don't over do this
- Also if you try to squeeze more resolution with some overlapping UV islands, remember to tweak them properly for sway (check "Sway for vegetation" section)
- Image below shows the setup of lowpoly, highpoly, and cage models in Modo for baking grass.


Baking Opacity Maps and Vertex Maps in xNormal
- Follow the instructions from 3D Asset Workflow: Baking in xNormal
- Once you have highpoly texture and the opacity map baked, import them to your Substance Painter project
- In Substance Painter, bake the rest of the maps for the lowpoly planes, like you normally would
- Usually high antialiasing is good to have when baking vegetation, because of the small details in them
- After that, create two Fill Layers for XNormals opacity map and the baked highpoly texture map
- On top of these you can start to do texturing
- Export the textures from Substance Painter using the "T4_asset_export_alphatest" export settings
Baking your opacity map without using xNormal
There is another way of baking your alpha without using xNormal. Substance painter and Photoshop are required. Although Substance painter won't bake a perfect ready to use for the opacity. You will have to bake a texture without any padding then tweak it in Photoshop. The process is quite simple and short.
- Import first your low poly and bake the way you usally do.

- Now we are going to bake a texture (Normal) without any dilation Width. Untick "Apply diffusion" so we won't have any padding. This texture will be use as a base for the Opacity map.

- Go to your Shelf > Textures. You will find your Normal map texture without any padding. Right click on it then "Export resource". Find the texture in your folder then open it in Photoshop. The transparency layer is required so the texture should be a PNG.

- In photoshop, we are going to create the Opacity map ready for Substance painter. Black area is the transparency so you have to create a black background. Create a new layer placed at the bottom of you list and fill it with black color. Then double click on your layer 1 and create a color overlay with white color. Your opacity texture is ready !

- Import your freshly made texture in Substance painter. In Texture Set Settings add a new "Opacity" channel. Create a new layer and disable everything except OP (opacity) and drag and drop your texture in the opacity material from your shelf.

- And the last step is to display your opacity map on your model in Substance painter ! By default Substance painter display on "PBR". There is not alpha treatment. To render the display you have to go to your shader settings and change it for PBR with alpha test. Done !

Sway for Vegetation
- Swaymap creator for Modo
- 3D Asset Workflow: Sway
- Includes instructions for how to make the sway work in the Editor
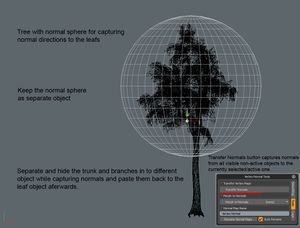
Vertex Normals for Vegetation
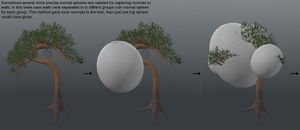
- New vertex normals are usually needed for large leaf plane groups
- Vertex normals can be captured from another mesh, so that they look like one mass, and not separate planes
- Usually a sphere is used for capturing the vertex normals
- Example gif image below shows what the vertex normal transfer does to tree leafs
- Source: Eric Chadwick

- You can capture vertex normals in Modo with Vertex Normal Tools window
- Switch to Tools tab, and use Transfer Normals
- Make sure that only the leaf mass and the half sphere are visible
- If you separate some of your meshes into different layers for transferring normals, remember to copy and paste them back together
- Don't use Modo's Merge Layers command, as that often seems to break the normals!
- If you separate some of your meshes into different layers for transferring normals, remember to copy and paste them back together
- Transfer the normals from the visible, inactive mesh(es) to the active mesh
Simple normal capture
Multiple normal capture meshes
Normal capture mesh


Vegetation Specific Tips
Trees
Ways to Unwrap Trees
- There are few ways to unwrap your tree
- One way is to do custom UVs for the trunk and branches
- This is done when more unique material and shapes are needed
- Second way is to use tiling texture for trunk
- This is useful when lots of variations are needed for the trunks
- Pictures below showing the two ways


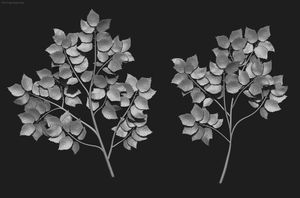
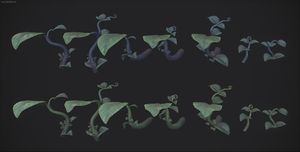
Deciduous Trees
- For deciduous trees, e.g. trees with leaves, it is not good idea to create every single leaf as a separate plane
- If each leaf is a separate plane, the lowpoly of it will be too heavy to use in the end, or not many of them can be used in a same level
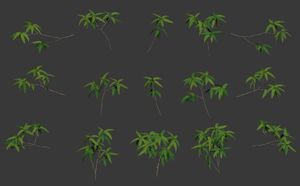
- Instead, make branches that have multiple leaves on them
- When you create different branches, try to make few with different overall silhouette
- E.g. one filler branch, with much more leaves in it, and more simple silhouette
- Then other branches with less leaf mass for the outer edges of the overall leaf mass of the tree
- Usually 3-5 different kind of branch variations get the job done, you don't need tons of different variations
- When you create different branches, try to make few with different overall silhouette
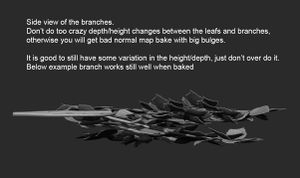
- Try to keep the leaf branches relatively flat in the sculpting phase
- It is good to have height difference in the branches of the plane, but too much difference will make a bad looking normal map, that can cause weird shadowing
- Example image of leaf branches below.
Steps Tom Deerberg used to create branches. Source:https://www.artstation.com/tom_deerber
Leafs made in to groups. Source:https://www.artstation.com/tom_deerber
Final lowpoly branches, that have groups combined to larger branches. Source:https://www.artstation.com/tom_deerber


Coniferous Trees
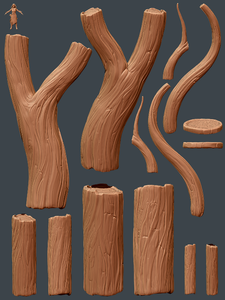
- Coniferous tree branches can be made easily with Modo's Mesh Paint Instance Tool
- First, create 1-3 different needles, that have different sizes, shapes, and bends
- Unwrap those needles, and create texture for the highpoly
- Creating texture for the highpoly needles is very important, because without it texturing them would be very hard later in Substance Painter
- Test with Modo's subdivision preview how they look when subdivided
- Default is tab key for subdiv preview
- Center those needles, and make each of them as a separate object
- Name the needles logically so you know which is which kind, when you start to duplicate/clone them
- Model a few very simple thin branch shapes, where you will next use Mesh Paint Instance Tool and paint them full with needles
- Below images show steps
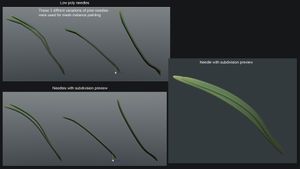
First create needles
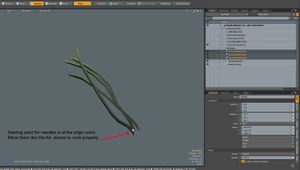
Needle attachment points must be at origin.
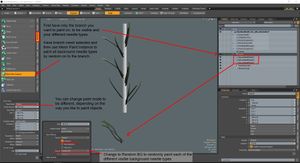
How to paint clone meshes in Modo.

Modo part for needles complete.

Quick modifications for instance meshes.
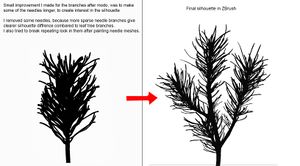
Check often silhouette of your branches
Final high poly branches to be baked on to a planes.
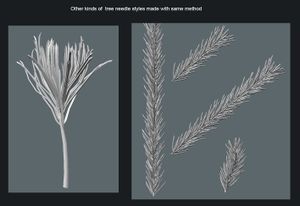
Couple other kinds of needle branches made with same methods.


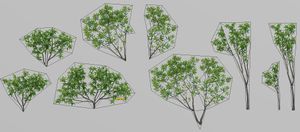
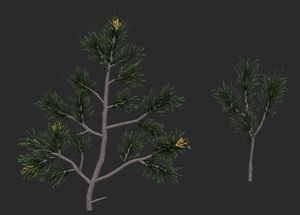
- Below are some example trees


Billboards
- Usually trees also require billboard versions of them done, for background use
- Check this wiki page for instructions on how to create those: 3D Asset Workflow: Billboards
Very Large Vegetation
- With very large foliage, think first if leaves should be just modeled meshes, instead of thin planes
- This depends very much on each case
- A good rule is, that when leaves start to be bigger than a character, they might work better as thicker mesh than planes
- Advantage of planes is that their silhouette does not show any lowpolyness
- When sculpting leaves for large plant, you can already quickly make a decimated version of that leaf, and check in Modo, what kind of a triangle count that kind of a leaf might have
- Reduce the triangle count further with Modo’s reduction tool (found under the Polygon Tab) to see a bit more accurately what the triangle count might be at the end
- If the triangle counts seem crazy, then cheaper option might be to use a plane with transparency
- Huge transparent planes, that use alpha maps, can be heavy on the performance, if they are starting to cover large parts of the screen - so in those cases too, think if just a mesh would be better
- For large trees, it might be better that the trunk is modular, and branches with leaves are added as separate assets entirely
- This way, the level artists can assemble different variations
- Trees like this are very large and more of a special case
Modular tree trunk set
Leaf platforms, with no alpha planes for thicker leaf look.


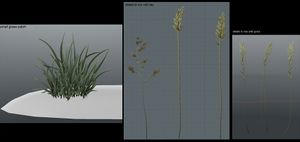
Grass and Hay
- Easiest way to make grass is to model the highpoly grass blades with texturing in Modo
- Some small tweaks can be also done in ZBrush after
- Start by modeling single grass blade and unwrap it'
- Keep the grass blade very lowpoly and check with Modo’s subdivision toggle how the highpoly will look like when the mesh is later subdivided
- Default hotkey for it in Modo is Tab
- Now, depending on how far you want to go with your highpoly's textures, you can either do simple project unwrapping for simple texture map (like gradient), or do proper unwrap for more detailed texture
- Might be good idea to also make couple of duplicates of the blade and map them, to use slightly different a color variation
- For grass, it’s good to make the normals blend more with the ground
- Easy way to do this is to select all the bottom vertices of grass planes, and then run Transfer Normals when a separate planar object is under the grass and is set to be visible
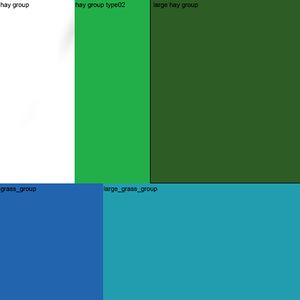
Different sized groups of grass in editor
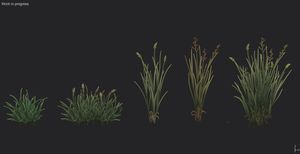
textured grass planes
Mix some additional details to your grass and hay for interest.

High poly grass with gradient texture
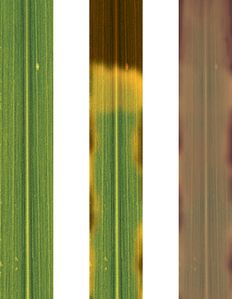
For grass high poly blades more detailed texture could also work in some cases. Source: https://www.tonytextures.com/tutorial-how-to-make-render-super-realistic-3d-grass-with-3ds-max/


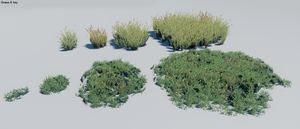
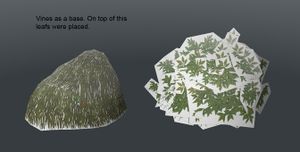
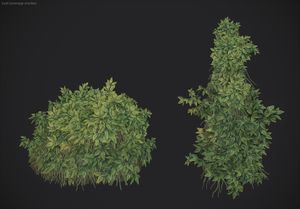
Vegetation Coverage Assets
- These are assets that are meant to cover up a large are with e.g. leaves
- They help dressing a level quickly with vegetation, and give an illusion of lush nature easily
- More specific vegetation might be added on top of these later
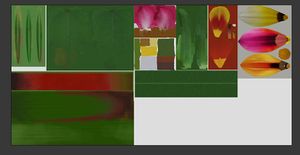
- It's good to have a value difference in the leaf planes, so that darker are at the bottom, and on top of those layer more bright leaf planes
- Also the leaf planes at the bottom should be more full of leafs to cover and hide more, while the next layer on top of those can have less leaves to create interesting silhouettes to the outer edges of the leaf mass, and to also show the darker color underneath, and give depth from the layers under them
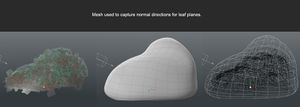
- Remember to also capture normals for vegetation coverage assets - this is crucial especially for them, so they look like on mass when light hits them in game
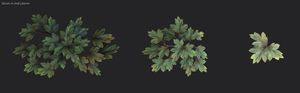
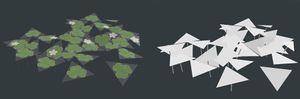
Value difference in leaf planes
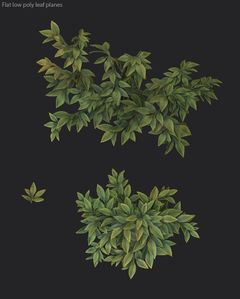
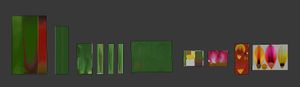
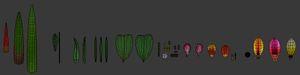
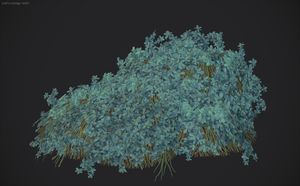
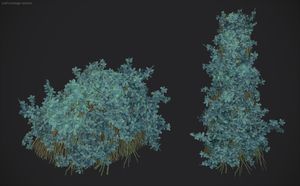
parts of a leaf coverage model.
Low poly model broken down.
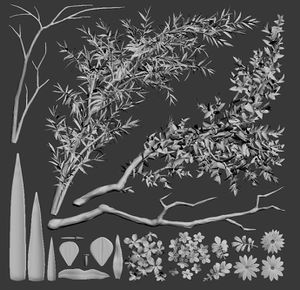
Normal capture mesh
assembled Leaf coverage models.
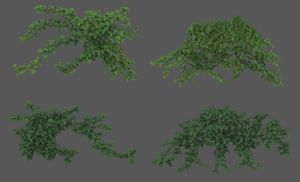
Good example images by Tom Deerberg, that shows wall covering ivy


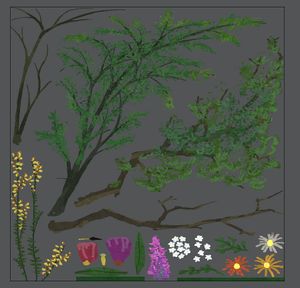
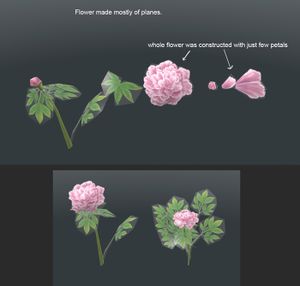
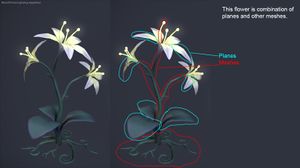
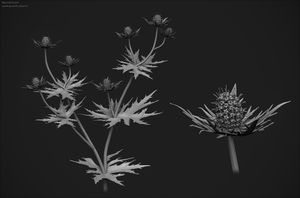
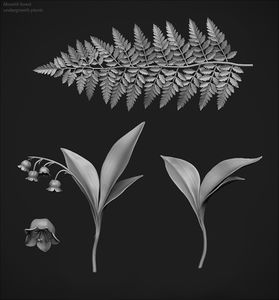
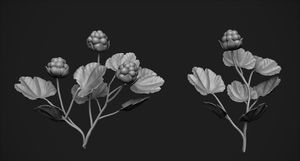
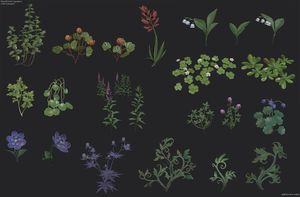
Small Undergrowth and Flowers
- General workflows for vegetation work for small undergrowth, except oftentimes the UV map does not need space for as many variations on the type of leaves one plant might have
- Triangle count is also very important, and it's best to keep it low as possible
- Some undergrowth also benefits from capturing normals from a sphere or other smooth shape
- When making undergrowth, have one single plant asset and groups made of that same asset
- This helps level artist to fill levels faster

These Heather flowers were done much the same way as grass was


Decals
- Tips on how to create variation to ground decals

Are the Leaves Too Noisy?
- Sometimes your leaves might look too noisy in the Editor
- One reason could be that the normals have too much going on in the individual leaf shapes
- Too much depth difference in the leaves especially can do this
- You can try to tone down the effect by quickly smoothing your highpoly leaves, and baking another normal map from them
- Then, in Substance Painter, you can mix it with the original normal map and adjust how much the leafs get smoothed
- This same thing can also happen if the high poly leaf plane has too much height differences in it's placement of small branches
- Smoothed leaves example:

Sources
Video 01 : pixelfondue. [accessed June 7, 2018] MODO - Create Grass and Hair Alpha Maps. Available at: https://youtu.be/E_QYtANycq4
Video 02 : pixelfondue. [accessed June 7, 2018] MODO - Using Fur to Create Polygon Strips Available at: https://youtu.be/gfmJyg_qIg4