Dynamic objects
Shadwen Editor Tutorial Main Page
-> Next tutorial (Rope Targets)
<- Previous tutorial (Static Objects)
This section covers the basics of dynamic objects, which are objects that react to in-game physics. We'll also take a closer look of modifying object properties and components.
- Level path in Shadwen Public Editor: \data\mission\editor_tutorial\03_dynamic_objects
Dynamic Objects
"So far, we've been looking at levels built out of basic static objects - things that are used to build the ground and walls for your levels.
This tutorial level will introduce DYNAMIC OBJECTS. These are what you'll use to make your levels actually truly interesting.
We'll also go more in-depth with object components - how to add new components to objects, which components are the most common to edit, and so forth."
"Dynamic objects are objects that react to the in-game physics.
They can be moved, they can be pushed around by the player or other objects, and usually they are affected by gravity.
Dynamic objects are the backbone of all physics related gameplay in Shadwen. While static objects are vital for building out your level, dynamic objects are equally important for making your level actually fun."
Most of the time, dynamic objects will act just like a similar object would act in the real life. Were you to build a tower of blocks or even a complicated card house, you'd have to be just as careful in building them as in real life or they'd come crashing down just as you'd expect if you moved some of their most crucial balancing parts. A good rule of thumb is to use dynamic objects just as you would see them work in real life even if the physics don't obviously perfectly match.
ActorTypes
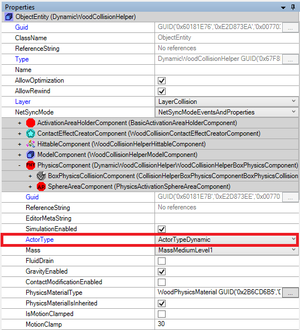
"Dynamic objects are fundamentally quite similar to static objects. They simply have their PhysicsComponent's "ActorType" set to ActorTypeDynamic, "CollisionGroup" set to CollisionGroupDynamic and "DominanceGroup" set to DominanceGroupDynamic. These can be found from the object properties window (Ctrl + P).
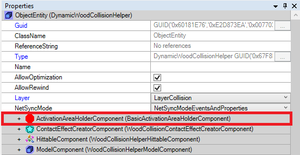
In addition, dynamic objects require a Physics Activation Area component. When the game camera is close enough to this component, the object will react to in-game physics.
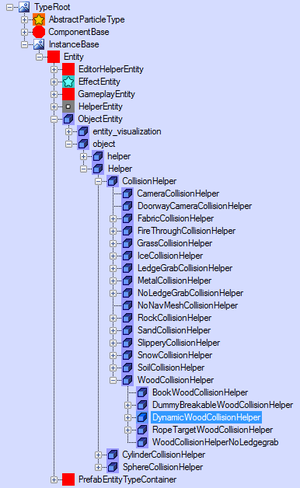
To add a new dynamic object, simply find DynamicWoodCollisionHelper (for example) in the Type tree and add it into your level. You can also find all kinds of pre-made dynamic objects, such as the boxes, chairs and surfboards here."
Adding dynamic objects
"Try to add a few dynamic objects of your own in this section or the bowl beyond.
Try different dynamic object shapes and materials, and see how they act when colliding with each other or the player character!
A simple way to find the dynamic collision helpers from the Type tree is to type dynamic in the search field and then navigate:
TypeRoot -> InstanceBase -> Entity -> ObjectEntity -> object -> Helper -> CollisionHelper.
Remember to set VisibleInGame = true for your new objects!"
ASSIGNMENT IN DYNAMIC OBJECTS PLAYABLE TUTORIAL LEVEL:
"The blue block on top of the tower in the bowl looks like it's just resting on the other blocks.
In reality, it's ActorType is set to ActorTypeStatic so it won't react to any in-game physics aside from having collision.
Try changing it's ActorType (found under PhysicsComponent) to ActorTypeDynamic to make it react to the tower falling when you roll the green balls into it!"
"Also, if you're wondering how to change the color of your objects, it's really simple too!
You can find DiffuseColor property under ModelComponent where you'll just have to click on the three dots to choose a color.
It's really useful to learn to color-code the elements in your levels to help the player differentiate between different types of objects."
While being helpful to players too, you should take a habit of doing it for yourself as well since it will start getting much harder to navigate and select the right objects in your levels if everything is constructed of the same gray mass.
Mass Property
"More often that not, you're going to want to modify the properties of your dynamic objects one way or the other, to make sure they behave exactly as you want in the game.
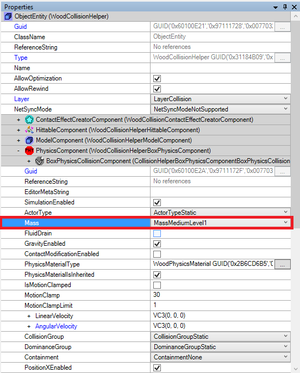
One of the most common properties to modify is the Mass of the object, found under PhysicsComponent:Mass.
In a see-saw puzzle, for example, the size, shape or material of the object has no significance. The only thing that matters is which Mass has been set to the object."
"There are 7 different levels of mass for this property, ranging from Not Set(0.25) to Max(20). Most of the levels are also divided to 3 different sub levels, like MassMediumLevel1-MassMediumLevel3."
ASSIGNMENT IN DYNAMIC OBJECTS PLAYABLE TUTORIAL LEVEL:
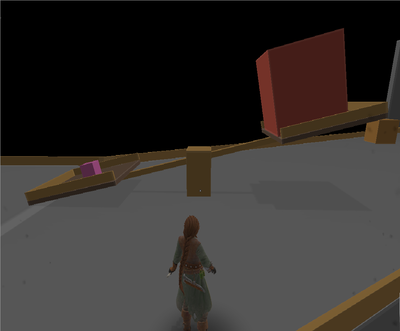
"On these simple see-saws, there are differently colored blocks with different Masses set to them.
Try changing the Mass (PhysicsComponent -> Mass) of some of the objects! See how modifying this one property changes the way they behave in the physics world. The premade boxes are also attachable by your rope so you can pull them off from the see-saws.
You can also bring in some of your own dynamic objects and see how they behave with the see-saws."
Of course, the benefit of working in virtual space is the ability to alter the physic properties of these dynamic objects to suit them perfectly to your needs. Even if it is generally a good idea to think of real life situations when editing, the possibilities with all different properties of an object will allow you to make objects behave unexpectedly, as like they don't follow any traditional rules. Mass is one property you can change to make objects' mass to match their appearance or create unexpected physic situations, it can be found under PhysicsComponent in the object properties window. It has preset weight classes to choose from which you can find from the table below.
| Name | numericMass |
|---|---|
| MassVeryLightLevel1 | 0.25 |
| MassVeryLightLevel2 | 0.5 |
| MassVeryLightLevel3 | 1.0 |
| MassLightLevel1 | 1.5 |
| MassLightLevel2 | 2.0 |
| MassLightLevel3 | 2.5 |
| MassMediumLevel1 | 3.0 |
| MassMediumLevel2 | 4.0 |
| MassMediumLevel3 | 5.0 |
| MassHeavyLevel1 | 6.0 |
| MassHeavyLevel2 | 7.0 |
| MassHeavyLevel3 | 8.0 |
| MassMassiveLevel1 | 10.0 |
| MassMassiveLevel2 | 15.0 |
| MassMassiveLevel3 | 20.0 |
More of these properties will be introduced along the tutorial.
Adding Components
"At times, a pre-made object doesn't contain the component you need to make it behave the way you want.
When this is the case, you'll need to add a new component to the object.
To do this: select the object, right-click on it in the editor view, and choose Add component.
You'll then be prompted to find and select the component you need from ComponentBase."
ASSIGNMENT IN DYNAMIC OBJECTS PLAYABLE TUTORIAL LEVEL:
"The purple box above the ledge should be attachable by Shadwen's rope so she could drag it down to use it as a counterweight for the scale.
Add the necessary components to the box to be able to drag it down.
To make the box attachable by the rope:
- Add a NinjaRopeTargetGameplayEntityBoxAreaComponent to the object.
- Add a RopeTargetWoodCollisionHelperAimedRopeTargetComponent to the object.
Remember to adjust the mass of the box for it to be able to hold the scale down!"
The purple box is located above the ledge with the different symbols written on it. By default, it doesn't have any of the components mentioned in the book. To add them, you'll have to select the object (remember to select the right layer which is the collision layer in this case) and right click on it in the editor view. From the dropdown menu, select Add component and a new popup window appears. From here, you'll have to search for both of the mentioned components which happens effortlessly by typing the component names in the search bar above the component base. Select the component you want and click OK. The component you just selected then appears in the properties window of the purple box but in this case, we don't need to modify it's properties further. Then you'll just have to add the remaining component with the same procedure and it too will appear in the properties window.
Now that we have both components intact, we still need to take a look at the object's mass. Having the purple box selected, the Mass property can be found from the properties window, under PhysicsComponent just like before. There is a drop down menu with all the different weight classes listed above on this same page from which you can choose the one to your liking. But just to be sure, you can select the heaviest class which is MassMassiveLevel3, apart from MassMax which isn't usually recommended since it doesn't leave any room to make heavier objects than they already are if needed. Your pushing ability isn't affected by the mass of the object so don't worry of not being able to push it on the scale.
Now the purple box should have all the right components and properties changed so it can hold down the scale for you to use the other end to climb on the high platform.
Video tutorial for adding components and solving the area III assignment of the playable Dynamic Objects tutorial level:
"A bit about gameplay area components:.
These components come in many different shapes and utilities but fundamentally, they all allow the object to interact with other components.
They basically notify the game engine that they are gameplay objects so that other objects and game features can react to it appropriately."
"The purple box from before had a PushingInfoComponent set to it by default which makes it pushable by characters.
Basically, you're not able to push the objects without PushingInfoComponent added to them, even if they're dynamic objects. However, you're able to move them around by pushing other objects to which the ones without the PushingInfoComponent react.
"An object's breakability is also the work of different components that you will probably be playing with eventually.
There are some breakable CollisionHelper objects ready for use in the type tree to test breakability if you wish."
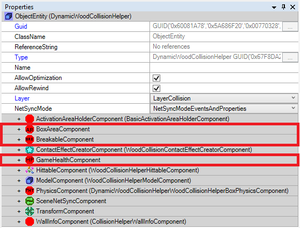
After added to an object, the components in the beside picture don't need further adjustments to make the object breakable. However, there are a lot of different properties under these components which you can experiment on and see what happens by changing them.
In general, when you're not sure which component is creating the effect you want to replicate, it's usually smart to look up an object that already functions at least partly like you want your object to function as well. After finding one, start going through the components of both your object and the one having the right function, and compare them to find all the differences between them. Now you're ready to start narrowing down the possible options either by judging from the name of the component or just trying to delete one and see how it functions afterwards without it. If the object is suddenly missing the function you're searching for, you've probably found the one at least partially causing the wanted effect.
Shadwen Editor Tutorial Main Page
-> Next tutorial (Rope Targets)
<- Previous tutorial (Static Objects)