Triggers and property connections
Shadwen Editor Tutorial Main Page
<- Previous tutorial (Hinge Joints)
- Level path in Shadwen Public Editor: \data\mission\editor_tutorial\10_triggers_and_property_connections
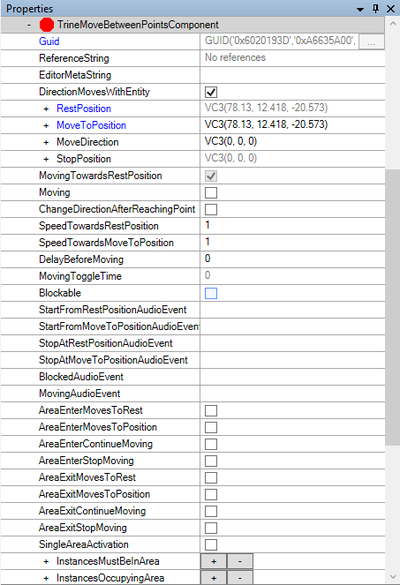
TrineMoveBetweenPointsComponent
"So far, we've learned how to place both static and dynamic objects on the playfield, and how to use HingeJoints to create physics contraptions out of them.
In this tutorial, we'll take the next step and learn how to use simple triggers in order to make your physics puzzles more interactive.
We'll also look at "TrineMoveBetweenPointsComponent", which is one of the most common ways of putting life and movement to your objects."
"TrineMoveBetweenPointsComponent is a very versatile component that has many uses. It's addable to any object with its ActorType set to dynamic.
For example, an object may be made to automatically move between two points or to change its behavior depending on if a trigger is activated or not."
The TrineMoveBetweenPointsComponent can be imagined as a straight rail in which an object of your choice will travel. You're able to specify its starting and ending point, its speed in both directions and how the object will actually decide on which direction it will be going in a specific situation. It is really handy for platforming obstacles and for making puzzle contraptions.
As mentioned too, it requires a dynamic object to work. Otherwise the component won't work at all and the editor will be giving out errors.
"The blue platform here is just a normal DynamicRockCollisionHelper but it has been given a TrineMoveBetweenPointsComponent and made to move automatically between two different positions.
This has been achieved by giving position values to its "RestPosition" (its visible position which updates automatically) and "MoveToPosition" (its destination position) properties and checking "Moving" and "ChangeDirectionAfterReachingPoint" properties.
But before anything, always remember to set the object's "GravityEnabled" to false from its PhysicsComponent in order to have it work properly.
Also, since the object is meant to move only up and down, only its PositionYEnabled has been left checked to avoid any unnecessary movement."
RestPosition is just as obvious as it sounds; it's the visible current position of an object that holds the component in question and it changes every time you move the object to match its position. MoveToPosition is the other end of the rail which you'll have to specify yourself by giving it a position value. The easiest way of doing this is to just move the object to the wanted place and then open up its TransformComponent from where you can just copy and paste its current position.
Moving and ChangeDirectionAfterReachingPoint properties are useful when you don't want to specify any circumstances when the object should be moving but to just make it move automatically. Since the object is moving towards the rest position automatically at all times (MovingTowardsRestPosition is forced to be true) if it's not given any movement conditions (we will return to these later on), you'll need both of the properties to be set to true for it to move automatically or it won't move at all.
More info about TrineMoveBetweenComponents can be found from here.
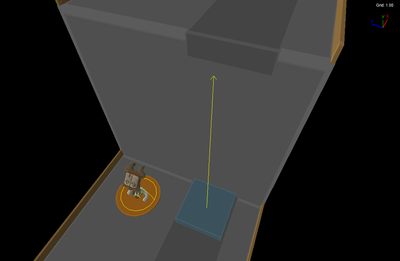
"The next blue platform is using the same component but it has been made to move forward only when the player is standing on it.
This can be achieved by adding "BoxAreaComponent" as a subcomponent of TrineMoveBetweenPointsComponent (right click on the component and select "Add subcomponent") and then setting how the platform functions when entering or leaving the BoxAreaComponent.
The BoxAreaComponent requires a few mofifications after being added too, like setting what can actually trigger it. This platform can only be triggered by Shadwen as only ActorPlayerBox has been set to true from its ListenMask.
It's also recommended to resize and relocate the BoxAreaComponent to make it properly-sized by editing its "Dimensions" and "Offset" values.
If you want to make the BoxAreaComponent move with the platform, you'll also have to check "UseTransformComponentFromFinalOwner".
Unfortunately, BoxAreaComponent's shape may not display immediately so you may have to save and reopen the level to get it visible."
ListenMask contains most of the options you will be using with the editor. ActorPlayerBox is associated with playable characters and will make it react when a playable character (note that it includes Lily) has been detected inside the BoxAreaComponent.
"How the platform will actually behave in relation to BoxAreaComponent is up to its "AreaEnter..." and "AreaExit..." properties which can be found under TrineMoveBetweenPointsComponent.
These options cover both entering and leaving the BoxAreaComponent, such as making the platform either move to a position, move towards a position or stop.
The platform over the pit starts moving to the position of MoveToPosition only when the player enters its BoxAreaComponent which is because "AreaEnterMovesToPosition" is set to true. On the contrary, the platform will return to the position of "RestPosition" when the player leaves it since "AreaExitMovesToRest" is true as well."
All the different options can be found here. Note that the pressureplate options are not suited for Shadwen as they break easily with the rewind mechanic.
"There's a normal DynamicRockCollisionHelper next to you, make it a functional elevator by using BoxAreaComponent!
1. Start by disabling Gravity under PhysicsComponent, then add a TrineMoveBetweenPointsComponent for it and add BoxAreaComponent as a subcomponent for the first component.
2. Modify BoxAreaComponent's ListenMask as you see fit, set UseTransformComponentFromFinalOwner as true and modify its dimensions and offset.
3. Under TrineMoveBetweenPointsComponent, set a value for MoveToPosition and then proceed to set the wanted AreaEnter and AreaExit functions.
Now your platform should be functioning as wanted! You probably want to restrict its position and rotation axes from PhysicsComponent as well and maybe even change its movement speed under TrineMoveBetweenPointsComponent as well."
Video tutorial for area I assignment
This video goes through a step to step process on how to make the blue platform in question to function like an elevator. The implementation of the movement is up to the player but this video aims to make it move to MoveToPosition when Shadwen stands on it and, on the contrary, move back to RestPosition when Shadwen leaves the platform. The pre-tested values that were mentioned in the video are listed beneath but you should try to assign them yourself for the sake of practice. What wasn't mentioned in the video is that you can also use area tool [Hotkey 4] to resize the BoxAreaComponent which is a bit more easier to use than just assigning numbers.
- Dimensions: VC3(2, 0.5, 2)
- Offset: VC3(0, 0.3, 0)
To see the visual outlines for the BoxAreaComponent, you'll have to save and reopen the level first. If you're still unable to see the outlines, check that UseTransformComponentFromFinalOwner is set to true. Otherwise, it's dimensions and offset will be based of the center point of the level's X, Y and Z axes, meaning that it does exist but it's probably located somewhere far away.
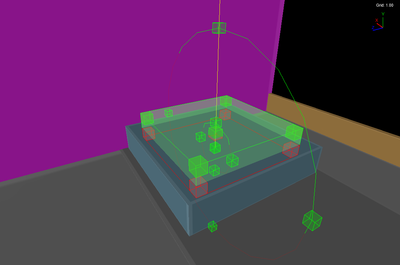
"Here's an example of TrineMoveBetweenPointsComponent whose BoxComponentArea's UseTransformComponentFromFinalOwner property isn't set to true. This means that the activation area doesn't move with the object so it will stay in its default position.
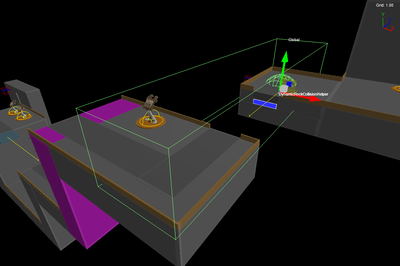
This allows somewhat different mechanisms like the bridge ahead which can be triggered from both sides of the pit for easy travel."
Triggers and property connections
"While TrineMoveBetweenPointsComponent has a lot of utility and can be used in a variety of ways, it doesn't always hold the answer you're seeking.
One other common way of creating these kinds of mechanisms is setting up a property connection between a trigger and an object of choice.
Fundamentally, a property connection allows you to trigger any single available property from any object which opens up many, many possibilities."
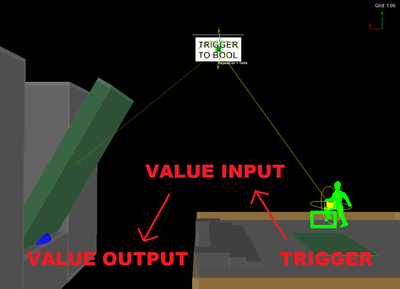
Triggers itself are the entities that have to be activated in a way or another to start a chain of actions. They allow desired things to happen in a desired place at a desired timing by utilizing different ways of linking these triggers to properties of other objects and entities. For example, we're able to make a barrel explode in the distance when simply walking to a certain area/spot with our character. The most common used triggers are different BoxCollectorAreas which are invisible areas that will activate a reaction when an object or entity of choice enters the area.
"The green bridge standing ahead of you is connected to a ZHingeJoint from its low end so it should be able to fall down due to gravity. However, from its PhysicsComponent, "RotationZEnabled" property has been set to false, preventing it from falling the way it normally would.
This is all intentional though as we're able to toggle the aforementioned property between true and false through a property connection. A PlayerBoxCollectorArea has been set over the green plate ahead which will trigger the mechanism and ultimately set the bridge's RotationZEnabled to true, allowing it to fall down."

"How was all of this set up?
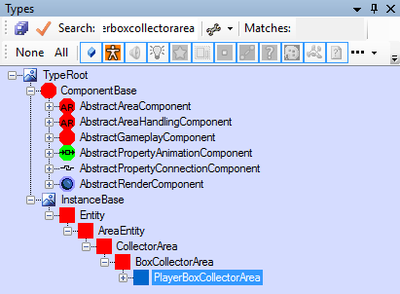
At first, you'll need a trigger. You can find a PlayerBoxCollectorArea from from the type tree which will trigger when a player enters the area. There are other kinds of BoxAreaCollectors too so the optimal one depends on the situation. You can resize the area by using area tool (Hotkey 4).
Then we'll need an entity called "TriggerToBoolPropertyEntity", it's found from the type tree as well. It doesn't matter where it's located but you should place this near the other parts of the mechanism for convenience.
After they're both on the scene, we'll start by opening the PlayerBoxCollectorArea's "TriggerOtherInstancesComponent" and finding a list called "OtherInstances". Simply add the TriggerToBoolPropertyEntity to the list by clicking the three dots. Every entity in this list will get triggered when entering the trigger area.
We've now set up the actual trigger and so only the property connection remains to be done."
"To set up a property connection, you'll need to open up TriggerToBoolPropertyEntity and find "TriggerToBoolPropertyComponent" under it. Here we have a variety of important properties but we'll concentrate on setting up the actual connection before delving into them.
Right click on the very last property on the list called "OutBool" and select "Select property as input". Now select the green drawbridge, find the RotationZEnabled property, right click on it and select "Connect input to this property directly".
Now the TriggerToBoolPropertyEntity is assigned to "send" its current OutBool value to the selected property and thus changing its current setting to match between the two. Every time the player enters the trigger area, OutBool will move one step further in the "Values" list above and choose that value to send to the output property.
In the drawbridge case, the first starting value is set to false (0) as default but the next value in the list will be true (1), setting RotationZEnabled to true as well with the first trigger. You may add more steps to the list if needed as well."
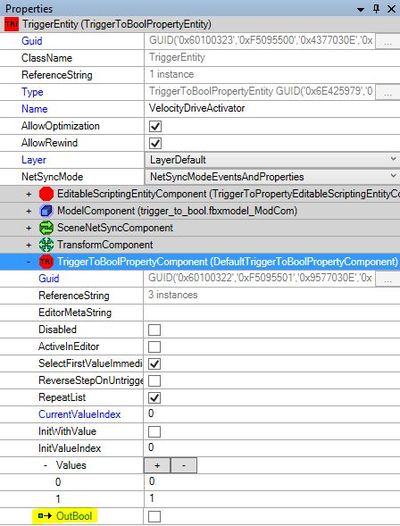
An entity called TriggerToBoolPropertyEntity plays a very central part in all of this. It is an entity that is able to assign and change boolean values (either FALSE (0) or TRUE (1)) of different properties when it receives a confirmation that a trigger has been activated. For example, we can trigger any object's Enabled property which makes it either function or not. Of course, this requires that the trigger and the TriggerToBoolPropertyEntity have been linked together which can be done from the TriggerOtherInstancesComponent which is assigned to almost every type of trigger available. From there, you'll just have to add the TriggerToBoolPropertyEntity to the list called OtherInstances. In the drawbridge example, a PlayerBoxCollectorArea was used which will trigger when a player enters its invisible area.
Our trigger system isn't fully operational yet as we've yet to make a property connection between the TriggerToBoolEntity and the object or entity of choice. To start, you'll have to select the TriggerToBoolEntity of the contraption you're making and find a TriggerToBoolPropertyComponent under it. This component is the one in charge of handling which boolean values it will be assigning and changing once being triggered. It has a few properties that are useful to understand:
- SelectFirstValueImmediately: No matter which values are set to the OutBool and the property it's connected to, they will immediately be replaced with the first value from the Values list.
- ReverseStepOnUntrigger: If you unactivate the trigger for this TriggerToBoolEntity, it will take one step backwards in the Values list.
- RepeatList: This list being set to TRUE, the Values list will repeat itself from the first value after each happened triggering action.
- Values: When this entity gets triggered, it will move one step further in the Values list. In this specific entity, the only possible values are 0 and 1 (FALSE and TRUE).
- OutBool: This property inherits the current value from the Values list.
The property you'll be the most interested in is the OutBool one as you're not able to complete the trigger without it. At first glance, it doesn't seem to have anything else to it than a simple checkbox which is true. To make a property connection to the property which you want to be able to change by activating the trigger, start by right clicking OutBool and selecting "Select property as input". This essentially makes this property forward its boolean value (again, either FALSE or TRUE) to another boolean property of choice, making their values match. To specify the receiving property for this connection, you'll have to right click on it and select "Connect input to this property directly" which completes our trigger set up. If you were succesful in making the connection, you should see a green box with an arrow leading out of it the input property () and a green box with an arrow leading to it in the output property (
![]() ).
).
To test this out, an easy way would be to set a dynamic object to your level, leave it in the air and disable it's GravityEnabled from its PhysicsComponent, aiming to enable the property in question to have it falling down. You'll also need a trigger area, like PlayerBoxCollectorArea, and TriggerToBoolEntity to complete the contraption. There will be an assignment later regarding the subject too so practice as you see fit.
Assigning OtherBoxCollectorAreas
"Here's an example, where a couple of different triggers have been set up to demonstrate a simple physics contraption: A PlayerBoxCollectorArea on the green plate will release a green ball, which then needs to reach the bottom of its rail in order to open the hatch for moving forward.
For checking when the green ball has reached the bottom, we've used an OtherBoxCollectorArea, which is a rather generic BoxCollectorArea that can be set to collect all kinds of different objects or types.
The BoxCollectorArea has a TrineTriggerWhenCollectedComponent. There's is a list under it named as RestrictToInstances, for which we have added the green ball to be the only instance this specific area will collect.
It's also possible to set RestrictToTypes instead, which means that any object of the same type (DynamicWoodSphereCollisionHelper) would be getting collected."
"NOTE: An object can only be collected by a BoxCollectorArea if it has a Gameplay Area Component with NotifyMask : default = TRUE.
You can find a basic SphereAreaComponent from the green ball's properties. Expanding this component will reveal a property named NotifyMask, which on its part will show you the value being as default = 1 (TRUE).
The reason for this is that the BoxCollectorArea doesn't actually look for the physical outlines of any object. Instead, it listens to this Gameplay Area. Once the AreaComponent intersects with the BoxCollectorArea, the object gets collected.
Pre-made objects usually contain this Area Component by default. However, when you add new Collision Helpers and such to your level, the component probably needs to be added."
So far we've been using a preset BoxCollectorArea with PlayerBoxCollectorArea whose trigger conditions can be pretty much figured out already from it's name. Fundamentally they function all the same though; they count or collect specific objects inside their area range which are based on their property settings. While there are a variety of BoxCollectorAreas ready to collect predetermined objects, you're also able to assign it yourself, just like you did before with TrineMoveBetweenPointsComponent's BoxAreaComponent to collect the player character.
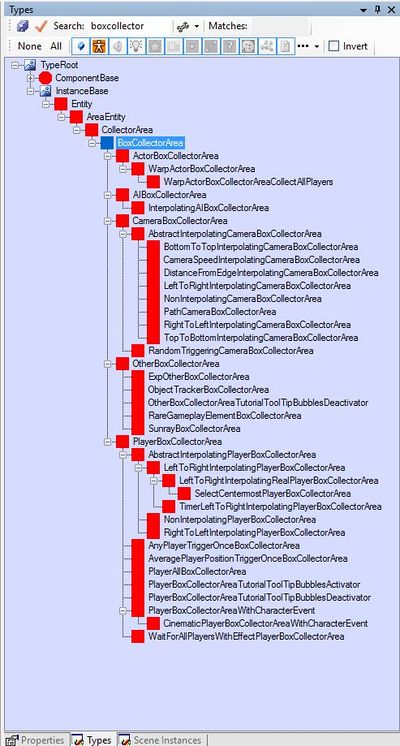
To assign which objects or types a BoxCollectorArea can collect, start with finding an OtherBoxCollectorArea from the Type Tree and placing it to the level. It's basically like any other BoxCollectorArea but it hasn't yet been assigned to collect anything so you can start from a clean table. You should be able to find a TrineTriggerWhenCollectedComponent in it's properties and three different lists under it called RestrictToTypes, RestrictToInstances and ExcludeTypes under it. It's worth to note that all these lists accept multiple different selections so it's possible to make pretty complicated conditions for accepted objects. They aren't limited to just literal objects either, it can be anything from an AI character to an in-game item. Here's an explanation for each list:
- RestrictToTypes: Any object assigned to this list will have it collect all objects of the same type as the one you selected. For example, assigning a DynamicWoodSphereCollisionHelper to it would mean that it collects all DynamicWoodSphereCollisionHelpers.
- RestrictToInstances: Any object assigned to this list will get collected independently.
- ExcludeTypes: Any object assigned to this list will not have it collect any objects of the same type as the one you selected. For example, assigning a DynamicRockSphereCollisionHelper to it would mean that it doesn't collect any DynamicRockSphereCollisionHelpers. Takes priority over RestrictToInstances.
By adding an object to one of the first two lists (the third one only excludes objects so it doesn't work alone) you've set up the trigger to be activated by the object(s) of your choice. However, while the trigger is ready to receive these objects, the assigned objects itself may not yet be able to notify the OtherBoxCollectorArea you've set that they're in it's activation area and thus triggering it. You'll still need to modify the objects a bit to make it possible. Start by selecting an assigned object and find out if it has an AreaComponent already set to it which is usually either a BoxAreaComponent or a SphereAreaComponent depending on the object's shape. If it doesn't, add either one from above to its properties. Locate the component, expand it, find a dropdown list called "Group" and change it to "AreaGroupGameplay". This makes the object to be able to interact with all kinds of gameplay objects and further modifications on what these gameplay objects are can be make from a property list called "NotifyMask". The list contains a few different activation options from which we have to set the one called "default" to 1 (TRUE) which basically makes the object able to be recognized by the BoxAreaComponents in question for example. Remember to set this for all the objects that you've assigned.
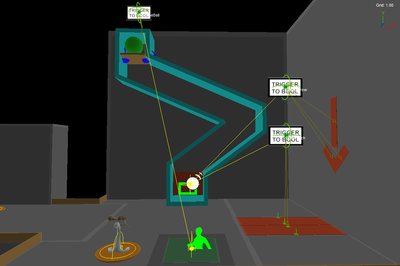
"The hatches are held by two Hinge Joints, making them completely immobile.
Here, TriggerToBoolEntities have been set up to disable a few whole Hinge Joints instead of just single properties. Their HingeJointComponents have an Enabled property, which can be turned off to make the Hinge Joint deactivated.
The TriggerToBoolEntity called ShowArrow, on the other hand, is connected to ModelComponent : IsVisible property of the arrow, which makes the arrow visible once the trigger has been activated."
You may notice here that several arrow lead out of a single TriggerToBoolPropertyEntity which means that a single one can trigger multiple different properties. However, this restricts all the connected properties to the same Values list which may not yield desirable results in case you want different connected properties being TRUE and FALSE at the same time. With multiple connections from the same input property, it's important to know that you can erase single connections instead of all at the same time by going to an output property, right clicking it and choosing "Delete all connections to/from this property". Naturally, doing the same to the input property with multiple connections leading out of it would erase all its connections.
"Make the orange door open when you push the orange box on the green plate! Take the previous contraption as an example on how to set up a OtherBoxCollectorArea and make it the trigger that will open the door.
The door is currently floating in the air thanks to its GravityEnabled property being set to false but by making a property connection to it you can activate it again and thus "opening" it."
Video tutorial for area III assignment
How the door has been set up, there aren't currently any other straightforward options other than disabling its Gravity : Enabled to make it drop out of the way or to make it disappear along with its collisions. The first option is a lot more convenient so we'll go with that and the video also chose the same option (you can see the other one has been implemented in the next contraption behind the door if you wish to examine it).
To start up, you'll be needing an OtherBoxCollectorArea and a TriggerToBoolEntity from the type tree. Start by relocating and resizing the OtherBoxAreaCollector to fit on the green plate as you see fit. After that, find its TrineTriggerWhenCollectedComponent and add a row to the RestrictToInstances list. By clicking the three dots here and adding the box to this list, you just made it the only instance that is able to trigger the OtherBoxCollectorArea. However, the box itself hasn't yet got the components to be able to be recognized by the area you set but this can be fixed by giving it a BoxAreaCollector (in the tutorial video it was given a SphereAreaComponent on accident but they both have the same functions outside of their shape). Expand the component and change its Group to AreaGroupGameplay from the dropdown menu. After this, expand NotifyMask and set default to 1 while leaving all others as 0 just to make sure nothing unexpected happens. You may also want to resize the AreaComponent to match the object shape better from Dimensions (BoxAreaComponent) or Radius (SphereAreaComponent).
After this, complete the trigger mechanism from OtherBoxCollectorArea's TriggerOtherInstancesComponent by adding the TriggerToBoolEntity to the OtherInstances list. Proceed to select the TriggerToBoolEntity itself and go to its TriggerToBoolPropertyComponent. The Value list has our desired order of values by default (0: 0 and 1: 1), meaning that the door's GravityEnabled is false by default and can be switched to true by the trigger. Uncheck RepeatList to avoid any unexpected problems as our door cannot be operated anymore after being opened. For the actual property connection, right click on OutBool and select "Select property as input" to set up our input property. The only thing remaining is to set the output which is the door's GravityEnabled property. Locate it, right click on it and select "Connect input to this property directly" to complete the process. Now you're able to "open" the door by pushing the orange box on the green plate.
"With everything you've learnt so far, you're able to design all kinds of different mechanisms and traps! Ahead is just one fun example of what is possible with just little effort!
If you get stuck, rewind time back to the starting point!"
The trap area contains only objects and entities familiar to you and is fully replicable with the skills you've just been taught. It's relatively simple in the end too, the area has four different PlayerBoxCollectorAreas which all trigger some GravityEnabled properties to true from the objects levitating above. The TriggerToBoolPropertyEntities have their RepeatList set to FALSE to ensure that the GravityEnabled properties don't accidentally turn to TRUE again. The seemingly solid roof is a normal RockCollisionHelper whose PhysicsComponent has been simply disabled, allowing objects to fall through it and maintaining the surprise element.
The door itself has a TrineMoveBetweenPointsComponent set to it with a BoxAreaComponent added as a subcomponent, allowing us to trigger it from entering a specific area. This area is located on the green plate and is identical to its own TrineMoveBetweenPointsComponent's BoxAreaComponent, creating an illusion that triggering the plate directly causes the door to rise (the same method was used with the earlier green plates as well). The door's movement speed has also been altered from SpeedTowardsRestPosition and SpeedTowardsMoveToPosition to make it rise quickly and then fall back down very slowly, giving the player enough time to navigate himself past the door.
A safeguard mechanism has also been implemented to stop players from triggering all the traps and then coming back to activate the door again. A red block is assigned to appear over the green plate when the player enters the first PlayerBoxCollectorArea and stops him from coming back and opening the door again. The red block's PhysicsComponent Enabled and ModelComponent VisibleInGame properties have been property connected to make them turn to TRUE. It could've also been possible to just property connect the door's BoxAreaComponent Enabled property to FALSE after being triggered but it would've been somewhat confusing to the player without any kind of feedback or visualization that the plate can't trigger anymore.
Shadwen Door System
"Here we have a door and two levers. It needs two triggers to open. They can be triggered by either Shadwen (ThiefCharacterEntity) or Lily (ChildCharacterEntity).
There are three PlayerBoxCollectorAreas in total. Two of them are at the levers collecting Shadwen and Lily and the third one activates when both characters are in the area.
If the levers are pulled down by either character, the other character still needs to reach this PlayerBoxCollectorArea for the door to open.
This door uses the same system as the doors used in the game itself. In fact, this door is a direct copy of one of the game's doors."
"The two PlayerBoxCollectorAreas at the levers send a trigger to their respective SyncedTimerEntities while the third PlayerBoxCollectorArea needs two triggers to activate (so that both characters are needed). This PlayerBoxCollectorArea then sends a trigger to the TriggerToBoolEntity and the TriggerToFloatEntity.
The SyncedTimerEntities are informed that there is a character at a lever. This information is then sent to the TriggerToFloatEntity that makes the lever go down.
The TriggerToBoolEntity sends a trigger that enables the hingejoint that makes the door open. There is a second hingejoint that keeps the door in its place (just like there are hinges in a regular door).
You can get Lily here and test it out by starting the game at this position with CTRL+F5."
The door system is quite complicated but can be reasonably understood at least on a basic level. As it is the offical door system used in the actual game too, it's recommended to examine it and understand the principles behind it but don't worry if you're unable to reconstruct it yourself. If you're planning to use the system in your own levels, you may freely copy this very door from here or any of the offical levels for your own use.
Shadwen Editor Tutorial Main Page
<- Previous tutorial (HingeJoints)