3D Asset Workflow: Alternative Textures
Revision as of 15:41, 28 July 2023 by Mio Mäkijärvi (talk | contribs)
- ◇ Main Steps
- 3D Asset Workflow: Concepting
- 3D Asset Workflow: Sculpting
- 3D Asset Workflow: Retopology
- 3D Asset Workflow: UV Mapping
- 3D Asset Workflow: Baking
- 3D Asset Workflow: Texturing
- 3D Asset Workflow: Asset Assembling
- 3D Asset Workflow: Naming the Asset
- 3D Asset Workflow: LODs
- 3D Asset Workflow: Exporting to Editor
- 3D Asset Workflow: Completed asset checklist
- ◇ Additional Steps
- 3D Asset Workflow: Alternative Textures
- 3D Asset Workflow: Billboards
- 3D Asset Workflow: Blocksets
- 3D Asset Workflow: Collisions
- 3D Asset Workflow: Sikailu
- 3D Asset Workflow: Sway
- 3D Asset Workflow: Tile Textures and Trimsheets
- 3D Asset Workflow: Tintmask
- 3D Asset Workflow: Vegetation
- ◇ General Tips and Troubleshooting
Contents
Summary
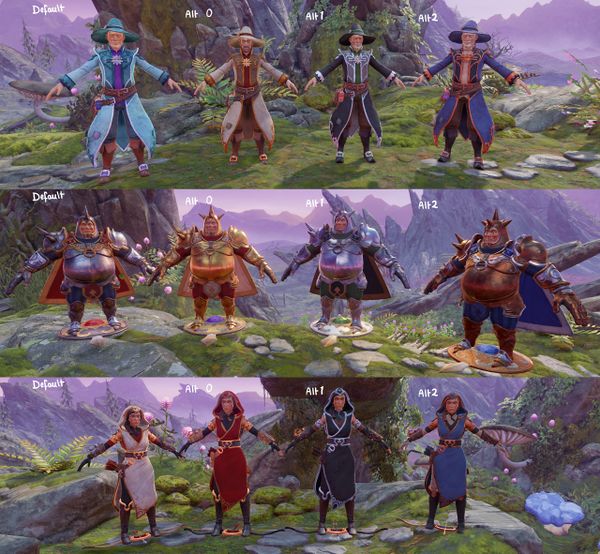
- Alternative Textures (AltTextures) are used when there's a need for a different looking material/color for the same asset
- Some times it's better to make a tintmask instead, depending on the case
- One model can have several Alternative Textures of all the maps
- Usually there's only need to make an Alternative Texture for albedo only - this depends on the case, but don't make unnecessary 1:1 copies of the default textures
- The Editor creates a separate meshmaterial for the Alternative Textures, and it will use the default textures for all maps that don't have separate Alternative Textures
- Usually there's only need to make an Alternative Texture for albedo only - this depends on the case, but don't make unnecessary 1:1 copies of the default textures
- Using Alternative Textures eliminates the need to make a separate fbxmodel, as only the texture is changed
- Alternative Textures can be swapped in the Editor's ModelComponent properties
Alternative Texture Worklow Steps
- Create the Alternative Textures
- Name them correctly
- Add them to the same folder where the original textures are in the binary SVN
- Open the Editor (the Editor can also be open when you add the textures to the binary)
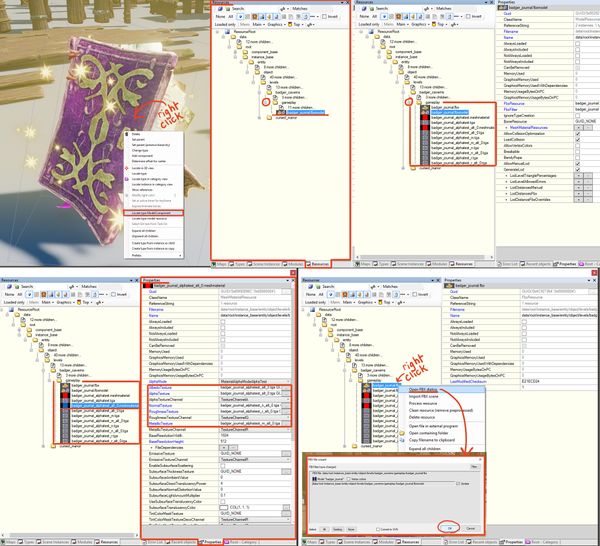
- The Editor should now notice the new textures, and open a pop-up about adding new resources and a new meshmaterial
- If it doesn't do so automatically, find the model's FBX from the Resources Window, right-click it and select "Open FBX Dialog" or "Process resources"
- Reprocessing the FBX should force the Editor to notice that a new meshmaterial is needed, and create it
- Find the model you added the Alternative Texture to from the Type Tree, add it to the scene to test it
- Open the model's ModelComponents
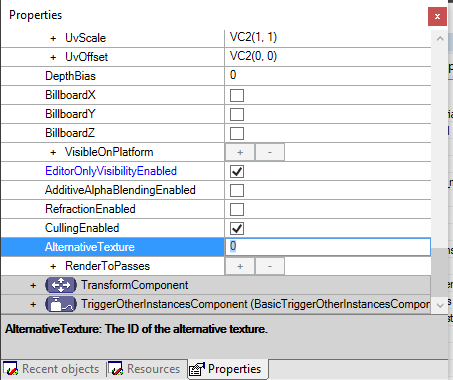
- Find AlternativeTexture setting, and try changing the number (e.g. from 0 to 1, 0 being the default)
- The new texture should appear on the model
- If it doesn't, try troubleshooting
Naming the Alternative Texture
- The Alternative Textures need to have a correct suffix, or else the Editor will not create the needed meshmaterial for them
- The Editor will use the albedo material to make the meshmaterial, so you can only make the Alternative Texture for that, if nothing else is needed - the asset will use the default textures for the rest or the materials automatically
- The suffix should be the very last thing in the texture's name - it goes after all other suffixes
- In the ModelComponent properties:
- AlternativeTexture 0 = default textures (no suffix)
- AlternativeTexture 1 = the first Alternative Texture (suffix _alt_0)
- AlternativeTexture 2 = the first Alternative Texture (suffix _alt_1)
- Etc
Troubleshooting
- If the Editor doesn't create the meshmaterial for the Alternative Texture
- Are the textures named correctly?
- The Editor will make the meshmaterial based on the albedo texture's name
- Have you tried processing the resources of the FBX file?
- If that doesn't work, try restarting the Editor
- Are you trying to add an Alternative Texture to a model which uses textures from multiple places in the binary?
- In this case, try adding the Alternative Texture to the folder where the FBX is, instead of the original textures


